Home Page Hard Times Survival Hard Times Recipes Gourmet Recipes Gardening Tips Firearm Facts Economy Book Reviews
Wilderness Survival Christian Poems Bible & Prophecy Bible Truths Other Information Children Stories Product Links Search Website My Books

Grandpappy’s Wilderness Cabin Cave

Copyright © 2008,2010 by Robert Wayne Atkins, P.E.
All Rights Reserved.


Traditional Log Cabin What is a wilderness cabin cave?

I have never personally heard or read about anything called a "cabin cave." However I have thought about this intellectually intriguing concept many, many times during the past thirty-years. After much careful consideration I finally reached the conclusion that this idea was entirely feasible, and I also figured out the most effective way to build a cabin cave. In my opinion it would take one-person between six to twelve weeks to build a cabin cave using a pick, a shovel, an axe, a hand saw, a strong rope, a hammer, a wood chisel, and a bark removal tool (no power tools or chain saw).

Following are some of the advantages of a cabin cave when compared to a camping tent, a camping trailer, or a traditional log cabin (such as the cabin under construction in the picture):
  1. The exterior of a manmade cabin cave would be of an irregular shape and it would blend in with the surrounding environment. Therefore, unlike a tent, trailer, or cabin that could be easily seen from a distance, a manmade cave would be almost invisible. This would provide its inhabitants with a significant degree of safety. They would also be virtually invisible to modern heat seeking technology.
  2. The location of most natural caves and manmade mine shafts are well known to the residents living in the surrounding area and to the government. However, you would be the only one who would know where your cabin cave was located.
  3. A carefully hidden cabin cave would be a relatively safe place to store your equipment, supplies, and food.
  4. You could snore, sneeze, talk, laugh, or make a little noise and no one outside the cave would hear you.
  5. You would not have to worry about a rifle bullet penetrating the walls of your cabin cave.
  6. The inside of your cabin cave would remain at approximately 50 to 60 degrees Fahrenheit all year (10 to 16 degrees Celsius). This is a comfortable temperature in the winter, spring, summer, and fall. You wouldn't need to keep a fire burning during freezing winter weather or on very cold nights. You would only need to hang a thick blanket over the inside and outside of your doorway entrance. This would help to block air drafts and it would keep the natural warmth inside your cabin cave. And during the summer months you would be able to stay cool without electrical fans or air conditioners. This means you could get some well-deserved sleep every night regardless of the time of year. (Note: The 55 degree Fahrenheit average year-round temperature is the reason bears, groundhogs, and many other animals hibernate inside a cave or a deep hole in the ground. It keeps them from freezing to death during the winter.)
  7. You would not have to prepare a huge stack of firewood in order to comfortably survive the winter. You would only need enough wood for a small daily cook fire. And perhaps an occasional small fire after returning to your cabin cave if you went outside for an extended hike during freezing winter weather. If these fires were built from well-seasoned hard wood, these fires could be small and virtually smokeless.
  8. Since you would not need to keep a continuous fire burning all winter, there would be no column of chimney smoke to attract attention to the location of your cabin cave.
  9. The 55 degree Fahrenheit average year-round inside cave temperature would help to extend the shelf life of any food you may already have, and it would extend the shelf life of any future wild game meat you convert into smoked meat jerky or pemmican. This temperature would also be appropriate for the winter storage of root vegetables such as potatoes, and for whole fruits such as apples and pears.
  10. A cabin cave would provide excellent protection from all types of wild animals. A wild animal may be able to dig through the dirt but it could not get through the 4 to 7 inch diameter logs. Any animal trying to attack you by breaking through your doorway entrance log door could be killed by sticking a sharp spear deep into its face, neck, or body.
  11. Since a cabin cave is below ground it would be a relatively safe place to be during a tornado, hurricane, or some other type of really bad weather.
  12. Finally, a cabin cave may also provide some reasonable degree of protection from nuclear fallout in the event of World War Three.

Instructions for Constructing a Cabin Cave

Three Side Views of Hill 
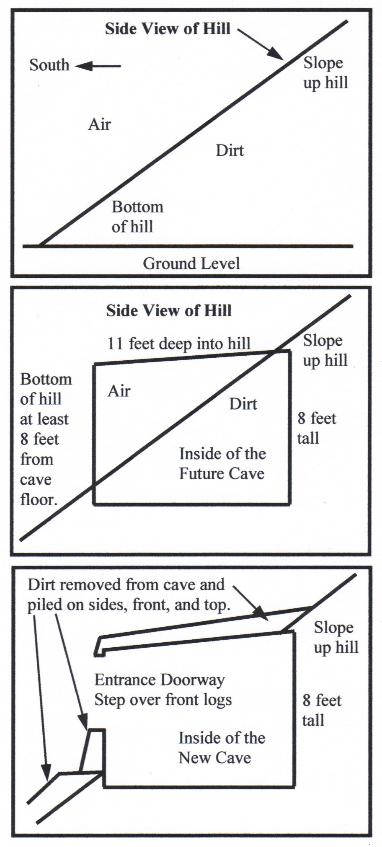
Location: Look for an area where there are a lot of pine trees. Then look for a relatively steep hill or mountain that is at least 20 feet tall and that is not too far from a reliable source of water (stream, creek, river, lake). Steep hills (45 degree or more slope) usually do not contain animal paths or human trails because it takes too much effort to climb straight up a hill this steep. Look for a natural depression in the side of the hill. This will reduce the amount of manual digging you will need to do. If possible the opening to your new cave should be facing south, southeast, or southwest so the inside of the cave will get as much natural sunlight as possible during the day. To avoid possible future flood waters, do not dig your cave at the bottom of a hill. Your cave should be a reasonable distance up the side of the hill based on the terrain. It should be at least 8 feet from the bottom of a short hill, or at least 20 feet from the bottom of a very tall hill or mountain.

Cabin Cave Size: A one-person manmade cabin cave should have minimum inside dimensions of about 9 foot deep, 9 foot wide, and 7 foot tall. This would provide enough space to sleep, and to move around, and to store your equipment and supplies. One-person could move and stack the thin 10 foot long logs needed to build a cabin cave of this size, after the logs have been allowed to dry in the sun. (Note: Two people would require a cabin cave with dimensions of at least 11 foot by 11 foot by 7 foot tall.) Neither a 9 foot nor an 11 foot cave would be subject to the danger of a cave-in or to any special structural problems during construction. However, as a cave gradually gets bigger the risk of a future cave-in also increases.

(Note: The following discussion will be based on a cabin cave with inside dimensions of 9 by 9 by 7 feet and with outside dimensions of 10 by 10 by 7.5 feet. This will require a cave hole of 11 by 11 by 8 feet. It will also require a ground tarp of 12 by 12 feet and a cover tarp of 26 by 20 feet. However, the actual cabin cave dimensions may easily be adjusted to more fully utilize whatever size tarps you have available. The cabin cave does not need to be perfectly square. For example, the inside dimensions of the cabin cave could easily be changed to 8 by 10 by 7 feet, or 8 by 12 by 7 feet, or 9 by 10 by 7 feet, or 9 by 12 by 7 feet, or whatever depending on the size of the tarps you actually have available.)

Digging the Cave Hole: You do not want to dig a hole into the side of the mountain. Instead you want to dig a hole straight down into the hill. Therefore the hill should have a steady downward slope from the rear of your new cave towards its front. This will reduce the amount of digging you have to do because the front of the cave will only need to be dug out one or two feet and the back of the cave will be dug out about 8 feet. You will need to dig a cave hole about 11 feet wide by 11 long by 8 feet tall. (Note: The cabin exterior walls will be 10 feet square. The cave hole will be 11 feet square and this will give you about 6 inches of working space on each side of your new cabin as you build it. It will also provide enough space to insert an exterior heavy duty waterproof tarp over and around your cabin when you are finished.)

The dirt you remove from the hill can be used to build up the sides of your new cave. This will reduce the amount of digging you have to do by approximately 40% and it will give you a convenient nearby place to toss the dirt from the hole. Shovel as much dirt as possible to your right and left and not down the hill. Your objective will be to create a dirt enclosure around your new manmade cabin cave so it looks as natural as possible. Leave an open space at least 3 feet wide at the front for a cave entrance.

(Note: The doorway entrance should be about 24 to 28 inches above the inside floor of your cabin cave and about three feet wide and four feet tall. Later you can cover the outside doorway entrance with a small camouflage tarp (or waterproof cloth) suspended from the top of the entrance and hanging down. Then transplant a few short evergreen bushes near the front of the outside cave entrance. You can block the inside entrance with a few 2-inch thick pine logs lashed together to make a log door that you can swing to the right so you can enter and exit your cabin cave.)

Cutting the Pine Logs: After you have finished digging your cave hole, the inside of your new cabin cave will be constructed with pine tree logs about 10 feet long and between 4 to 7 inches in diameter. A ten-foot long log will yield a nine-foot wide inside room because about seven-inches of each end of the log will be resting on the logs directly below it on each side. You will need a thin piece of string, rope, or rawhide about 10 feet long and one that is 12 feet long so you can cut all your pine wall logs to the proper length. The roof logs and a few of the wall logs will need to be about 12 feet long. Cut the pine tree as close to the ground as possible. Then shovel some dirt onto the tree stump to hide the stump and to help it decay more rapidly. Look for relatively thin straight pine trees with ground diameters of between 7 to 9 inches, which corresponds to outside circumferences of 24 to 30 inches (with the bark still on the tree). Do not harvest all the pine trees in one small area. Leave at least half the pine trees alone so you do not create a large empty area which would draw attention to your future cabin cave. You should look for pine trees that are relatively straight and which do not have pronounced curves or odd growth patterns. Leave the poorly shaped pine trees, and the really small pine trees, and the really big pine trees alone.

(Log Size Note: A traditional log cabin uses pine logs that are between 8 to 12 inches in diameter. This diameter log is needed to support the roof and to provide sufficient thermal mass to keep the heat inside the cabin during the winter. However, the inside of a cabin cave will be much smaller than a traditional log cabin, and it will have a simple flat shed type roof, and the surrounding dirt will provide the insulation needed to keep the cabin cave warm during the winter. Therefore a cabin cave can be built using pine logs that are between 4 to 7 inches in diameter. This size log is much lighter in total weight and each log can be more easily moved by one person, after the log has dried out. However, if you wish to use logs with a larger diameter then you may certainly do so.)

Scraping Tools 
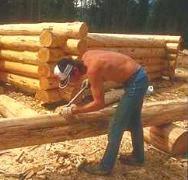
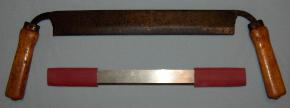
Bark Removal: After you have cut down the pine tree, leave the top and branches on the tree for two weeks because they will pull the moisture out of the trunk of the tree. Then cut off the tree top and the limbs. You can usually cut two or three pine logs from one pine tree. Some of the logs will be ten-feet long and some twelve-feet long. Remove the bark from the pine logs using a tree bark removal draw tool (picture top right with wood handles) or a hide scraping tool (picture bottom right with red rubber handles). To remove the bark pull the tool towards you while applying downward pressure on the tool against the tree. The tool will slip under the bark and strip the bark off the tree. Gradually work from one end of the log to the other. Then rotate the log 1/4 turn and repeat until you have all the bark off the log. You can now move the 10 and 12-foot logs to your cabin cave location. If possible, let the logs dry in the sun for two more weeks after removing the bark.

Chemical Preservation: After the logs are sufficiently dry they may be chemically treated to extend their useful lives. You may use any exterior wood stain, wood oil, or waterproof clear wood protector ($65 per 5-gallon pail). Use a paint brush to apply a coat completely around each log and let it dry for at least one-day. (Note: Do not paint the cut ends of the logs until later when you notch the log for assembly into your cabin wall.) If possible, use a clear transparent coat or a very light color stain. If you select a dark stain color then the inside of your cabin cave will look dark and depressing. If you use a clear or light color then the inside of your cabin cave will look bright and cheerful.

Front View of Cabin Wall

The Foundation: Find four large rocks with at least one relatively flat surface. Plant each of these rocks into the ground with the flat surface approximately two-inches above the level of the ground. These will be the four corner foundations of your cabin cave. If you have a level then use some string to get these four rocks at the same level height. Smooth out the dirt floor of your new cave and try to get the floor as level as you can. Pack the floor dirt down hard. Jump up and down on it if you need to. Place a 12 foot by 12 foot heavy duty tarp on the dirt floor of the cave and extend it up and over the four rocks. (Note: If you have an extra 12 foot by 12 foot tarp then place it on the ground on top of the first tarp.) Later, after carefully positioning your four bottom cabin logs, securely tack or nail or tie the ground tarp at several places to the outside of the four bottom logs.

Building the Cabin Cave: The bigger logs should be used for the walls and the thinner logs used for the roof and the interior shelves. (Note: Save your two best logs to put on the top of the front and rear walls to support your roof because they will be supporting the weight of your roof.) Alternate the logs by putting the thin end of the next log over the thick end of the previous log. The end of each log should be even with the outside wall and it should not extend past the wall in the same manner as a traditional log cabin.

Notched Log 
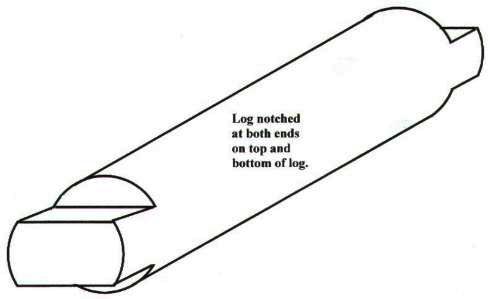
Cut a notch in the underside of each log to match the size of the log below it at the corner. Do not cut a notch more than one-fourth through the thickness at the end of the log. See the notch illustration on the right. You can cut an end notch using a saw by sawing through the log a short distance, and then sawing through the log again at 90 degrees to your first saw cut. You will need to notch the bottom and the top of each log so it will fit level with the logs below and above it at each corner.

Logs notched in this manner will result in a very stable cabin cave. The notches will allow you to stack each log firmly on the log below it at the corner. Your four cabin corners will also provide most of the support for your roof. And the notches will prevent the log walls from gradually moving or sliding into the cabin. The dirt that you pack around the outside of your cabin walls will prevent the walls from falling away from the cabin. Therefore, if you use the illustrated notch design your cabin will remain standing for a very long time. (Note: After you finish cutting a notch and you have verified that it fits properly against the other logs, then use a paint brush to apply some chemical treatment to the newly exposed cut areas of the log, and the outside end of the log.)

To the extent possible, each log should make contact along most of its length with the log directly below it on the same wall. There should only be small gaps or spaces between the two logs. This will require some careful fitting and notching of the ends of each log. It would be better to cut each log end notch just a little, and then see if it fits, and do this two or three times until you get a really good fit. This strategy would be better than cutting a deep notch in the beginning and then discovering the notch is too big and you have ruined your log. The roof will be supported by the four corners of your cabin so you should take the time to get a good smooth fit with each log notch in each corner.

You will not need to perfectly match the logs together along their entire length in the same manner as a traditional log cabin because you are going to place a tarp against the outside of each wall and pack dirt against the tarp. Therefore, dirt, wind, rain, snow, and insects will not be able to get into the small spaces between your logs.

Both the left and right side walls should have the small end of the first log facing the front of the cave. The large end of the first log on the left and right should be at the rear of the cave. Later, when you reach approximately 6.5 feet in height in the front, finish the left and right side walls with another log on each side with the small end to the front of the cave and the large end to the rear of the cave. Then put one of your best logs across the rear wall of the cave, but do not add another log onto the front. This will make the rear wall about 7 feet tall and it will provide at least 6 inches of slope from the rear to the front of the cave. This will be enough for rain water to flow forward.

Optional Interior Wall Shelves (see illustration far below): As you build your cabin you may install three log shelves along the entire rear wall of your cabin. The first shelf should be 24-inches off the floor, the second 42-inches off the floor, and the third 60-inches off the floor. See the illustration below for additional information.

Doorway Entrance: The doorway entrance will need to be constructed as you build the front wall of the cabin cave. You will need a few short logs to support the front wall on the left side of the door, and the side wall on the right side of the door. When you have finished the front wall you will need to nail or tie some thin logs to the outside front wall on the left side of the doorway to keep the front wall in position so it does not gradually lean over and fall into your cabin.

Cat Flap 
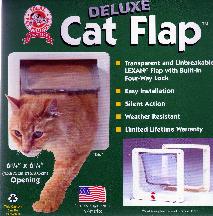
Small Windows or Air Vents: Install two or three small glass windows with wire screens in the front wall. (Note: If you don't have any windows then install simple air vents.) The windows will let sunlight into your cabin cave and they will let you to see what the weather looks like outside. If you see a deer walk by outside and you have a hunting rifle then you could shoot the deer from inside your cabin through the small window. See the first illustration above and the last illustration below for more details about the placement and installation of these windows. For $20 Home Depot sells a 6.25-inch square "Cat Flap" door (picture on right). It has an unbreakable weather resistant clear plastic door that is lockable. The door is in two parts. The swinging transparent door could be mounted on the inside cabin wall. You could then install a wire screen on the other half of the door opening before you mount it on the exterior front wall. During the hot summer months you could prop the inside door open and the wire screen would let fresh air into your cabin but it would keep the insects out. During the winter you could easily replace the exterior wire screen with a square piece of thick glass to provide additional protection from freezing winter weather. The exterior glass would let sunlight into your cabin cave but it would help to form an air pocket inside the wall of your cabin to help keep the freezing air outside. Some fresh air would still enter your cabin in the winter through the large doorway entrance. (Note: After you have finished the rest of your cabin cave, then build an exterior log tunnel using thin logs for each window. However, each window tunnel should gradually get wider as it extends out from the cabin. This will allow more sunlight to enter the cabin and it will provide a downward slope for rain water to flow away from the cabin window. Face one window tunnel directly southwest, one south, and one southeast. This will help to direct sunlight into your cabin cave for the greater part of the day.)
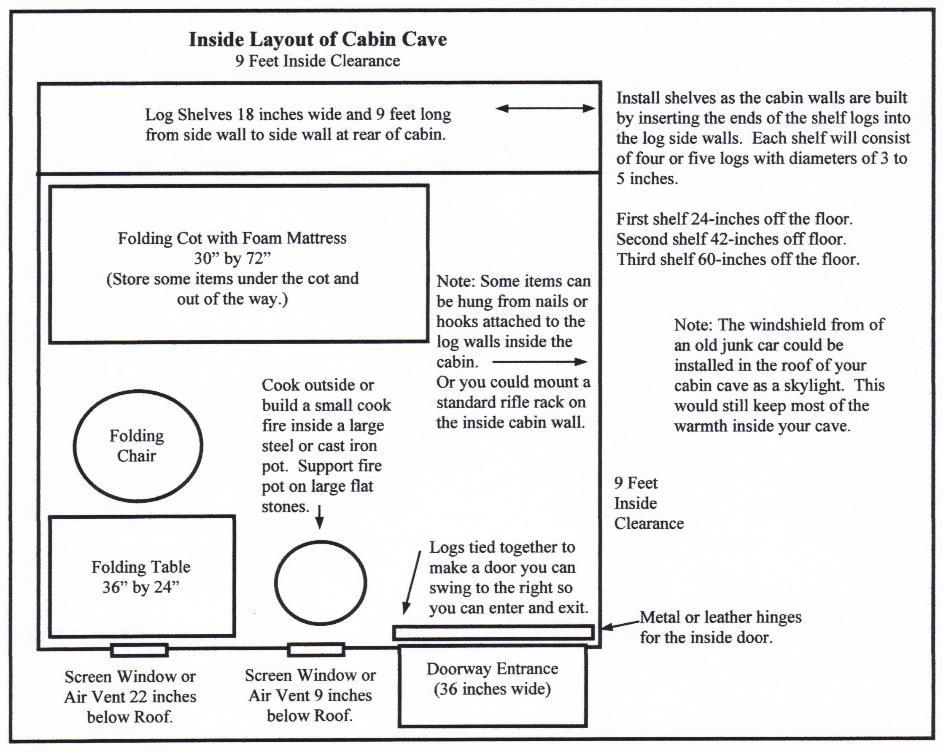
(Note: Even if you don't have any glass windows, you should still leave a light and air opening in the front of your cabin cave. If you have any screen wire then you could cover the inside and outside of this opening with screen wire to keep insects out of your cabin cave.)

The Roof: Build a shed type cabin roof by installing your logs from rear to front so the spaces between the logs run from the rear to the front of the cave. Alternate the roof logs with a thick end at the rear and then a thin end at the rear. Notch the underside of your roof logs so each one fits over the highest front and rear wall logs. This will help to keep the roof securely in place. Press your roof logs together as tightly as you can and tie them securely to one another. The extra roof log length should extend over the front of your cabin wall (but no more than two-feet).

Tarp Covers: Place a heavy duty tarp over the entire cabin so that it covers the roof, the rear wall, and the two side walls. A 26 foot by 20 foot tarp will do the job nicely. (Note: If you have two of these large tarps then use them both to provide more protection.) (Note: If necessary, you may use several smaller tarps instead of one big tarp. Place a tarp so that it hangs all the way down each wall to the ground and secure the top of the tarp to the roof. Then place the roof tarp into position so that it covers the four wall tarps. Rain water will now run down the outside of your wall tarps and not into your cabin.)

Use another smaller tarp to cover the front wall. You will need to cut openings in this tarp to match the exact location of your doorway opening and your windows or air vents. Cut each opening down one side, across the bottom, and back up the other side. Do not cut across the top of the opening. Then roll each flap into a tight cylinder and tie them into place just above the door and air vents, after you punch two small holes into the tarp for your flap strings. (Note: You can unroll these flaps later if you need to cover these openings for some reason. For example, you may wish to do this if you leave your cabin cave for several weeks to more completely explore the surrounding wilderness area.)

Packing the Dirt: Fill in the side and back trenches around your cabin cave with dirt so the dirt makes firm contact with your exterior tarps. Use a long pole to pack the dirt firmly down in the trenches outside your walls, but be careful you don't tear your tarp walls in the process. You should also put between five to eight inches of dirt on top of the outside roof of your cave. If possible, seed this dirt with wild grass seed that is common to the surrounding area. This is called a "sod roof." The inside log roof and the outside dirt roof of the cave should slope down from the rear to the front for water runoff when it rains. Your cabin cave will now be waterproof and when it rains the water will flow forward off the front of your cabin cave.

(Water Note: If you need water then when it rains put another tarp on the outside roof of your cave to direct the rain into some type of water storage container, or collect the rain using the tarp itself. Then transfer the rain water into your cave for future use. Rain water is far superior in quality when compared to ground water from a stream or lake.)

Finish your cabin by packing dirt tightly against the front wall of your cabin cave. You should have at least 30 inches of dirt at the bottom of your cabin cave and at least 18 inches of dirt at the roof. This will provide a slope in front. Tightly pack the dirt below your doorway entrance and your windows or air vents. Pack the dirt in a random manner and do not make it look smooth and level. Sow some native grass seed in the dirt to keep it from washing away when it rains.

Transplant some short evergreen bushes (that are common in the surrounding area) in a random fashion several feet in front of your cabin cave. Most of these transplanted bushes will gradually grow and help to more completely hide the location of your new cabin cave. Unfortunately a few of the bushes may die as a result of the transplanting process.

Inside Layout of Cabin Cave


A Few Final Suggestions

After you have selected a good site for your cabin cave and you have tested the ground by digging a few feet deep, then you should probably cut down the pine trees before you finish digging out the rest of your cave hole. This will give the pine trees some time to dry in the sun as you work on your cave hole.

Do not store your equipment and supplies directly on top of the ground floor tarp. They may absorb moisture from the earth if you do. Instead, lay several 3-inch diameter logs on the ground tarp and stack your items on top of these logs.

Purchase and store at least two good quality hunting knives at your wilderness cabin cave. You will probably discover that you use your hunting knife more frequently than any other item you have at your cabin cave. A hunting knife is one of the tools that is absolutely necessary for wilderness survival. If something should happen to your knife then you will need a replacement. Therefore you should have at least one extra hunting knife at your cabin cave. You should also have an Arkansas Sharpening Stone or a Diamond Sharpening Stone to keep a sharp edge on your knife blade.

Be creative and figure out one or two different ways to secure your cabin log door from the outside to prevent stray animals from pushing the door open and entering your cabin when you are absent. You will need to be able to unlatch your interior door from the outside of your cabin cave. You don't want to get locked out of your own home. You can place a log bar across the entire width of the interior door when you are inside the cabin cave to prevent a wild animal from pushing the interior door open while you are asleep.

Always approach your cabin cave carefully from the outside when you return and use a long stick to move the front tarp away from the doorway entrance to make sure some wild animal has not found this area and decided it would be a great nesting place.

You could build some primitive pine furniture. Or you could use some folding camp furniture inside your cave, such as a folding table and folding chair, a folding cot with a foam mattress (or a high quality air mattress), and a good sleeping bag. (Note: A folding cot would allow you to store things below the cot out of the way.)

Purchase some nice sheets, a good feather pillow, a thin blanket, a thick wool blanket or "down comforter," and a high-quality low-temperature "goose down" sleeping bag. Use these assorted sleeping items in your cabin cave at the appropriate times during the year depending on the weather.

Invest in some quality "long underwear," some really good wool socks, some cloth gloves, and a soft comfortable ski mask to sleep in during the winter months.

If you need to build a fire inside your cabin cave then build a very small fire inside a large heavy duty steel or cast iron pot that is supported on top of several flat rocks. Cover the inside bottom of the fire pot with two-inches of sand or dirt. The fire pot should be at least 12-inches off the floor and at least 12-inches from the log wall and from anything else that is flammable. Build a smokeless fire using well seasoned hard wood.

Learn how to make homemade soap using cold campfire ashes, rainwater, and melted animal fat.

Build and learn how to use a solar oven. However, a solar oven will only work when the sun is shinning.

Stock your cabin cave with cast iron cookware and a set of non-stick Teflon coated cookware. Also invest in some good quality plastic food storage containers with snap on lids, some good enamel coated eating dishes, some tableware, and two dish washing pots. If the food storage containers are all the same size they may fit inside one another when they are empty and not require much storage space. You should have both large and medium size food storage containers.

You could hang a rifle rack on one of the interior walls of your cabin. You could also install nails or large hooks in the walls of your cabin and hang things from them, such as your cook pots.

Invest in some commercial quality animal traps, such as the conibear 110, 220, and 330 sizes, and some Duke leg traps, and some aircraft cable snares. These items can currently be purchased on Ebay. Store these items inside your cabin cave. (Note: Traps and snares will allow you to hunt silently 24 hours per day seven days per week in several different locations simultaneously. Your traps will still be working for you even while you are asleep at night.)

Learn how to make meat jerky and how to make pemmican, a native American Indian survival food.

You should also learn how to harvest and process widely available and easily identifiable edible wild foods, such as acorns.

Store all your cabin building tools inside your cabin cave. You may need them to make future repairs on your cabin cave. Your pick and shovel will also be useful for planting a Spring garden.

Store some vegetable seeds at your cabin cave. In the Spring plant your vegetable seeds a reasonable distance away from your cabin cave in a vacant field or other area that gets good sunlight most of the day. Do not plant all your vegetables in one area. Root vegetables that grow below ground, such as carrots, onions, potatoes, and peanuts usually do better in a wilderness environment. Since the edible part of the plant grows below ground they will not attract any special attention to your fresh food supply. Root vegetables also store reasonably well for future consumption during the winter months. Carrots and onions can actually be left in the ground if your winters are not severe. Tomato seeds are also nice to have because tomato plants are easy to grow and each vine yields a lot of tomatoes. The major shortcoming of tomato plants is they can be easily seen from a distance and their bright color attracts insects and forest wildlife.

You should also have some way to store at least 50 gallons of rain water inside your cabin cave. This could be accomplished using clean empty soft drink bottles with screw on caps, or several large plastic storage containers with tight fitting lids. Or you could build a log box inside your cabin cave and then put a waterproof tarp inside the box and then fill the inside of the tarp with rain water.

In addition to a good wilderness survival manual, such as the SAS Survival Guide by John "Lofty" Wiseman (ISBN 978-0060849825), you should also have a reasonable supply of paperback novels to read during the winter months. You can normally purchase gently used fiction paperback novels at yard sales and garage sales for between ten cents to twenty-five cents each. In addition to your favorite type of fictional novel, you should not overlook novels in areas you may only have minor interest, such as westerns, science fiction, romance, murder mysteries, adventure, etc. In my opinion 200 of these paperback books would not be excessive. You would be surprised at what you will read when you have nothing but time on your hands. Two normal decks of 52 playing cards and a good book on solitaire card games would also allow you to pass away the hours in an entertaining manner.

Although you may not currently read the Holy Bible very often, you may discover that your interest in spiritual matters increases significantly when God is the only other Person you have to talk to, and He is the only One who can help you to survive a variety of unexpected wilderness survival situations.


Materials Estimates for a 9 foot long by 9 foot wide by 7 foot tall Cabin Cave (Inside Dimensions)
(Note: Tarp Quantities Assume a Double Layer of Tarps on the Roof, Walls, and Ground)


QuantityMaterial Description
212-foot by 12-foot heavy duty tarps for the floor
226-foot by 20-foot heavy duty tarps for the roof and 3 walls
212-foot by 8-foot heavy duty tarps for the front wall
18-foot by 8-foot camouflage heavy duty tarp. Cut into pieces and wrap in front of the doorway entrance and the window tunnels.
114 to 18-inch diameter heavy duty steel or cast iron fire pot
36-inch to 12-inch square screen glass windows that swing in and out
3Extra glass panes that will fit the windows
1Tube of waterproof caulk sealant for the three windows
4Metal Hinges for the interior and exterior doors
1006-inch long nails
1004-inch long nails
50Heavy duty wall hooks (shaped like a dish cabinet cup hook - hang pots and pans and other things on the walls)
5200-yard rolls of heavy duty nylon cord, or poly cord, or thin wire
10Gallons of Wood Stain or Waterproof Wood Sealer
1Rifle rack (plastic type used inside a truck)
SomeScreen wire for the windows
50Ten-foot long wall logs (4 to 7-inch diameters)
9Twelve-foot long wall logs for the bottom of the right wall (4 to 7-inch diameters)
24Twelve-foot long roof logs (3 to 6-inch diameters)
12Ten-foot long shelf logs (3 shelves with 4 logs per shelf) (3 to 6-inch diameters)


Minimum Time Estimates for One-Person to Build a Cabin Cave:

1.00 Hour = Cut down one thin pine tree. One pine tree will yield two or three logs.
+0.50 Hour = Cut off top of tree and remove limbs (Note: Pile the limbs in a safe area for burning).
1.50 Hours = Total time per tree.
0.60 Hours = Total time per log when 1.5 Hours is divided by 2.5 average logs per tree.

0.60 Hours = Total time per log when 1.5 Hours is divided by 2.5 average logs per tree.
0.25 Hours = Cut each log to the proper length.
0.50 Hours = Remove bark from each log.
0.25 Hours = Move each log to the cabin site.
0.25 Hours = Paint each log with chemical treatment.
0.75 Hours = Notch and carefully fit each log into cabin.
2.60 Hours = Total time per log.

2.60 Hours = Total time per log.
X 95 Logs = Total number of logs needed to build the cabin.
247 Hours = Total time required to build the cabin.

31 Days = 247 hours / 8 hours per day = Total time required to build the cabin (approximately).
4 Days = Dig the cave hole (Note: More time may be required in rocky ground or extremely hard earth).
1 Day = Pack the dirt around the cabin walls and finish the front of the cabin.
36 Days = Total days to build a cabin cave.

6 Weeks = 36 Total days / 6 working days per week = Minimum time estimate for one-person to build a cabin cave.
(Note: If any type of difficulty is encountered at any step in the process then more time may be required to build the cabin cave.)


Grandpappy's e-mail address is: RobertWayneAtkins@hotmail.com

Home Page Wilderness Survival