Home Page Hard Times Survival Hard Times Recipes Gourmet Recipes Gardening Tips Firearm Facts Economy Book Reviews
Wilderness Survival Christian Poems Bible & Prophecy Bible Truths Other Information Children Stories Product Links Search Website My Books

Grandpappy's Homemade Soap Recipe

Copyright © August 14, 2007 and updated March 12, 2008 by Robert Wayne Atkins, P.E.
All rights reserved and all rights protected under international copyright law.


Introduction

Two Bars of Soap During hard times sooner or later everyone runs out of soap.
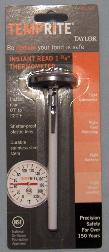
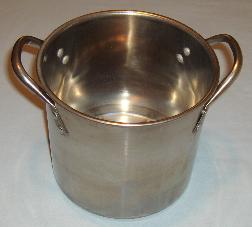
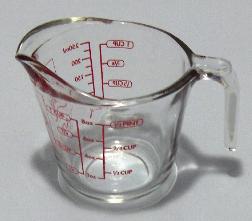
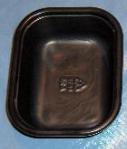
To make soap you only need three things:
  1. rainwater,
  2. cold ashes from any hardwood fire, and
  3. animal fat from almost any type of animal, such as a cow, pig, goat, sheep, bear, beaver, raccoon, opossum, groundhog, etc.
All soap consists of the above three ingredients in one form or another, and that includes bath soap, dish soap, laundry soap, and hair shampoo.

Soap is not difficult to make and it does not require any special equipment. And soap can be made from things that exist in large quantities in nature, and which are typically discarded as being of little value (rainwater, campfire ashes, and animal fat). Therefore, a person who knows how to make good soap could provide his or her family with a small but steady income during hard times by making and selling soap. Soap requires no financial investment in raw materials, and therefore it does not require the advance purchase and storage of inventory before the hard times occur.

Soap is a "perfect consumer product" for the following five reasons:
  1. Soap is a legal product.
  2. Everyone everywhere uses soap.
  3. Soap is completely used up in a short period of time.
  4. When people run out of soap they want to buy more.
  5. Soap is relatively low in price so almost everyone can afford it.
In my opinion, soap is one of the basic necessities of life for the following five reasons:
    Soap and Brush
  1. Personal hygiene: Good health is maintained by washing your hands before eating and by taking a bath on a regular basis.
  2. Laundry: If your clothes get really filthy then they will collect lots of germs and those germs will eventually attack your body and you will get sick. During hard times families with small babies quickly revert back to cloth baby diapers that require a really good cleaning before being reapplied to the baby's bottom.
  3. Dish washing: If your eating utensils are not clean then it won't be long before you get sick from the microscopic organisms that collect and grow on your dishes.
  4. Wound care and other medical situations: Even small wounds can get infected and become life threatening if they are not properly cleaned with soap at the earliest possible opportunity.
  5. Disease control: Soap is extremely valuable in preventing the spread of diseases because you can wash the bed sheets, clothes, and eating utensils of the sick person, and you can also give the sick person a daily bath or cleaning to help neutralize any germs on the sick person's body.
In developed countries most people take soap for granted until they don't have any, just like they take water, canning salt, socks, and shoes for granted. When their soap is all gone people suddenly realize how important it really was. Regardless of how much soap you may have stored for an emergency situation, it will eventually be used up. At that time it would be useful if you knew how to make really good soap from rainwater, campfire ashes, and animal fat.

There are three major differences between homemade soap and commercial quality soap:
  1. Homemade soap does not lather or produce soap bubbles. However, soap bubbles are only for visual appeal. Bubbles do not increase the cleaning power of soap. (Note: It is possible to add bubbles to homemade soap and that procedure will be explained below.)
  2. Soap made from campfire ashes will not be as hard as soap made from commercial quality lye crystals.
  3. Homemade soap has an oilier texture than commercial quality soap. However, homemade soap will still yield very acceptable results for most routine cleaning chores because it will surround and cling to the dirt particles, regardless of their size, and allow them to be more easily washed away.
Soap making lye crystals have been withdrawn from the market because they were being used to make illegal drugs and you can no longer purchase lye crystals at your local grocery store or hardware store. Therefore if you have an existing soap recipe it will probably be of limited value during a long-term hard times event because you can no longer purchase lye crystals at your local grocery store or hardware store.

However, soap making suppliers still sell lye crystals by mail order. But why would you want to purchase an inventory of lye crystals so you can make homemade soap during a long-term hard times event? If you are trying to prepare for a future hard times event wouldn't it make more sense to simply purchase some ordinary soap and put it away for future use. To me this would make far more sense than purchasing some chemicals to make some homemade soap in an emergency.

On the other hand, if the hard times last longer than you expected and you use all the soap you have stored then you could make good soap using lye water made the old fashioned way by using the following soap making procedure that does not depend on commercial quality lye crystals.


Basic Soap Making Equipment

Stainless Steel One Gallon Pot Glass Measuring Cup Empty Plastic Frozen Food Tray Instant Read Cooking Thermometer
Stainless Steel PotGlass Measuring CupFood Tray MoldThermometer

To make soap you will need:

A cook pot made of stainless steel, or cast iron, or enamelware, or heat-tempered glass, or a clay-fired cooking pot. Aluminum and tin and Teflon coated pots are not acceptable because the soap making lye will adversely react with these materials. The cook pot should be at least twice the size of the batch of soap you intend to make. Generally, a one-gallon or four-quart cook pot will be more than adequate as a soap making pot. (Note: You may use the same pot for soap making and cooking. Just wash the pot when you are finished making soap. Some soap recipes suggest having a special pot just for soap making but this is not necessary, in my opinion. You are just making soap in the pot, and it will be the same soap you use later to wash the pot after you cook a meal.)

A long spoon made of stainless steel or wood. If necessary, an old wood broom handle or a big stick may be used to stir the soap if nothing else is available.

A glass measuring cup. You can use a plastic measuring cup but the concentrated brown lye water may permanently discolor the inside of the measuring cup. (Note: If you don't have a measuring cup, then use approximately 2.5 times the amount of melted grease as concentrated brown lye water.)

Empty Matchbox Lined with Food Wrap 
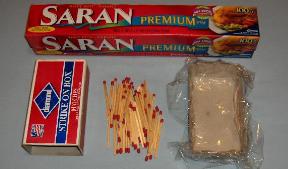
Some type of mold to pour the soap mixture into so it can harden into a bar of soap. For example, you could make a soap mold out of a large empty kitchen matchbox by lining it with plastic food wrap. Or you could use the small black plastic serving trays that contain frozen dinner meals, such as a single serving lasagna meal. The soap mold container should be at least 1 to 1.5 inches deep.

A thermometer is optional because soap was made for centuries before the thermometer was invented. If you wish to use a thermometer, then select a cooking or meat or candy thermometer that will show temperatures from a minimum of 70ºF to at least 140ºF. An instant-read thermometer works exceptionally well.

Almost anyone can make good soap if he or she has a little patience and is willing to begin on a small scale in order to gain practice and experience.


Grandpappy's Homemade Soap Recipe

Yields two large eleven-ounce bars of soap or a total of 22 ounces of soap by weight.
This is equivalent to approximately four normal bars of store bought soap.

3/4 cup of concentrated brown lye water. Normal strength brown lye water can be made by pouring rainwater through the cold ashes of any hardwood fire. Detailed instructions for making concentrated brown lye water are at the end of this article.

Two cups of melted grease. Any type of animal fat may be melted into grease, such as beef, pork, lamb, goat, bear, beaver, opossum, raccoon, groundhog, etc. Only use the fat because lean meat will not make soap. Do not use any lean meat. Detailed instructions for melting animal fat into grease are at the end of this article. Beef tallow is a hard fat and it makes a hard soap that cleans really well. A soft fat, such as Pork Lard, may be used in a ratio of up to 50% with a hard fat. (Note: If you do not have access to animal fat, then you can ask the employees in the fresh meat section of your local grocery store if they have any beef fat or pork fat for sale.) Ordinary vegetable oil or vegetable grease may be used instead but vegetable oil or grease has more valuable uses than making soap. In addition, soap made from oil and lye water will be a very, very soft soap.

(Note: You should reduce the above quantities by one-half when you first attempt to make soap. This will give you the opportunity to gain confidence and experience on a small scale. You may use the above quantities, or any multiple thereof, for future soap making efforts depending on how much soap you wish to make in one batch.)

The Six Soap Making Steps

STEP ONE: Mix the concentrated brown lye water and the grease, stir thoroughly, and give the chemical reaction between 30 minutes to 3 hours to gradually take place. Be patient.

This is the most important step in making soap.

The concentrated brown lye water (or lye crystals) used in soap making can hurt you. Be careful when handling the lye. Wear rubber gloves to protect your skin from the lye. If some lye solution gets on your skin, wash it off immediately with soap and water. Lye is caustic and it will permanently disfigure Formica counter tops, kitchen tables, and other nice furniture, even if you wipe it off the surface immediately. Be careful when handling lye and do not let it splash or spill or bubble over onto your kitchen furniture or onto your floor.

Concentrated brown lye water is normally used at room temperature unless the room is unusually cool or cold (below 75ºF). If necessary, heat the concentrated brown lye water to between 80ºF to 130ºF in a separate cook pot. The temperature is not critical as long as it is not too hot. The purpose of using warm lye water is to help maintain a warm soap mixing temperature inside the soap mixing pot.

Put the grease into a separate small melting pot and then put the pot on the stove over very low heat. Do not heat the grease to the smoking point. If you see smoke then you are burning the grease. Melt all the grease and then allow it to cool back down to 90ºF for pork lard, or to 130ºF for beef tallow, or to 110ºF for a combination of tallow and lard. Do not allow the grease to harden while it is waiting to be added to the soap mixture. The grease must be melted when it is added to the soap mixture, and it should be relatively warm. The temperature does not have to be exact, but the grease must be warm and fully melted.

Soap Mixture Showing Brown and White Streaks 
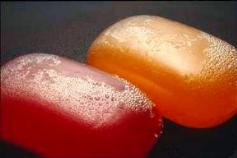
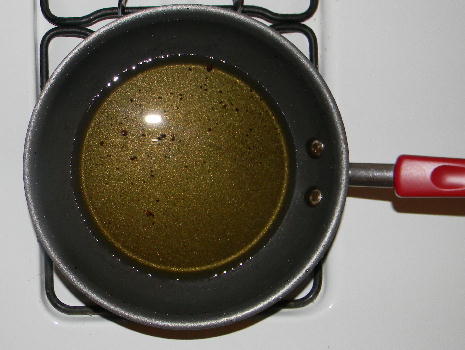
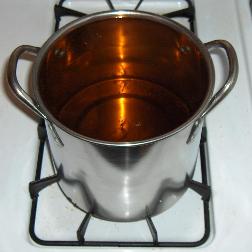
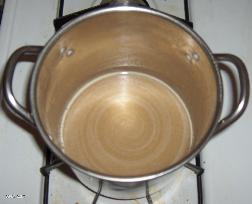
Pour one cup of the melted grease into the big soap making pot. Slowly pour 3/8 cup of the concentrated brown lye water into the soap making pot. Stir the mixture for three-minutes. The mixture will look like brown soup with white streaks in it (see picture on right). Add another cup of grease and another 3/8 cup of concentrated brown lye water and stir thoroughly and continuously for about 15 minutes. The grease and lye must be completely and thoroughly blended together to make soap. If the mixture is not thoroughly blended then the mixture will separate later and you will not get a good soap.

(Note: You can use a manual hand-cranked blender to speed up the mixing process and reduce the amount of time it takes for the chemical reaction between the grease and the lye to be completed. However, this method does require a little practice and experience because it can also result in what is called a "false trace" which is described in Step Two below.)

(Note: If you increase the original recipe to make larger batches of soap, you should still slowly and gradually mix the grease and concentrated brown lye water together at the rate of one cup of grease to 3/8 cup of concentrated brown lye water until all the grease and lye water has been added to the soap making pot. By adding the ingredients gradually and mixing thoroughly each time, you can avoid a separation problem later in the process.)

When you are not stirring the soap mixture, cover the soap mixing pot with a towel to help conserve the heat inside the mixing pot. Remove the towel if you need to add a little heat to the mixing pot, and then replace the towel when you turn off the heat.

This part of the soap making process normally takes between thirty minutes to three hours if you are using grease made from animal fat. During this time the soap mixture needs to remain slightly warm and just above the temperature at which the grease normally hardens. This is where an instant read thermometer is useful. If the mixture begins to cool too quickly, then add just a little bit of heat to the soap mixing pot until the temperature of the soap mixture is between 90ºF to 130ºF, depending on the type of grease you are using (pork lard melts at 85ºF and beef tallow melts at 125ºF), and then turn off the heat.

(Note: Do not cook the soap mixture and do not heat it to the boiling point. Although additional heat will speed up the chemical reaction it can also cause potential separation problems later in the process.)

Be patient and wait for the chemical reaction to gradually take place at its very slow normal speed. Once every ten or fifteen minutes stir the soap mixture vigorously for one-minute to facilitate a more complete mixing of the lye and the grease. Vigorous stirring means fast and smooth stirring. Do not splash the soap mixture onto the sides of the mixing pot. When you begin stirring the mixture after a ten or fifteen minute rest, you will notice that the brown lye water and the grease are still partially separated because you will be able to see streaks of color in the soap mixture as you stir. However, as you stir vigorously for one minute you should attempt to combine the lye and grease into a solid color so there are very few or no streaks in the mixture. Then you may stop stirring and wait for another ten or fifteen minutes.

Each time you make a new batch of soap you may or may not encounter one of the following two problems. These problems may occur because your concentrated brown lye water may be just a little stronger or a little weaker than what you used in your previous batch of soap. You may also encounter one of the following problems if you use a different type of animal fat, or combination of animal fats, than you normally use. The exact amount of concentrated brown lye water that is required will be slightly different depending on the type of animal fat you are using.

Problem One: If a layer of grease forms on top of the mixture, then check the temperature of the soap mixture and make sure it is above the temperature that the grease normally solidifies, which is 125ºF for 100% beef tallow, or 85ºF for 100% pork lard, or 110ºF for a 50-50 blend of tallow and lard. If the top layer of grease is simply due to a cold soap mixture, then heat the mixture just a little bit and stir the grease back into the mixture. However, if the soap mixture was already at a reasonably warm temperature, then heat the soap mixture just a little, then turn off the heat, and then add 5% more of the concentrated brown lye water, and stir the soap mixture thoroughly for ten minutes.

Problem Two: If the mixture does not thicken properly after three hours, then heat the soap mixture just a little, then turn off the heat, and then add 10% more melted warm grease, and stir the warm grease thoroughly into the soap mixture for ten minutes.

(Note: It takes time for the concentrated brown lye water and the grease to combine together chemically to make soap. Depending on the type of animal fat or grease you are using, it may take as much as twenty-four hours. If you are using vegetable grease or oils, it can take several days. The most difficult part of Step One is to be patient if the chemical reaction is going slowly, and not ruin your batch of soap by adding too much lye water or too much grease in an effort to get the soap mixture to Step Two more quickly. Waiting patiently does not hurt the chemical reaction. Adding too much of the wrong thing can upset the chemical balance.)

Soap Mixture Solid Creme Color and Trace Stage 
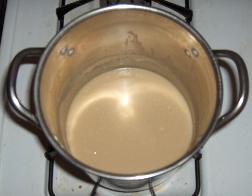
When the soap mixture is a solid cream or solid light brown color that displays no streaks when it is first stirred after a ten-minute rest, and it is the consistency of thick gravy or soft pudding (see picture on right), then you can test it using one of the methods in Step Two below. (In the picture on the right the bright white circle is the reflection of my camera flash off the top shinny surface of the stainless steel cook pot.)

STEP TWO: Verify the soap mixture is warm enough and that it is ready to be poured into the molds using one (or both) of the following two test methods.

The grease will gradually thicken if the temperature of the soap mixture gets too low. This will make you think the chemical reaction is complete, when in fact it is not. This is called a "false trace." Therefore you must verify the soap mixture is still above the melting point of whatever grease you are using before you test the mixture using either (or both) of the following two methods. The minimum soap mixture temperature is 125ºF for 100% beef tallow, or 85ºF for 100% pork lard, or 110ºF for a 50-50 blend of tallow and lard. If your soap mixture temperature is above the minimum, then it is ready to be tested.

(Note: If the soap mixture is below the minimum temperature, or if you do not have a thermometer, then add a little heat to the soap mixture and see if the soap mixture melts back into a fat and lye solution that separates into different colors when stirred gently. If the mixture does show streaks of different colors, then continue to add very low heat for two minutes, stir the mixture vigorously, and then turn off the heat and cover the pot with a towel and return to the instructions for Step One.)

Test Method One: Use a spoon to lift a little of the soap mixture about one-inch above the top surface of the mixture, and then allow one drop to fall back onto the top of the mixture. If the surface of the mixture will support the drop for a moment, then the soap is done.

Test Method Two: Try to draw a medium thick line in the top of the soap mixture with the front tip of your spoon. If you can see the line, then the soap is done. This is called "tracing."

(Note: When the mixture "traces" the chemical reaction between the lye and the grease is approximately 90% complete. However, the final 10% will happen very, very slowly and it will take another 3 to 7 weeks. The soap will not be ready for use until the chemical reaction has been 100% completed.)

STEP THREE: (Optional Step) - Add Color and Fragrance.

If you wish, you may add color and/or fragrance at this time. However, in my opinion, it is generally not worth the effort. Soap is a consumable item and when it is used up it is gone. Investing time and energy to make the soap more colorful or more fragrant has marginal value if you are simply going to use your soap yourself. On the other hand, if are considering the sale of your soap for a profit then color, shape, and smell are important marketing factors. However, do not use commercial perfumes or alcohol-based solutions. Adding a fragrance or color that is not compatible with the soap making chemical process may ruin your batch of soap. Pure essential oils or herbal solutions are preferred, if you chose to use them. Stir them thoroughly and completely into the soap mixture and then proceed to Step Four.

(Note: Another way to add fragrance is to wait until the end of Step Six when the soap is fully cured after six-weeks. Then place the soap and your fragrance inside an air-tight container and seal the lid. Wait three to six weeks. The soap will gradually become saturated with the smell of your fragrance, regardless of what it might be. Remove the soap and put the lid back on your fragrance bottle, or return your fragrance to its own airtight container.)

STEP FOUR: Pour the soap into the soap molds and let the soap rest for seven days.

Greased Empty Food Trays to be Used as Soap Molds 
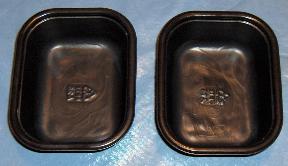
Any container can be used as a soap mold, such as cupcake pans, small boxes, or any other type of container. Lightly grease the inside of the containers. Or place plastic food wrap inside a small cardboard box, such as an empty kitchen matchbox. The small black plastic serving trays that contain a frozen dinner meal, such as a single serving lasagna meal, make really nice soap molds if you wash them out first. The soap molds need to be at least 1 to 1.5 inches deep because the soap mixture needs to retain its heat during the initial phase of this step and if the mold is too shallow it will lose its heat too quickly.

In the old days our ancestors would use a thin damp towel to line the inside of whatever container they were using as a soap mold. When the soap finished curing, the towel permitted the easy removal of the soap from the mold.

Today the best way to line the inside of a mold is to use plastic food wrap. The plastic food wrap will not react with the soap while the chemical reaction continues to its completion, and it provides a very easy way to remove the soap from the mold when the soap is done.

The soap mixture should be above the minimum melting point temperature for the type of grease you are using.

Soap Poured into Molds 
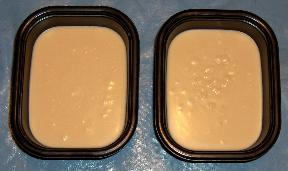
Pour the warm soap mixture into the molds and then put the soap molds in a warm location.

Immediately cover the soap molds with a thick cloth or blanket to prevent the heat from escaping too quickly. Do not let the cloth or blanket make contact with the soap in the molds. The blanket should simply provide a cover to help keep the molds warm.

Allow the soap to rest in the soap molds for one day. Then remove the towel.

Let the soap continue to rest in the soap molds uncovered for six additional days.

If you peek at your soap during the first day while the soap is covered inside the molds, the soap may look strange depending on what stage of cooling the soap is in. Do not worry. Be patient and wait for the chemical reaction to run its normal course.

During most of this seven-day period the soap may be relatively soft and it will not have the hard consistency you expect from soap. This is normal. Remember to be patient.

STEP FIVE: After a total of seven days, remove the soap from the molds.

If you used a hard fat that melts at a higher temperature, such as beef, or goat, or lamb, then the soap will probably be firm enough to be easily removed from the molds. However, if you used some combination of soft fats such as chicken or pork mixed with a hard fat, then your soap may not be firm enough for it to be easily extracted from the molds. If your soap feels soft like a firm pudding then put it in the refrigerator for two hours and it should then be firm enough to be removed from the molds.

Two Bars of Soap From Soap Molds 
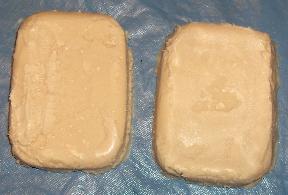
Turn the soap mold upside down and the soap should fall out, if the soap mold was lightly greased or if the mold was lined with plastic food wrap. If the soap does not fall out of the mold, and you are using flexible plastic molds, then flex the sides and bottom of the mold to loosen the soap from the mold so it can release and fall out. If necessary, you can use a thin bladed knife to separate the soap from the sides of the mold and then gently help the soap out of the mold. (Note: If you used plastic food wrap to line the inside of your soap mold then you will not encounter this problem.)
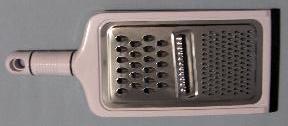
If you wish to cut the soap into smaller bars, then use a sharp thin knife, such as a serrated steak knife, or use a thin fine wire to saw through the soap. At this time the soap should still be relatively soft, similar to cheese, and it can be divided into smaller sizes if you wish.

If there are any imperfections, lines, or tiny cracks in the exterior surface of the soap, you may smooth them out with your fingers at this time.

STEP SIX: Air dry the bar soap for 2 to 6 weeks.

After removing the soap from its mold, allow the bar soap to dry in a warm dry dark place for two to six weeks before using it. If you really need your soap, then you could start using it after the second week. But if you want the best possible soap, then allow it to air dry for the full six weeks.

Cover a dish or large serving tray with some plastic food wrap, and then stack your soap on the dish in a manner that will allow as much air as possible to reach each bar of soap. Do not stack one bar of soap directly on top of another bar of soap. Do not put the soap in direct sunlight or in a moist area. The longer the bar soap ages the harder it will become and the better it will perform when used as soap. During this time any remaining water in the soap will gradually evaporate out, and any remaining lye will gradually blend in with the surrounding grease. However, if your soap is brown lye water heavy, then it will leak out of your soap onto the dish during the first day and you will see a small puddle of brown lye water around your soap. If this happens, then drain off the excess brown lye water so it does not have an opportunity to be reabsorbed into your current batch of soap. You should also consider the addition of about 10% more grease to your next batch of soap at the beginning of Step One.

After three weeks, turn your bars of soap over so the underside will have an opportunity to dry in the air for the next three weeks.

After a total of six weeks of air drying, put the bars of soap into an air-tight container, or wrap them in plastic wrap, or put them in a plastic food storage bag. Depending on your local climate conditions, this will either prevent the soap from drying out, or it will prevent the soap from absorbing moisture from humid air.

When you remove your bar of soap from storage it may have a thin layer of white powder on it, which is the result of the air reacting with any lye on the outside surface of the soap. This thin layer of powder will contain some lye and it needs to be removed from the surface of the soap. Just rinse the ash off and forget about it.

You may also discover that the first two or three times you use the soap to wash your hands that it does not work very well. This is because the soap needs a brief adjusting period after making its first initial contact with water. After the soap has been in brief contact with water a few times, and rubbed, and allowed to dry, it will start to behave like normal soap and clean very well, with one exception. Homemade soap does not lather the way ordinary store bought soap lathers. Bubbles are not necessary for a soap to be effective. Bubbles only add visual appeal.

(Note: If you are going to sell your soap for a profit, then you should dip the bar of soap in water and allow it to air dry several times to pre-condition the soap for your customers. This will help to reduce the number of customer complaints about your soap not working the way it should.)

You can test the quality of a finished bar of soap by shaving it with a sharp knife. If it crumbles, it contains too much lye, but it will still be very effective as a good laundry soap. Good all-purpose bar soap will curl slightly when shaved with a sharp knife blade. Keep a written record of your soap making results and make minor adjustments as required on your next batch of soap.


How to Make Special Types of Soap Using
"Grandpappy's Homemade Soap Recipe"

All-Purpose Soap (Bath Soap, Laundry Soap, Dish Soap):
Use 100% beef tallow, or any other hard fat, in "Grandpappy's Homemade Soap Recipe."

Bath Soap:
Use 75% beef tallow and 25% pork lard in "Grandpappy's Homemade Soap Recipe."

Facial Soap (an oily texture):
Use 50% beef tallow and 50% pork lard in "Grandpappy's Homemade Soap Recipe" to make a soft facial soap that has an oily texture that is useful for moisturizing the skin.

Vegetable or Cheese Grater Soap Flakes:
To make soap flakes, rub a bar of hard soap made from 100% beef tallow (or any other hard fat) over a vegetable or cheese grater (shredder).

Soap Powder:
To make soap powder, dry the above soap flakes for 10 to 12 minutes in a 160ºF oven and then pulverize the dry soap flakes.

Liquid Dish Soap or Liquid Laundry Soap or Hair Shampoo:
Add one-pound of soap flakes to one-gallon of boiling rainwater and boil for 10 to 12 minutes. Stir frequently. Then turn off the heat and allow the mixture to cool. Pour the liquid soap mixture into a storage container with a lid. The lid will prevent the mixture from drying out. This liquid soap mixture dissolves very quickly in hot water and it makes dish washing and clothes washing much easier. This procedure will also make a good hair shampoo if the original bar of soap was an all-purpose soap that contained an average amount of lye.

Saddle Leather Soap:
Old fashioned "saddle leather soap" is made by using five-parts beef tallow and one-part pork lard in "Grandpappy's Homemade Soap Recipe."

Floating Soap:
Either of the following two methods will yield a bar of soap that floats on top of water:
Method 1: Just before Step Four, fold the soap mixture over onto itself several times and stir really well each time in order to add lots of air bubbles into the soap mixture. Then immediately pour the soap mixture into the soap molds.
Method 2: After all the grease and lye has been added in Step One, and the original mixture has been stirred for at least 15 minutes, then add one-teaspoon of ordinary baking soda to the soap mixture and stir really well.

Soap that Lathers and Makes Soap Bubbles:
At the very beginning of Step One, replace one-fourth of the grease with either olive oil or coconut oil. (Note: In my opinion, olive oil and coconut oil both have better uses than making soap bubbles.)

Other Soap Additives:
Kerosene (coal oil), ammonia, vinegar, borax, sugar, milk, honey, and several other chemicals that are occasionally recommended as soap recipe additives provide minimal or no benefit, and may even have a minor negative impact. My suggestion is to not use any of them. However, if you wish to experiment with additives such as oatmeal or salt or Vitamin E, then I suggest you do so with a small batch of soap, and then verify for yourself that the advertised benefits actually materialize in the soap that you make, and that they don't introduce other problems into the soap making process.

Volume or Weight:
"Grandpappy's Homemade Soap Recipe" is based on volume (cups). As of August 2007, most other good soap making recipes are based on weight because of the variation in the weight to volume ratio of the different types of animal fats and vegetable oils that can be used to make soap. These other recipes are based on a very precise concentration of lye water made from commercial lye crystals. If you are working with two variables, and you can hold one variable constant, then it is not too difficult to predict the amount of the second variable that needs to be used. However, commercial lye crystals are no longer available, so it is not possible to easily control the lye variable as a constant in the soap recipe. For this reason I decided to use the easier method of measuring volumes (cups) of lye and grease instead of the more precise scientific method of using weights. When you are working with brown lye water made from campfire ashes, your lye water will be whatever strength it happens to be on the day you make it. If you use "Grandpappy's Homemade Soap Recipe" then you will be very close to the correct ratio of water, lye, and grease that is required to make good soap. However, since there will be variations in the strength of your brown lye water, and variations in the type of animal fat you use, you may need to make minor adjustments towards the end of Step One depending on what you actually see in your soap making pot at that time. These minor adjustments are discussed as Problem One and Problem Two at the end of Step One in the recipe.


Additional Supplementary Information

How to Melt (Render) Animal Fat

Important Information: Raw animal fat can quickly become rancid. Therefore raw animal fat should not be saved and then converted into grease at some future date. The best procedure is to melt animal fat into grease while the fat is still fresh. Melted animal fat has a much longer storage life than raw animal fat. If you have some animal fat and you cannot process it immediately then freeze it until you have the time to process the fat.

Types of Animal Fat:
  1. Beef fat is called tallow and pig fat is called lard.
  2. Poultry fat is too soft to be used by itself. However, you might be able to use poultry fat in a ratio of about 10% with tallow or lard. You will need to conduct a test using a little poultry fat to see how it impacts your final soap results.
  3. The fat from farm animals, such as sheep or goats, may also be used.
  4. You may also use the fat from a variety of wild animals, such as beaver, opossum, raccoon, and groundhog.
  5. If there is any lean meat still attached to the fat then you must cut it off and make sure you only use the fat to make grease.
Melting Fat Lid Covering Melted Fat
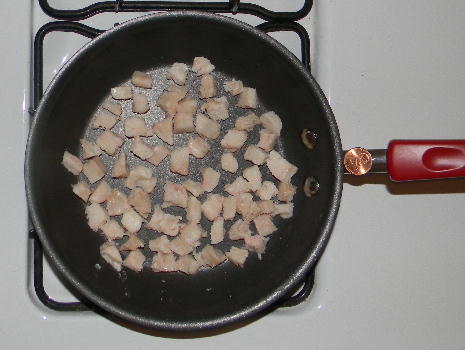
Raw Fat Cut into Small Pieces
(See Copper Penny on Red Handle)
Partially Melted Fat after
One-Hour over Low Heat
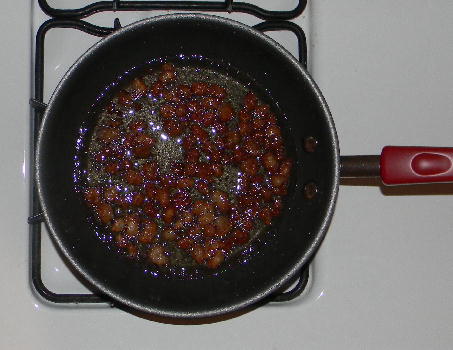
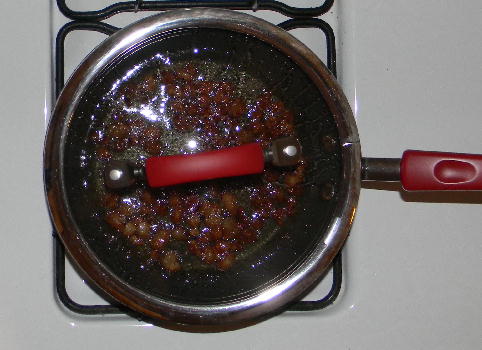
Glass Lid on Skillet to
Prevent Splattering
Melted Fat After Removing the
Tiny Pieces of Unmelted Fat
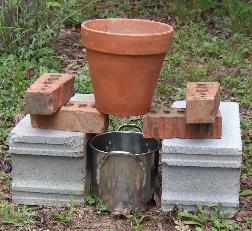
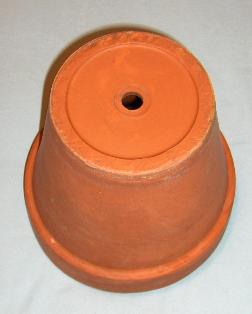
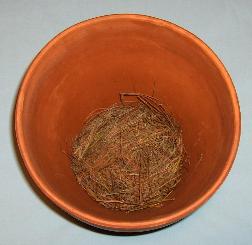
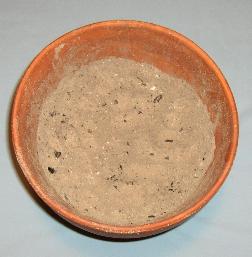
Note: The white spots in the above pictures are the reflection of my camera flash on the melted animal fat or the glass lid.

Melting the Animal Fat:
  1. Melting animal fat is called rendering.
  2. Rendering should be done outdoors or in a well ventilated area because the smell of melting animal fat can make some people nauseous.
  3. If possible use a pot or a skillet that has a lid cover. The lid will help to protect you and the top of your stove from the melting animal fat when the hot fat and grease occasionally pops and splatters.
  4. Just barely cover the bottom of the pot with a little rainwater or distilled water. Do not start with more than 1/8 inch of water in the bottom of the pot. The purpose of the water is to keep the fat from sticking to the pot and burning when you first begin to apply heat to the fat. The water will gradually evaporate as steam after you add heat to the pot.
  5. Cut the animal fat into small pieces about one-quarter inch cubed (or smaller) and put the fat into the pot so that you just barely cover the bottom of the pot in a single layer of animal fat. I recommend cutting the fat into very small cubes between 1/8 inch to 1/4 inch in size in order to reduce the total amount of time required to melt the fat into grease. (Note: Animal fat is easier to cut into small pieces if the animal fat is partially frozen.)
  6. Slowly add low to medium-low heat to the pot. I recommend the use of low heat because low heat minimizes the risk of burning the fat and ruining the grease.
  7. The animal fat will melt into a relatively clear or transparent grease when you first begin melting it. However, with the passage of time the grease will gradually become darker in color as the fat in the pot turns darker in color.
  8. After you have a shallow pool of melted fat in the bottom of the pot then you may gradually add more fat to the pot. Stir the mixture occasionally to keep the hot grease and solid pieces of fat circulating. As you stir be sure to scrape the bottom of the pot to prevent any fat from sticking to the bottom and burning.
  9. Do not burn the fat or allow it to smoke. If it starts to smoke then you are applying too much heat and you are burning the fat or the grease.
  10. It will usually take 3 or 4 hours, or longer, to melt the animal fat into grease depending on: (a) the type of animal fat, (b) the size of the pieces of animal fat, and (c) the amount of heat being used.
  11. One pound of fat will yield about 2.25 cups of grease. Most of the fat will melt into a liquid but some small solid particles will not melt and these are called cracklings. There may also be a few larger soft pieces of fat that will not melt. These soft pieces may be discarded or they may be used as you believe appropriate.
  12. After melting the fat, allow it to cool just a little, and then strain the melted fat through a clean thin cloth (or a clean paper towel). If you do not need the melted animal fat immediately then store it inside a sealed container until it is needed.
  13. The cracklings will be on the top surface of the straining cloth. If you wish you may save the cracklings for use in cooking recipes. The flavor of the cracklings will depend on the type of animal fat used and the heat at which it was melted. Some people enjoy the taste of the cracklings and some people do not.

How to Make Concentrated Brown Lye Water

You will need rainwater (or steam distilled water) and the cold ashes from any hardwood fire, such as oak, hickory, maple, ash, beech, or old fruit trees. Do not use the ashes from a fire that burned pine tree wood.

The cold ashes from any hardwood fire can be converted into lye. Lye made from fire ashes is not as caustic as commercially purchased lye. Any large wooden, plastic, or clay container may be used, such as a huge flower pot. A deep container is better than a wide container. The container should have a hole in its bottom center and that is why a flower pot is perfect. Do not use a container made of tin or aluminum because lye is caustic and it will react with these materials. (Note: Or you could use a container with a side-mounted water valve, such as a 5-gallon water jug.)

For example, I use a clay flower pot that has a 9 inch outside diameter top, a 5.5 inch outside diameter bottom, and it is 9 inches tall, with sides and a bottom that is 0.25 inch thick. When packed with cold ashes to within 2.5 inches of its top, it holds approximately 145 cubic inches (about 10 cups) of tightly packed cold ashes. Ten cups of tightly packed cold ashes will yield one-gallon of average strength brown lye water. Tightly packed means the loose ashes were pressed down firmly into the cup. If you use a different size container, then you should do the math to determine how much average strength brown lye water you will get from your container.

Caution: Lye water is caustic and it will burn your skin. Be extremely careful and wear rubber gloves when handling lye water. If possible, lye water should be made outdoors.

Clay Flower Pot, Upside Down to Show Hole in Bottom Layer of Brown Pine Needles on Bottom of Flower Pot Cold Ashes From a Hardware Fire Packed Tightly in Flower Pot Flower Pot on Bricks with One Gallon Pot Below
Flower Pot with HoleLayer of Pine NeedlesAshes Firmly PackedFinal Setup

Firmly pack a layer of straw, or brown pine needles, or sand about one-inch deep in the bottom of the container to help keep the ashes inside the container. Firmly pack the cold ashes from any hardwood fire on top of the bottom layer. Slope the top surface of the ashes slightly from the sides of the container to its center to help direct the water flow to the center of the container. Tightly pack the ashes to within two to three inches of the top of the container, depending on the size of the container. This empty top space is necessary to receive and hold the hot rainwater when it is first poured into the top of the container.

Place the large container on top of concrete blocks, bricks, or any other type of support so a second smaller container (at least one-gallon or four-quarts) can be placed beneath the center of the upper pot to catch the brown lye water as it drips through the hole in the bottom of the upper pot.

Rainwater is the best water for making brown lye water because it is soft and it contains no minerals or chlorine. Several easy ways to collect large quantities of rainwater can be found on my web site at How to Find Water and How to Make Water Safe to Drink.

(Note: If you do not have access to rainwater, then you may use the steam distilled water sold at most grocery stores. Steam distilled water is chlorine and mineral free water. Instructions for making steam distilled water are also included in the above water article on my web site.)

One Gallon of Regular Strength Brown Lye Water Your objective is to make approximately one-gallon of brown lye water from one fresh batch of cold hardwood fire ashes. Heat about one-half gallon of rainwater to boiling and then slowly pour it over the ashes in the upper container. If the ashes were packed down firmly they should not be swimming or floating in water. While the rainwater gradually disappears into the ashes, heat another one-half gallon of rainwater and then slowly pour it over the ashes. Wait about one-hour and then heat another one-half gallon of rainwater and slowly pour it over the ashes. Wait about one-half hour. If your brown lye water container has about one-gallon of brown lye water then you may stop. If you do not yet have one-gallon of brown lye water, then heat another one-half gallon of rainwater and slowly pour it over the ashes. When you have finished you will have poured a total of approximately 1.5 to 2 gallons of hot rainwater into the pot of ashes. It may take a little while for the water to make its way through the ashes and out the hole in the bottom of the upper container. Be patient. The liquid that drips into the smaller container on the ground will be brown lye water. 1.5 to 2 gallons of hot rainwater will yield approximately one-gallon of brown lye water (see picture on right). (Note: The ashes will absorb and retain between one-half to one gallon of rainwater, depending on the size and shape of your container and how tightly you packed down the ashes in the container. Discard the used ashes after you have extracted one-gallon of brown lye water. If you need more brown lye water, then use a fresh batch of hardwood fire ashes to extract your next gallon of brown lye water.)

Wear rubber gloves when handling the brown lye water because it is caustic and it will burn your skin if it comes in contact with your skin. If you get some lye water on your skin, wash it off immediately with soap and water. If necessary, the brown lye water can be stored in a safe container, such as a stainless steel pot with a lid, or a glass jar with a lid. However, the best procedure is to use the brown lye water immediately to make soap.

(Note: There are several different methods for testing the strength of the brown lye water but none of them are necessary. There is no reason to complicate the soap making process by attempting to get the brown lye water to a specific strength prior to using it to make soap. If your lye water is at the recommended average strength, then you will make a good all-purpose soap. However, if your lye water is a little stronger than average then you will produce a good laundry soap. If your lye water is a little weaker than average then you will produce a good bath soap. Therefore don't be too concerned about the strength of your brown lye water. You will need both laundry soap and bath soap, and you will be making soap frequently if you are out of soap. Therefore you can tolerate a little variability in the strength of your brown lye water. Besides, you will be boiling off most of the brown water anyway before you use it to make your soap.)

(Note: Some recipes recommend that you pour the brown lye water through the same batch of ashes several times in order to increase the strength of the lye water. This procedure has marginal value. The first extraction of the lye from the ashes will remove most of the usable lye from the ashes. Trying to squeeze a little more lye out of ashes that have already been seriously depleted of their lye is just not practical. On the other hand, a single extraction of lye from each new set of ashes will yield brown lye water that is of approximately the same strength each time, and this will result in a more predictable soap making process that can be replicated over and over again. From a quality control perspective, this means the process will have less total variation and therefore it should yield a product that is more consistent from one batch to the next. When you have a consistent stable process, it is easier to fine tune the process and improve the quality of your finished product.)

There are three methods for making soap from the brown lye water as follows:

Method 1 - Brown Lye Water: Some soap making recipes recommend using the brown lye water in the same strength as it was originally created when the rainwater was poured through the ashes. This method requires a much larger soap making pot and it also adds several hours to the soap stirring process. This is the traditional method that was used in the 1800's and it is the method that is still used today in many third-world countries. If you have a really, really old soap making recipe, then this is probably the method it describes. The major difficulty with this method is that it requires considerable skill and experience to consistently produce usable soap. Relatively minor mistakes or poor timing when using this method will result in a batch of nasty stuff that is neither soap nor anything else worth using. That is the reason this method was abandoned by our ancestors when commercial lye crystals became available at the local hardware and general store. Lye crystals significantly reduced the time required to make soap and they also yielded consistent batches of good usable soap.

Method 2 - Lye Crystals: Some modern soap making recipes recommend boiling down the brown lye water until nothing remains except lye crystals, and then saving the lye crystals in a safe container for future use. Later, when you want to make soap, you add the lye crystals to a little fresh rainwater and make fresh lye water. This method adds an unnecessary step to the soap making process and it does involve some danger when reconstituting the lye crystals into lye water. (Note: These homemade lye crystals are very similar to the lye crystals that were once widely available at most hardware and grocery stores. However, it is no longer possible to purchase lye crystals at the grocery store because they were withdrawn from the market because they were being used to make illegal drugs.)

Method 3 - Concentrated Brown Lye Water: This is the method I developed out of necessity, and it is much more practical than either of the above two methods. Boil one gallon of normal strength brown lye water down into 3/8 cup of concentrated brown lye water. If you boil the brown lye water down before you use it in a soap recipe, you can reduce the amount of time it takes to stir the soap mixture by several hours. This also simplifies the trial and error method of combining the lye water and the grease and it significantly reduces the possibility of making a failed batch of unusable soap. If you start with one-gallon (16 cups) of original strength brown lye water, then it usually takes between 3 to 4 hours to boil it down to 3/8 cup of concentrated brown lye water, depending on the amount of heat used. This means you will have reduced the subsequent old fashioned soap stirring procedure by at least 3 to 4 hours. As the water gradually boils away, the boiling process begins to proceed faster and faster because there is less water remaining in the pot. By the time the water is down to one-quart or less, it boils away very quickly so you will then need to watch it carefully to make sure you don't boil off all your water. (Note: If you make a mistake and boil the one-gallon of brown lye water down into less than 3/8 cup of concentrated brown lye water, then wait until the concentrated brown lye water cools a little bit, and then add just enough rainwater to return the concentrated brown lye water to the 3/8 cup mark. Add the rainwater slowly and be careful because the mixture may sputter a little bit.)

(Final Note: The "Grandpappy's Homemade Soap Recipe" that I developed through trial and error specifies the use of the concentrated brown lye water made by following Method 3 above. However, as mentioned previously, most really old soap making recipes recommend putting the brown lye water and grease into a big pot and cooking it over a big fire for several hours and stirring it while it cooked. The reason for the big fire was because they were using original strength brown lye water that contained too much water to make soap. Therefore they had to boil the water off and this frequently resulted in a failed batch of soap, or a batch of soap that was gritty, lye heavy, and of very poor quality. If you follow my "Grandpappy's Homemade Soap Recipe" at the beginning of this article, you will notice that it is not necessary to cook the soap mixture. The reason is because the brown lye water has already been boiled down to the correct ratio of water to grease using Method 3 above. If a person does not know about Method 3 then he or she will probably invest a lot of time and energy in a multitude of unsuccessful attempts to make soap, and repeat the very same mistakes our ancestors did in the 1800's before the invention and sale of commercial lye crystals.)


Summary

A brief summary of the most important critical information from "Grandpappy's Homemade Soap Recipe" is as follows:
  1. Boiled rainwater poured through ten cups of tightly packed ashes from a hardwood fire will yield one gallon of average strength brown lye water.
  2. One gallon of average strength brown lye water should be boiled down to 3/8 cup of concentrated brown lye water.
  3. 3/4 cup of concentrated brown lye water should be mixed with 2 cups of warm grease which was made from melting (rendering) almost any type of animal fat.
  4. When stirred the lye and grease will combine together in a chemical reaction to make soap. This normally takes between 30 minutes to 3 hours. The soap mixture must be kept above the melting point of the type of animal fat you are using.
  5. When the soap mixture traces, pour it into a mold and let it rest for one to seven days, depending on the type of animal fat or oil used. Then remove the soap from the soap mold.
  6. Air dry the soap for another 2 to 6 weeks. The chemical reaction will then be 100% complete and all the lye and grease will be gone. The lye and grease will have been converted into homemade soap.
The major contributions this article adds to the body of knowledge about soap making are items 1, 2, and 3 above. Items 4, 5, and 6 above can be found in any good soap making book and at a variety of internet web sites, with both minor and major variations.

Conclusion

Knowing how to consistently and successfully make soap from rainwater, campfire ashes, and animal fat takes you one step closer to becoming an independent resourceful human being in God's natural order of things.

Respectfully,
Grandpappy.


Grandpappy's e-mail address is: RobertWayneAtkins@hotmail.com

Home Page Hard Times Survival