


How to Catch Wild Game
Using Professional Quality Snares and Steel Traps
Copyright © November 1, 2008 by Robert Wayne Atkins, P.E.
All Rights Reserved.
For Fair Use and Educational Purposes Only.
Always Consult and Obey Your Local and State Hunting and Trapping Laws.
 This short article will briefly discuss professional quality snares and the two different types of steel traps. These devices are used to catch wild game and therefore they can seriously injure you if you are not careful while you are handling them. If you are careless then there is a good chance you could hurt yourself. Therefore you should proceed at your own risk.
There are three different devices that can be used to catch wild game as follows:
- Professional Quality Snares.
- Conibear Steel Traps.
- Pan Steel Traps.
Each of the above devices is discussed below.
How to Season Professional Quality Snares
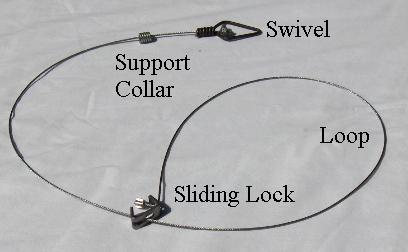 The snare in the picture on the right is a professional quality snare made for professional trappers. The parts of the snare are indicated in the picture.
A new snare is made from bright shiny heavy duty airline cable. The shiny surface of the cable must be converted into a dull finish in order to help it blend into the natural forest environment. Shiny cables are very easy to see and animals will notice and avoid them. Dull cables are not easy to see and therefore they will not be avoided by the animals you are trying to catch.
Separate each individual cable from all the others so each cable is by itself.
Open and close the snare end of the cable about 20 times to remove any tiny burrs on the aircraft cable. This will allow the snare to close quickly and smoothly around the animal at the proper time.
Fill a large metal pot about half full of water and bring it to a boil. (Do not use a Teflon coated non-stick pot or you may scratch the interior surface with the metal snares). Place all of your snares in the boiling water so each snare is completely under water. Very slowly add one cup of Baking Soda to the boiling water. The boiling water will foam up when you add the baking soda so add it very slowly to keep the pot from foaming over onto the stove. Reduce the heat to medium so the water is just barely bubbling. Boil for about 15 minutes. Turn off the heat and pour the soda water solution down the drain of a nearby stainless steel kitchen sink. The snares will fall into the bottom of the stainless steel sink. Let the snares cool for a few minutes and then thoroughly rinse them using warm or cool water to remove all the baking soda residue. The snares are now seasoned and they may now be used to catch wild animals.
How to Form a Professional Quality Snare Loop
When you first examine the snare opening you will see that it forms a tear drop shape. This is not the desired shape. Use your hands to bend the snare wire cable so that it looks more like a circle instead of a tear drop. The size of the circle should match the size of animal you intend to catch when you actually set your snares. Open and close the snare about 10 times to remove any new burrs that may have appeared after the baking soda seasoning process.
How to Store Professional Quality Snares
Form the snare opening into the size loop that you intend to use when you set the snare. Then wrap the other end of the snare cable in and out of the circle several times until you reach the end of the cable. The snare can now be stored and the circle you just created will gradually become the natural size circle that the snare will "remember" when you later use your snare.
How to Set a Professional Quality Snare
A snare is of no value if you can't find it the next day. Lost snares mean lost equipment. You must be able to find your snares after you set them. Look for nearby landmarks that will help you remember exactly where you set your snares. Before you risk loosing your snares, put something of little value (such as a penny or a nail) at the spot where you plan to put your snare and then see if you can find it the next day. Take some notes on how you got to that location and then see if you can find that same exact location the next day by referring to your notes and the landmarks you identified. If you will practice first, you can avoid the loss of your equipment.
Look for a well used animal trail. Then follow the trail and look for a place where the trail becomes relatively narrow due to natural obstacles (trees, bushes, large rocks, gully, steep hill bank, etc.).
Use 14 gauge wire to secure the swivel end of the snare to a nearby narrow tree trunk. Or attach it to a heavy short log (called a drag). If necessary, drive a stake deep into the ground and attach the snare to the stake.
Form the snare loop into a circle of the proper size and place the snare circle in the very center of the path. If possible, the snare slide should be at the top of the snare circle loop. The snare should not be touching the ground. Attach some spare 14 gauge wire to a nearby tree trunk or a tree branch (or a stick you force into the ground) and use the 14 gauge wire to support the snare circle at the correct height off the ground.
Push a few short 2-foot to 3-foot sticks into the ground at random locations to narrow the original trail so the animal must pass through the exact spot where you placed your snare. This is called �blocking� or �fencing.� Lean or wedge a stick or branch against the tree and above the snare so the animal will not be tempted to try to jump over the snare. This is called a �duck stick� because it forces the animal to duck its head into the snare loop.
Muskrat: 3-inch circle with entire snare below water and 1/2 inch above bottom of pond.
Rabbit: 4 to 5-inch circle 2-inches off ground.
Raccoons: 8-inch circle 3� off ground (or tree snare = 5 or 6-inch circle 2-inches off tree).
Coyote: 12-inch circle 10-inches off ground.
Beaver: 12-inch circle with 1/2 of the circle under water.
Deer: 14-inch circle 16-inch off the ground with a "Duck Stick" just above top of loop.
Squirrels and raccoons and possums like to climb trees. If you see a tree growing at a 30 to 45 degree angle then it will probably be used by animals to gain access to the tree canopy above the forest floor. Set a snare at waist level on the top side of the slanted tree so the bottom of the snare loop is 2-inches above the tree trunk and the snare circle is perfectly centered above the tree trunk.
Another option is to lean a pole or thick tree branch against a tree and then set your one professional quality snare (or a series of cheap loop wires) along your improvised tree run.
How to Repair a Professional Quality Snare
An animal will fight the snare when it is caught. Sometimes the snare cable will become twisted and chewed on and the snare wire will become severely damaged.
If you were using a long snare cable for larger animals, then you may be able to salvage part of the wire cable and convert it into a shorter snare for snaring smaller animals.
Even if the entire wire cable is ruined, all the other parts of the snare are still fine and they should be saved and attached to a new piece of heavy duty cable (save the lock, the swivel, and all the other parts on the snare). Only the snare cable itself should be discarded (or used for some other purpose).
Other Snare Wire Options
There are three basic ways to set a wire snare:
- Spring Snare: On the ground but tied to a bent tree branch that will lift the animal up off the ground when it is snared.
- Ground Snare: On the ground or on a slanted tree and secured to a tree trunk or stake driven into the ground.
- Water Snare: In the water and secured to a stake driven into the ground near the edge of the water.
Wire Size: 22 gauge to 28 gauge wire might work for the first option above but it will not work for the other two. If the animal is on the ground when it is caught, it will fight the snare and within two-minutes it will either twist the wire so badly it will break, or the animal will chew through the wire with its teeth. It does not matter if the wire is galvanized, or coated, or copper - it is too thin and it will not work. You must use heavy duty wire with a swivel if you intend to set the last two types of snares above. However, if you set the first type of snare then the animal will be hanging by its neck and the light weight wire will strangle the animal because it will not be able to gain any leverage in the air.
Steel Traps
 There are two basic types of steel traps:
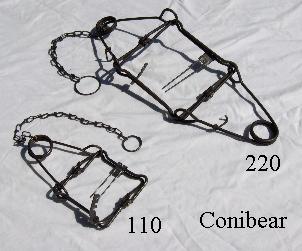
- Conibear traps have side springs and a dual wire trigger with a latch (called a dog) that hooks over the trigger. The 110 size has one side spring and the 220 and 330 have two side springs.
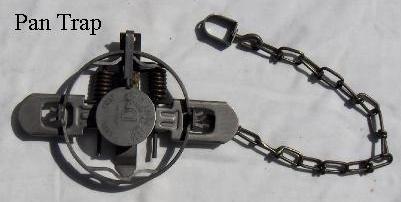
- Pan traps have two jaws and a pan between the open jaws and a latch (called a dog) that hooks onto the pan.
New traps should be seasoned and adjusted prior to use. Some of the companies that sell steel traps will also season those traps for you if you are willing to pay a small additional fee. My recommendation is that if you find a supplier who offers to do this then you should take advantage of this service. These suppliers sometimes sell their traps on ebay.
If you season your traps yourself then look through the supplier's web site and purchase some trap dye at the same time you order your traps.
Finally, regardless of how your traps are seasoned, your traps will gradually acquire some rust when they are put into actual use. If you are aware of this ahead of time then you will not be shocked when you first notice the rust when you later retrieve your traps.
Seasoning traps: Place the new traps in some hot soapy water and wash off the protective oily factory coating. Place the traps outside on the ground for two weeks to allow them to weather and acquire a little rust. Then use some trap dye (purchased from the same company where you bought your traps) to dye the traps a more natural color so the trap will blend in with the normal forest environment.
Pan Traps - How to Adjust the Pan Height: Open the trap and set the hook (called the dog) onto the pan so the trap is ready to be used. The pan is in the center of the trap and when an animal steps on it, it releases the dog and the trap jaws close on the animal's leg or paw. For the trap to work correctly, the pan of the trap must be level with the two surrounding jaws of the trap. Look at the trap from the side and adjust the height of the pan accordingly. Be careful and do not hurt yourself. Some traps have a pan screw adjustment that lets you elevate or lower the pan by twisting the screw. Some pans do not have a screw adjustment and you must use a heavy duty screwdriver or pliers where the pan is attached to bend it up or down so the pan is level with the jaws of the trap.
Pan Traps - How to Adjust the Chain Length: The chain on most pan traps is too long. A long chain gives the animal more maneuverability and a better chance to escape from the trap. A short chain keeps the animal in a very small area and makes it more difficult for the animal to get loose. Examine the chain and remove a few links so the chain is about 8-inches long. Save the links in case you wish to increase the chain length later. Reattach the swivel to the end of the shortened chain.
Where to Set the Traps
In freezing weather conditions put a "tiny amount" of antifreeze on the hinges of the trap so the trap can close and not freeze into an open position.
Look for a well used animal trail. Then follow the trail and look for a place where the trail becomes relatively narrow due to natural obstacles (trees, bushes, large rocks, gully, steep hill bank, etc.).
How to Set Steel Traps
Pan Traps - Use 14 gauge wire to secure the trap swivel to a nearby tree or to a stake driven deep into the ground. Dig a shallow depression in the forest floor at a narrow spot in the trail. The trap needs to sit in the depression so the top of the trap, including the pan, is just a tiny bit below the forest floor. Pack the dirt around the outside jaws of the trap to secure the trap in position. Sprinkle some dirt on the inside of the jaws of the trap but do not fill the area below the pan. Sprinkle a little dirt on the pan so it is hidden. Place some small leaves or pine needles over the entire trap area. Place a "step stick" directly in front of and behind the trap on the trail so an animal coming in either direction will need to step over the stick and place its paw in the middle of the trap on the pan. Each step stick should be about 1-inch in diameter and at least as wide as the trail. A step stick should be placed flat on the trail about 1-inch away from both sides of the trap.
Conibear Traps: Ground or Trail Set - Open the trap. (Note: You will need to purchase a special "opening tool" for the size 220 and 330 traps). On the size 220 and 330 traps set the safety on each of the two springs. Use 14 gauge wire to secure the swivel end of the conibear trap to a nearby tree or to a stake driven into the ground. Find a good size stick that will fit tightly between the two metal pieces that form the outsides of the square trap. Wedge the stick tightly between the two sides of the trap and then fasten the latch (dog) to the two-wire trigger. On the small 110 trap use the middle latch (dog) notch. On the medium and large traps (220 and 330) use the inside notch for the tightest fit. Do not remove the two spring safeties until after the trap is completely set into position. The conibear trap should not fall off the stick when you shake the stick gently. Push the stick into the ground so the conibear trap is in the center of the trail. The two trip wires should be on the top of the trap pointing down towards the ground. (Note: The ends of the two trip wires can be bent slightly so they form small U-shapes towards the outside of the trap.) Lean a "duck stick" above the trap against a tree or bush so the animal will have to duck and go through the trap instead of trying to jump over the trap. If the weather is freezing then place two small sticks on the ground under the conibear trap to keep it off the freezing ground. Place some leaves and sticks on and around the trap itself to break up its outline and disguise it. If necessary, push some sticks into the ground to narrow the path and force the animal into the trap. After the trap is completely set, then remove the two safety catches from the two side springs.
Conibear Traps: Tree Set - Look for a tree that is growing at a 30 to 45 degree angle from the ground. Set the trap at waist height. Drive two nails into the tree trunk and bend them at a slight outward angle to hold the two jaws of the conibear trap in position. Then put the conibear trap on the outside of the two nails so the nails hold the trap upright on the tree trunk. Secure the swivel end of the trap to the tree trunk using 14 gauge wire. Place leafy sticks around the trap to help disguise it. The final step is to remove the two safety catches from the two springs. If you use bait, place a very small amount near the base of the tree but place most of the bait past the trap higher up on the tree. Place leaves over the bait so it can not be seen by the birds. However the bait can still be smelled by passing animals.
Types of Bait
Conibear traps should have the bait placed just beyond the trap in order to encourage an animal to stick its head through the trap to get to the bait.
Pan traps should have the bait tied to a piece of vine and then suspended from a tree branch above the pan trap so the bait is between 18-inches to 24-inches above the pan trap. The animal will be looking at the bait and trying to smell the bait and the animal will usually not notice the pan trap until after stepping into it and getting caught by the leg. If you have enough extra traps, then it is a good idea to put two or three pan traps on the outside of an 18-inch diameter circle on the ground below the bait.
Put a little peanut butter before or beyond a conibear trap, or suspended above a pan trap.
Fish heads should be placed beyond a conibear trap in a small hole with the conibear trap in front of the hole, or suspended above a pan trap.
Push the center of a cut two-inch long corn cob containing dried or fresh corn onto the two trip wires of the conibear trap.
Remove acorns from their shells and place them in a row leading into and though the trap to the other side of the trap where most of the acorns are piled. Leave the broken shells beside the acorns so it looks natural.
How to Butcher an Animal
All animals are easier to skin immediately after they have been killed. Always use plastic or rubber gloves when handling animals to prevent the spreading of any disease. Gut the animal and remove its internal organs and then skin the animal if you wish to preserve its furry pelt. If you do not want the fur, then cut the meat away from the bones and put the meat into a plastic zipper freezer bag for transport. Cut all the fat away from the lean meat because the fat will go rancid very quickly.
Where to Purchase Traps Online
Professional quality snares may be purchased online from any of the following suppliers:
http://www.fntpost.com/Categories/Trapping/Snares+Slides+and+Supplies/Snares+Snare+Extension+Cables/Snare+Shop+Snares/
Conibear traps (Size 110, 220, and 330) may be purchased online from:
http://www.fntpost.com/Categories/Trapping/Traps/Body+Grip+Traps+(Including+Conibear)/Oneida+Victor+Conibear+Traps/
Pan traps (size #1.5 and size #2) may be purchased online from:
http://www.fntpost.com/Categories/Trapping/Traps/Coil+Spring+Traps/Duke+Coil+Spring+Traps/
Note: I do not earn any type of commission if you purchase from the above internet stores. The above links are being provided simply for your convenience.
Respectfully,
Grandpappy.
Grandpappy's e-mail address is: RobertWayneAtkins@hotmail.com