


The primary purpose of a primitive homemade bow is to hunt wild game. However, a better way to hunt wild game is with a modern rifle. Even a simple 22-caliber rifle is more accurate at a greater distance that the highest quality factory-made precision bow and arrows.
However, none of us can predict the future. Therefore, it is a good idea to have a back-up plan if your hunting rifle is not available or if it can't be used for some totally unexpected reason.
The purpose of this narrative is to provide information on how to make a primitive handmade bow and arrows. However, a good hunter will NOT rely on one single method of putting meat on the table. There is nothing wrong with a handmade spear (a sharpened stick), or hand-set snares, or other animal traps. Your objective is to obtain food and not to impress anyone with how you did it.
With that said, let's focus our attention for the duration of this narrative on the topic of a primitive handmade bow and arrows.
A bow increases the range at which you can successfully hunt and put meat into the cook pot. However, the purpose of the bow is to deliver the arrow. The arrow does the job of bringing down the game. The bow is just the delivery device.
A great bow with a lousy arrow has a very small chance of putting meat on the table. However, a poor bow with a great arrow has a much better chance of putting meat in the cook pot. Therefore, the arrow is more important than the bow.
In a survival situation you may need meat immediately. Therefore, a quickly made bow will be required. While you are using your quickly made bow each day to hunt wild game, you can still be working on a more advanced bow for future hunting expeditions. The same concept applies to the arrows. A quickly made arrow will do in the short term but a better made arrow will be preferred in the future.
Let's begin by looking at how to make a primitive handmade bow and arrows very quickly. Then we will look at how to make a better quality homemade bow and arrows.
Wood: Yew, willow, locust, cedar, hickory, black walnut, ash, oak, elm, apple, birch, or maple (never use pine or a dead tree with its roots still in ground). Select branches, saplings, suckers, or shoots near a creek or stream (their growth rings will be closer together). Your future bow should be as straight as possible, with no knots or side branches. Select and cut 2 or 3 potential bow shafts.
Length: 50 inches to 60 inches (from ground to between chest and chin). Cut or saw the wood to length. Do NOT break the wood.
Diameter: At least 1 inch at its center and 3/4 inch at its top end. Never more than 2 inches in diameter at its center.
Test: Step on the center of the bow and grip the two ends in your hands. Bend both ends of the bow 3 or 4 inches. If it breaks, discard it and start over.
Bark: Peel off the bark by hand. Do NOT whittle on the wood. Allow the wood to dry for 24 hours in the shade (not in the sun).
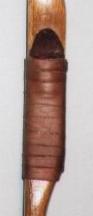 Handle: (Left picture.) Wrap the center of the bow with leather or tape. Wrap the top center of the bow several times to form an arrow rest.
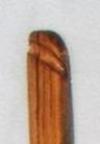
Notches: (Right picture.) Cut string notches at both ends of the bow on each side in a "V" shape towards the inside. Do not cut the outside of the bow. Reinforce both ends with a wrap of tape.
Bow String: The string should be 12 inches longer than the bow. Use nylon twine, or hemp twine, or string, or a leather strip, or shoe laces tied together. If your string is extremely thin then tightly braid 3 or more strings together to form a strong bow string.

Attach String: (Left picture.) Tie the string securely to the bottom thick end of the bow. Make a loop or slip knot in the other end of the string about 6 inches shorter than the bow. Place the thick end of the bow on the ground on the outside of your left foot. Hold the top end of your bow in your right hand. Lower the bow and step beyond the bow with your right foot and place the back side of your right knee against the inside of the bow. Hold the string slip knot in your left hand and bend the bow across the back of your right knee towards your left hand. Slide the string slip knot over the narrow end of the bow. When finished there should be about 5 or 6 inches between the string and the center of the bow.
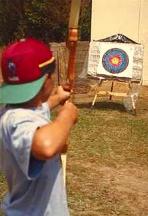
Practice: (Right picture.) Hold the center of your bow in your left hand with the large end down. Extend your left arm to shoulder level and straight out to your left side with a little bend at the left elbow. The rear heals of your two feet should be in a straight line to the target. Put an arrow on the left side of your bow on the arrow rest and fit the notched end of the arrow into the string. Pull the string back with the three long fingers of your right hand, one above and two below the arrow notch. Sight down the arrow with your right eye and allow for a little up and down arrow flight to your target. If the wind is blowing then allow for a little wind drift. Then move your head out of the way. Straighten your three right fingers to release the string and the notched end of the arrow. Your left hand should not move until the arrow hits the target. (If necessary, unstring and adjust the bow string slip knot.)
Optional Items: Wax the middle six inches of the string. Wear gloves on both hands and a long sleeve shirt. The glove on your left hand will help protect your left hand from the arrow shaft (and its feathers) as the arrow exits the bow at high speed. The long sleeve shirt will help protect your left forearm from a potential bow string burn. If you have the strength then you can bend your left wrist so your left forearm is a short distance away from the bow to prevent the bow string from making contact with the inside of your left forearm. (Note: Most archery supply stores sell a leather forearm pad that straps onto your left forearm to protect it from a bow string burn. Or you could tie a hand towel or a piece of cloth or a piece of leather around your left forearm using some string or shoelaces.)
Storage: Always unstring the bow when it is not in use.
Number of Arrows: Start 20 potential arrows. You will probably end up with 5 or 6 good arrows.
Wood: Any straight sapling, shoot, or sucker without branches or knots. They should be between 24 to 30 inches long and between 1/4 to 1/2 inch in diameter. Shorter arrows remain straighter, fly better, and don't break as easily. Remove the bark. Tie all the arrows together into a bunch to help preserve their straightness. Cure the arrows for one to ten days (but not in the sun) and hand straighten each day as necessary.
Point: Whittle the narrow end of the arrow to a point. Harden the point of a green arrow by charring it over the hot coals from a campfire.
String Notch: Notch the thick end of the arrow for the bow string. Wrap twine around the notch end to strengthen it and to prevent it from splitting.
Practice: Shoot each arrow at a very soft target (a box or bag of leaves, or a bag of some very loose dirt). Keep the arrows that fly straight on a regular basis. Discard the unpredictable arrows.
Wood: Same as the Quick Bow.
Length: Same as the Quick Bow.
Diameter: 1 to 2 inches at center with 1.5 inches the best.
Test: Same as the Quick Bow.
Bark: Same as the Quick Bow.
Bend: Place the thick end of the bow against the toe of your left boot and hold the thin end of the bow loosely with your left hand. Grasp the bow loosely by its center with your right hand and pull it gently towards you. The bow will rotate in your left and right hands until it bends with the natural curve of the wood. Mark or scratch the side of the wood facing you. Later you will string the bow against its natural bend to maximize its power. Do NOT bend the bow again until it is finished.
Removing Wood: Do NOT whittle on the wood. Hold the edge of your knife straight up and down against the wood (at a 90 degree angle) and scrape off a tiny amount of wood with each motion. Do NOT tilt the blade so it can cut into the wood. Always remove wood from the center towards the end of the bow. Don't remove any wood from the outside of the bow. Remove wood from the inside (the string side) and the two sides only. Be patient. Work slowly. Be patient.
Shaping: Leave the center round so it fits your hand comfortably. Start a little above the center of the bow and shape towards the narrow end. There is less wood there and it will determine the shape of the opposite end. Taper the wood from the center to a 3/4 inch diameter at the top end. The bow shape can be round over its entire length but it should gradually get smaller in diameter from center to top. (Note: If you wish to gradually flatten and taper the bow from the center to its ends in an oval shape you will have a superior shape but you will also invest a lot more effort.) When you finish the top end, then shape the bottom thick end of the bow so it matches the top end.
Seasoning: Lay the bow down in a warm dry spot (but not in the sun) and let it dry for 2 days. After 2 days, warm the bow near a fire and rub it down with oil or animal fat. Rub the bow with a cloth for an hour. Then let it dry near the fire and then rub it down with more oil or animal fat. Continue drying and rubbing oil into the bow until the wood is saturated. The bow is now ready for use. In the future, about once a week, rub the bow down with oil (or animal fat) and let it dry. The oil (or fat) will make the wood more flexible and keep it from cracking.
Handle, Notches, String: Same as the Quick Bow.
Attach String: Same as the Quick Bow EXCEPT bend the bow against its natural curve when you attach the string.
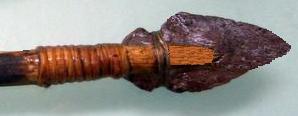
Arrowheads: Split the thick end of the arrow and insert the arrowhead. Tie the arrowhead to the thick end inside the split. Arrowheads are useful for hunting larger animals, such as deer, but they are not needed for smaller animals, such as squirrels and rabbits.
String Notch: Notch the thin end of the shaft for the bow string.

Feathers: Turkey or goose feathers work well. Cut the wing or tail feathers in half down the quill. (Or use thin plastic cut into a right triangular shape, about 4 inches long and 1/2 inch high.) One feather should be mounted at a 90 degree angle to the string notch. It is called the cock-feather and it is the bottom feather in the above picture. If possible, it should be marked or colored differently so it can be quickly identified. It will be the feather that will be facing you when you put the notch of the arrow against the bow string. Cut very thin scratches equally spaced around the notch end of the arrow shaft the same length as the feathers to help hold each feather quill stationary. If you have some glue then glue each feather to its thin scratch on the arrow shaft. Use dental floss, fishing line, or thread to tie the three feathers equally spaced from each other around the end of the arrow near the string notch.