Home Page Hard Times Survival Hard Times Recipes Gourmet Recipes Gardening Tips Firearm Facts Economy Book Reviews
Wilderness Survival Christian Poems Bible & Prophecy Bible Truths Other Information Children Stories Product Links Search Website My Books

How to Build a Reflector Oven and
How to Use a Reflector Oven

Copyright © December 1, 2015 by Robert Wayne Atkins, P.E.
All Rights Reserved.


Introduction

This article will explain how to build and use a reflector oven to bake food in front of a wood burning fire.

Baking food is not the same thing as heating canned food that has already been cooked. Some practical options for heating precooked canned food are on my website here.

Instructions on how to build a wood fire are on my website here.


What is a Reflector Oven?

Reflector Oven and Fire 
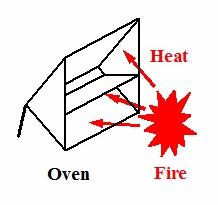
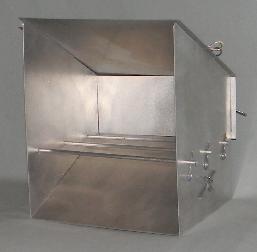
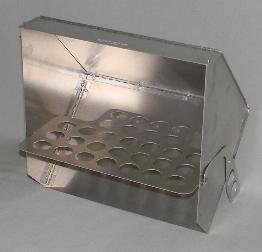
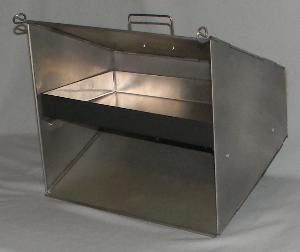
A reflector oven is usually made of aluminum, or metal, or stainless steel. It is placed about 8 inches away from a wood fire and the heat from the fire enters the front of the oven and the heat bakes the food that is put on the center shelf of the oven.

If you have access to dry firewood, and if you have a safe dry place to build a fire, then a reflector oven has the following advantages:
  1. Availability: A reflector oven can be used anytime during the day or night, anytime during the year, and when it is raining or snowing.
  2. Flexibility: You can bake an item in a reflector oven at the same time you are cooking a different item in a skillet on top of a grill surface placed above the fire.
  3. Speed: You can begin cooking immediately after you start a fire. You do not have to wait for the wood to burn down into red hot coals. This means the food will be ready to eat sooner when compared to other baking methods.
  4. Size of Fire: When the wood first begins to burn it produces enough heat to bake food. This is a major advantage because you can bake close to a small fire and then put the fire out when you are finished baking.
  5. Amount of Firewood: Since you can begin baking immediately you will consume less firewood to bake a food item.
A traditional reflector oven in shown in the above illustration on the right.
1. The back of the oven is supported off the ground with two posts or with a bracket. This makes the center shelf level to the ground.
2. The top and bottom surfaces of the oven are at a 90 degree angle to each other and they form a triangular shape at the rear of the oven.

However, a modern reflector oven with a flat rectangular back has the following advantages when compared to an oven with a triangular rear:
1. It does not have any wasted space at the rear of the oven.
2. It has more usable cooking space in the middle of the oven.
3. It can maintain a more uniform baking temperature inside the oven from the front to the rear of the oven.


How to Bake Using a Reflector Oven

Type of Food: Any food that can be baked in a conventional oven can be baked in a reflector oven.

Amount of Food: The cooking area inside a reflector oven is a lot smaller than the inside of a conventional oven. Therefore the amount of food (or the size of the food item such as a pizza) will need to fit into the space inside the reflector oven. If you are feeding a group of people then you may need two reflector ovens beside the fire in order to have all the food cooked and ready to serve at approximately the same time.

Color of Baking Pans: Shiny or white pans will reflect heat and therefore the food that makes contact with the surface of the pan will not get as done as the food that is exposed to the air. This means that food cooked in light color pans will be overdone on the top and underdone on the bottom. Black or dark color pans will absorb heat and therefore the food that makes contact with the surface of the pan will cook at approximately the same speed as the food that is exposed to the air. This means that food cooked in dark color pans will be more evenly baked than food cooked in light color pans.

Safety and Oven Mittens: The surface of the reflector oven will be a lot hotter than the air surrounding the outside of the oven. Therefore you must use cooking mittens to move the oven when the oven is hot or you will receive a very serious burn. You will also need oven mittens to remove the baking pan from the cooking shelf of the oven when the food is done.

Cooking Shelf Secure: The cooking shelf must be secure in the middle of the oven. If the shelf is not secure and the oven is accidentally bumped then the shelf could shift and fall down and the food item would be dumped on the ground.

Cooking Shelf Level: The cooking shelf needs to be level from side to side and from front to rear. This is very important if you are baking an item that is made using a batter that can flow. The batter needs to remain level inside the baking pan so that it cooks evenly. If the baking pan is not level then one side of the baking pan will contain more batter and the other side of the pan will contain less batter and the food will not cook evenly. However, if you are baking an item that is relatively firm, such as rolls or biscuits, then they will usually retain their shape even if the cooking shelf is not perfectly level.

Food Placement and Removal: Place the food in the baking pan and put the baking pan on the center shelf of the reflector oven. Then carefully move and position the oven with its open front facing the fire. When the food is done, use oven mittens to carefully move the oven away from the fire and then carefully remove the baking pan from the oven while you are still wearing your oven mittens.

Fire Outdoors on the Ground: If you are cooking outdoors then do not build a fire on a windy day unless you have a safe area to build the fire that is out of the wind. If there is only a very gentle breeze then position the front of the oven towards the campfire and the rear of the oven in the direction from which the breeze is blowing.

Fire Indoors in a Fireplace: Place the reflector oven on top of a stack of bricks or on a concrete block in front of the fireplace. Make sure the oven is stable.

Fire Damage: Do not place the reflector oven too close to the fire because flames may occasionally shoot out from the fire. If the flames make contact with the oven then the flames could damage the oven.

Oven Thermometer 
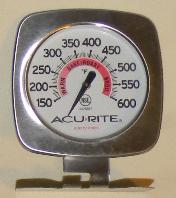
Fire Temperature: The temperature of a fire depends on a variety of factors, such as: the type of wood being burned, how dry the wood is, the diameter of the fire on the ground, the height of the firewood inside the fire, the amount of air circulating around the fire, and how long the fire has been burning. You can place a standard oven thermometer on the center shelf of the reflector oven to determine approximately how hot the fire is at different distances from the fire. Remove the oven thermometer before you put the food in the oven.

Temperature and Distance to Fire: Place the oven somewhere between 6 to 12 inches away from the fire. The temperature inside the oven will be hotter the closer the oven is to the fire. Some foods bake better at lower temperatures, such as 325ºF (163ºC), and other foods bake better at higher temperatures, such as 425ºF (218ºC). However, most foods will bake reasonably well even though the temperature inside the reflector oven may vary continuously up and down from 300ºF to 400ºF (or 149ºC to 204ºC). The important thing is that the food be uniformly cooked and that the food is not burnt on the outside and mushy on the inside.

Temperature Variations: The cooking temperature inside the reflector oven will fluctuate slowly but continuously while the food is cooking even though the oven remains at the same distance from the fire. The cooking temperature may go up or the cooking temperature may go down depending on how well the fire is burning from one minute to the next. If the fire is slowing burning down then the oven cooking temperature will gradually decrease. When more wood is added to the fire then the oven cooking temperature will quickly increase as the new wood catches on fire. Therefore it is relatively challenging to predict the exact amount of time required for a food item to cook inside a reflector oven, except in a very general way, usually within plus or minus a few minutes if the fire is burning relatively consistently. This means you will have to check the food inside the oven every few minutes to see how it is doing.

Heat Inside the Oven From Front to Rear: A reflector oven captures the heat from a fire and it concentrates that heat onto a baking pan in the center of the oven. However, since the front of the oven is closer to the fire it will be a few degrees hotter than the rear of the oven. This will result in the front half of the food becoming done at the front of the oven while the back half of the food in the rear of the oven still needs to cook a little longer. This uneven cooking problem can be resolved by rotating the rear of the baking pan to the front of the oven when the food item is approximately half done. This will help the food to cook more evenly.


Reflector Ovens Available on the Internet

Most portable reflector ovens can be folded relatively flat (approximately 13" by 13" by 0.75") and they usually weigh approximately 1.50 pounds and therefore they could be transported inside a backpack.

Some folding reflector ovens that can be purchased online are shown below.

Reflector Ovens are shown from left to right from the cheapest to the most expensive.

Wiseman Old Scout Reflecto Sproul
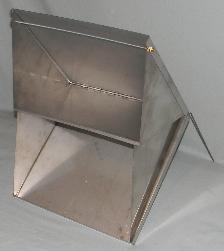
Wiseman: Price $73.94
Material: Stainless Steel
Weight: 108 ounces (6.75 pounds)
Flat: 13.25" x 13.5" x 0.75"
Assembled: H 18.75" x L 13.5" x D 9.5"
Max Bake Pan: H 2.5" x L 13" x D 6.75"
Available: See Link Below
Old Scout: Price $75.00
Material: Aluminum
Weight: 24 ounces (1.5 pounds)
Flat: 12" x 10.5" x 0.5"
Assembled: H 12" x L 10.25" x D 9.75"
Max Bake Pan: H 4" x L 9.5" x D 9.5"
Available: See Link Below
Reflecto: Price $95.48
Material: Aluminum
Weight: 21.5 ounces (1.34 pounds)
Flat: 7.75" x 10.5" x 0.5"
Assembled: H 10.75" x L 10.5" x D 8.75"
Max Bake Pan: H 2.25" x L 10.25" x D 6"
Available on Amazon
Sproul: Price $181.99
Material: Tinned Steel
Weight: 36 ounces (2.25 pounds)
Flat: 13" x 13.25" x 2.5"
Assembled: H 11.5" x L 13.5" x D 7.75"
Max Bake Pan: H 2.75" x L 13" x D 7.5"
Available on Amazon

The above prices were obtained on December 1, 2015 and the above prices include the cost of shipping.
Except for the Wiseman, the other three ovens come with a canvas or nylon storage bag that will hold all the oven parts when the oven is disassembled and folded flat.

The above Assembled dimensions are in the following order: Maximum Height from Top to Bottom, Maximum Length from Left Side to Right Side, Maximum Depth from Front to Rear.
The above Maximum Baking Pan size would be for a pan that touches the center cooking shelf and touches the top of the oven at the rear of the oven (height), and touches the right and left sides of the oven (length), and extends from the rear of the oven to the front of the oven without sticking out past the front of the oven (depth).
The Maximum Baking Pan height could be a little more if the baking pan were moved a short distance forward on the cooking shelf away from the rear of the oven.

Wiseman Reflector Ovens are Available at: http://wisementrading.com/outdoor-cooking/baking/camp-ovens/reflector-oven-fire-oven/
Old Scout Reflector Ovens are Available at: https://www.bdbcanoe.com/camping-campfire-reflector-oven-baking-cooking

More Information About the Above Reflector Ovens

Wiseman Reflector Oven:
Advantages:
1. The oven is made from stainless steel so it should last a lifetime if it is taken care of.
2. It is the least expensive oven currently available online.
Disadvantages:
1. The back of the oven is supported with two very thin metal rods. These two thin metal rods can gradually sink down into the dirt and the baking shelf in the middle of the oven would no longer be level to the ground.
2. It has a pointed back and this is not the most efficient reflector oven design.
3. The cooking shelf is attached to the center of the rear of the oven and this is not a good design because the back part of the cooking shelf comes to a point and it cannot be used to support a baking pan.
4. The cooking area inside the middle of the oven is too small from front to rear to use a standard size cooking pan.
5. The cooking shelf is a solid piece of shiny steel and therefore it will reflect heat away from the bottom of the baking pan that is placed on this shelf. This means the food that touches the bottom of the baking pan will not be as done as the food in the top of the baking pan that makes contact with the hot air inside the oven.
6. The oven weighs 6.75 pounds because it is made of stainless steel. This is between three to five times heavier than the other ovens available online. Because of its weight it would not be a reasonable item to include inside a camping backpack.
7. It is assembled together with a single 14 inch long threaded rod with nuts at both ends of the rod. Remove a nut from one end of the rod, push the end of the rod through four holes in the sides of the oven, and then replace the nut on the end of the threaded rod. This secures the top of the oven to the top corners of the two sides of the oven. Then the baking shelf is lowered down onto the offsets on the inside of each of the two side pieces.
8. The bottom of the oven is not secured to the sides of the oven and when you lift the oven to move it away from the fire then the bottom of the oven can swing down away from the oven. This allows the two side pieces to spread apart at the bottom, and the center baking shelf can then tilt down in the front, and therefore the baking pan can slide out of the oven.
(Note: Wiseman also sells an aluminum oven that is the same size and design as the stainless steel oven but I did not purchase one of the aluminum ovens.)

Old Scout Reflector Oven:
In my opinion, this is the best reflector oven that is currently available online.
Advantages:
1. It has a flat back and this is the most efficient reflector oven design (from an engineering perspective).
2. It is the only reflector oven that will hold a variety of different size baking pans that you can purchase almost anywhere.
3. A standard 8 inch or 9 inch pie pan or cake pan (either round or square) can be placed on the cooking surface inside the oven.
4. The oven has the highest area for baking a loaf of bread. Therefore a standard bread loaf pan (9" x 5" x 2.75") may be used in this oven.
5. The cooking pan is supported on three metal rods and this allows the maximum amount of heat to make contact with the bottom of the baking pan. (Note: From an engineering perspective this is the same basic design as a conventional oven that has grill type shelves in the oven compartment that allow the maximum amount of heat to make contact with the bottom of the baking pan.)
6. The oven is supported by a solid straight surface on both sides of the bottom of the oven (instead of swing out posts on the rear of the oven) and this keeps the oven relatively stable when cooking.
7. At the current time it only costs a little bit more than the cheapest reflector oven currently available online.
Disadvantages:
1. It can be a little bit difficult to assemble because the oven pieces are held together with 12 cotter pins. Each cotter pin only has to be pushed through one hole. There are two things you can do to make the oven easier to asssemble:
a. Use a metal file to remove a very, very small amount of metal from around the tip of each cotter pin to put a very minor gradual taper at the tip of the cotter pin.
b. Use two pliers to permanently spread the two ends of each cotter pin about 1/32 inch apart and this will allow each pin to more easily slide into position but it will still hold the oven pieces securely together.

Reflecto Reflector Oven:
Advantages:
1. It has a flip-open top that allows you to open and close the top of the oven so you can easily check the food to see if it is done. However, you must use cooking mittens to lift the top because it is extremely hot.
2. The flip-open top also allows you to remove the food from the oven when it is done without having to move the position of the oven from in front of the fire.
3. The baking shelf is perforated with large holes and this allows heat to make direct contact with the bottom of the baking pan that the food is on.
Disadvantages:
1. It has a pointed back and this is not the most efficient reflector oven design.
2. The cooking area inside the middle of the oven is too small from front to rear to use a standard size cooking pan.
3. The front of the cooking shelf extends about 1.25 inches out from the front of the oven and the part of the cooking pan that rests on this extension will not receive the same amount of heat as the rest of the cooking pan that is inside the oven compartment.

Sproul Reflector Oven:
Advantages:
1. It has a square back and this is the most efficient reflector oven design (from an engineering perspective).
2. It has a lifting handle on the top of the oven that allows you to more easily move the oven close to the fire and away from the fire.
3. It has a flip-down wire bracket in the back middle of the oven that does of a good job of keeping the oven level when it is being used.
4. It is sold with a food grade aluminum cooking pan. The cooking surface on the inside of the pan is polished aluminum and the exterior of the pan has been blackened to capture the heat from the fire to more evenly cook the food in the pan.
Disadvantages:
1. It can be a little bit difficult to assemble because the oven pieces are held together with two 8.5" long pins. Each pin has to be carefully inserted through five long round openings to complete the assembly process. The oven is made from lightweight tinned steel and you have to be very careful to not bend the oven pieces out of shape as you apply reasonable pressure to each pin to push it through each of the five openings on each side of the oven.
2. The aluminum cooking pan rests on two narrow brackets (1/2 inch wide) on each side of the oven. Therefore you must use the aluminum pan for cooking and you cannot replace it with an ordinary baking pan.
3. The width of the cooking pan is the same as the inside width of the oven and this requires you to hold the back of the oven while you force the pan into the cooking area inside the oven.
4. It is challenging to remove the hot cooking pan from inside the oven because the pan fits snuggly against the inside walls of the oven.
5. The cooking pan is made of thin aluminum and it does not maintain a solid rectangular shape. Instead the four corners of the pan are all twisted slightly up or down from the center of the pan. This means the cooking pan does not rest flat on the two side brackets inside the oven. Since the pan is made of thin flexible aluminum it cannot be twisted into a perfect rectangular shape and then retain that shape for cooking.
6. Since you must use the specially designed aluminum cooking pan that comes with this oven, the reflector oven's folded flat storage size is 2.5 inches thick and this is 1.75 inches more than any other reflector oven currently available. Therefore it will require a lot more of the precious storage space inside a camping backing.
7. It is the most expensive reflector oven currently available online and it costs approximately twice as much as the other models. This means you could buy two of the other reflector ovens for the price of one Sproul reflector oven.

Note: A fifth reflector oven is available at "http://www.rutabaga.com/svante-freden-reflector-oven" but I did not purchase the Swedish made Svante oven because I did not like the basic design of the oven based on the description of the oven and the picture of the oven that was on the seller's website.


How to Build a Reflector Oven

Reflector ovens are usually made of aluminum because it is lightweight and it has a shiny surface that reflects heat well and it is relatively easy to keep clean. However, another option is an oven made from stainless steel. Stainless steel is a lot heavier than aluminum but it is stronger and therefore it will resist bending and denting better than aluminum.

If you wish to build your own metal reflector oven then you should try to build an oven similar to the design of the "Old Scout" Reflector Oven. The "Old Scout" Reflector Oven is the best oven currently available and you could build one from aluminum, sheet metal, or stainless steel. Cut the pieces to the correct size and shape. Next cut slots in the pieces so the oven can be assembled together. Then drill holes in some of the pieces so cotter pins can be used to hold the oven together. Finally grind or buff all the cut edges and holes to make them smooth to avoid injuring yourself on a sharp burr. (Note: Although you could do this project yourself if you purchase all the appropriate materials, and if you have the correct type of metal working tools, I believe that the vast majority of people would be better advised to simply purchase an "Old Scout" Reflector Oven online.)

A reflector oven can also be made from a cardboard box by cutting the cardboard box diagonally from one corner to the opposite corner of the box. The box then needs to be covered on the inside and on the outside with heavy-duty aluminum foil to prevent the cardboard box from catching fire, and to capture the heat from the fire in the center cooking compartment of the box.

The following two websites have instructions for building a reflector oven using a cardboard box and aluminum foil:
http://www.guidesqld.org/Documents/23%20Resource%20Library/Resource%20Library/04.%20Outdoors/07.%20Outdoor%20Cooking/01.%20All%20Ages/Build%20a%20Reflector%20Oven.pdf
http://maineoutdoorliving.blogspot.com/2012/02/make-cardboard-box-reflector-oven.html

The following two websites have instructions for building a camp oven using a cardboard box and aluminum foil (a camp oven is not a reflector oven):
http://shelleyready.com/wp-content/uploads/2015/01/Paperbox-reflector-oven-_2_.pdf
http://www.scoutingaround.com/boy-scouts/camping/78-cardboard-box-oven.html


Conclusion

I strongly recommend the purchase of the "Old Scout" Reflector Oven. It is available online at the following internet store:
https://www.bdbcanoe.com/camping-campfire-reflector-oven-baking-cooking
The above internet store accepts payment by check, money order, debit card, credit card, or Paypal.

The reasons I recommend the "Old Scout" Reflector Oven are listed above when this oven was compared to the other reflector ovens that are currently available online.

Note: I do not receive a commission (or any other type of payment) if you click on any of the links in this article, or if you buy any of the reflector ovens mentioned in this article. The above links are provided solely for your convenience.

Respectfully,
Grandpappy.


Grandpappy's e-mail address is: RobertWayneAtkins@hotmail.com

Home Page Hard Times Survival