


Recommended Electric Grain Grinder and Automatic Bread Maker
Copyright © December 11, 2019 by Robert Wayne Atkins, P.E.
All Rights Reserved.
Introduction
In the USA and in Canada, a variety of additives and artificial preservatives are legally allowed to be included in flour and in bread. However, in Europe the use of additives is almost completely prohibited due to the unhealthy long-term impact of those chemicals.
If you live in the USA or Canada then it is not easy to find bread that does not contain some type of additive, or some type of artificial preservative.
A rancidity study conducted by Larsen in 1988 revealed that rancidity could be detected in some flour as soon as 2 to 14 days after milling. Many studies have shown that after milling the vitamins, unsaturated fatty acids, lipoproteins, lipids, and amino acids in flour gradually begin to degrade.
Bread that is made from flour that is more than 14 days old may not contain the same amount of healthy nutrition as bread that is made from flour that has been freshly ground and that is less than 2 days old.
The best 100% whole wheat flour that is available at a grocery store (or online) is probably already more than 14 days old. The freshest and the best 100% whole wheat bread that is available in a grocery store was most likely made from flour that was more than 14 days old.
Therefore, if you desire to provide the best possible nourishment for your family, then you may wish to consider grinding grain into flour at your home, and baking that flour into bread in your oven or in an electric bread maker.
Electric Grain Grinder
 There are two basic types of grain grinders:
- Manual: If you have the time and the energy then a hand-cranked grain grinder may be a good choice for you. However, manual grain grinders cannot produce a flour with as fine a texture as some electric grain grinders.
- Electric: Electric grain grinders use either metal or stone grinding wheels.
- Metal: Some of the metal grinding wheels will only grind wheat, but some will grind wheat, corn, and beans.
- Stones: Some of the stones are manmade and they contain aluminum and they are not recommended. Some of the more expensive grain grinders use real grinding stones and those grinders are recommended.
Some electric grain grinders have a lot of electronic controls that allow you to make a variety of changes to the way the grain is ground. However, as the number of electronic components increase, the chance of a malfunction in one of the components increases, and therefore the manufacturer's warranty of these grain grinders is not very long.
Some electric grain grinders only have an on/off switch. The texture of the flour from fine to coarse is done by manually adjusting the distance between the grinding stones using a simple manual procedure. The manufacturer's warranty on these grain grinders is frequently a lot longer than the warranty on the sophisticated electric grain grinders with lots of electronic "touch button" controls.
The grain grinders that I currently recommend are made in Germany by KoMo. They make a variety of flakers and grinders, both manual and electric.
KoMo flakers have a 3 year warranty. KoMo grain mills have a 12 year warranty.
The KoMo stone burr grain mills will grind dry grains including hard wheat, soft wheat, amaranth, barley, buckwheat, dent field corn (but not popcorn), kamut, millet, oat groats, quinoa, rice, rye, sorghum, spelt, teff, triticale, and dry beans.
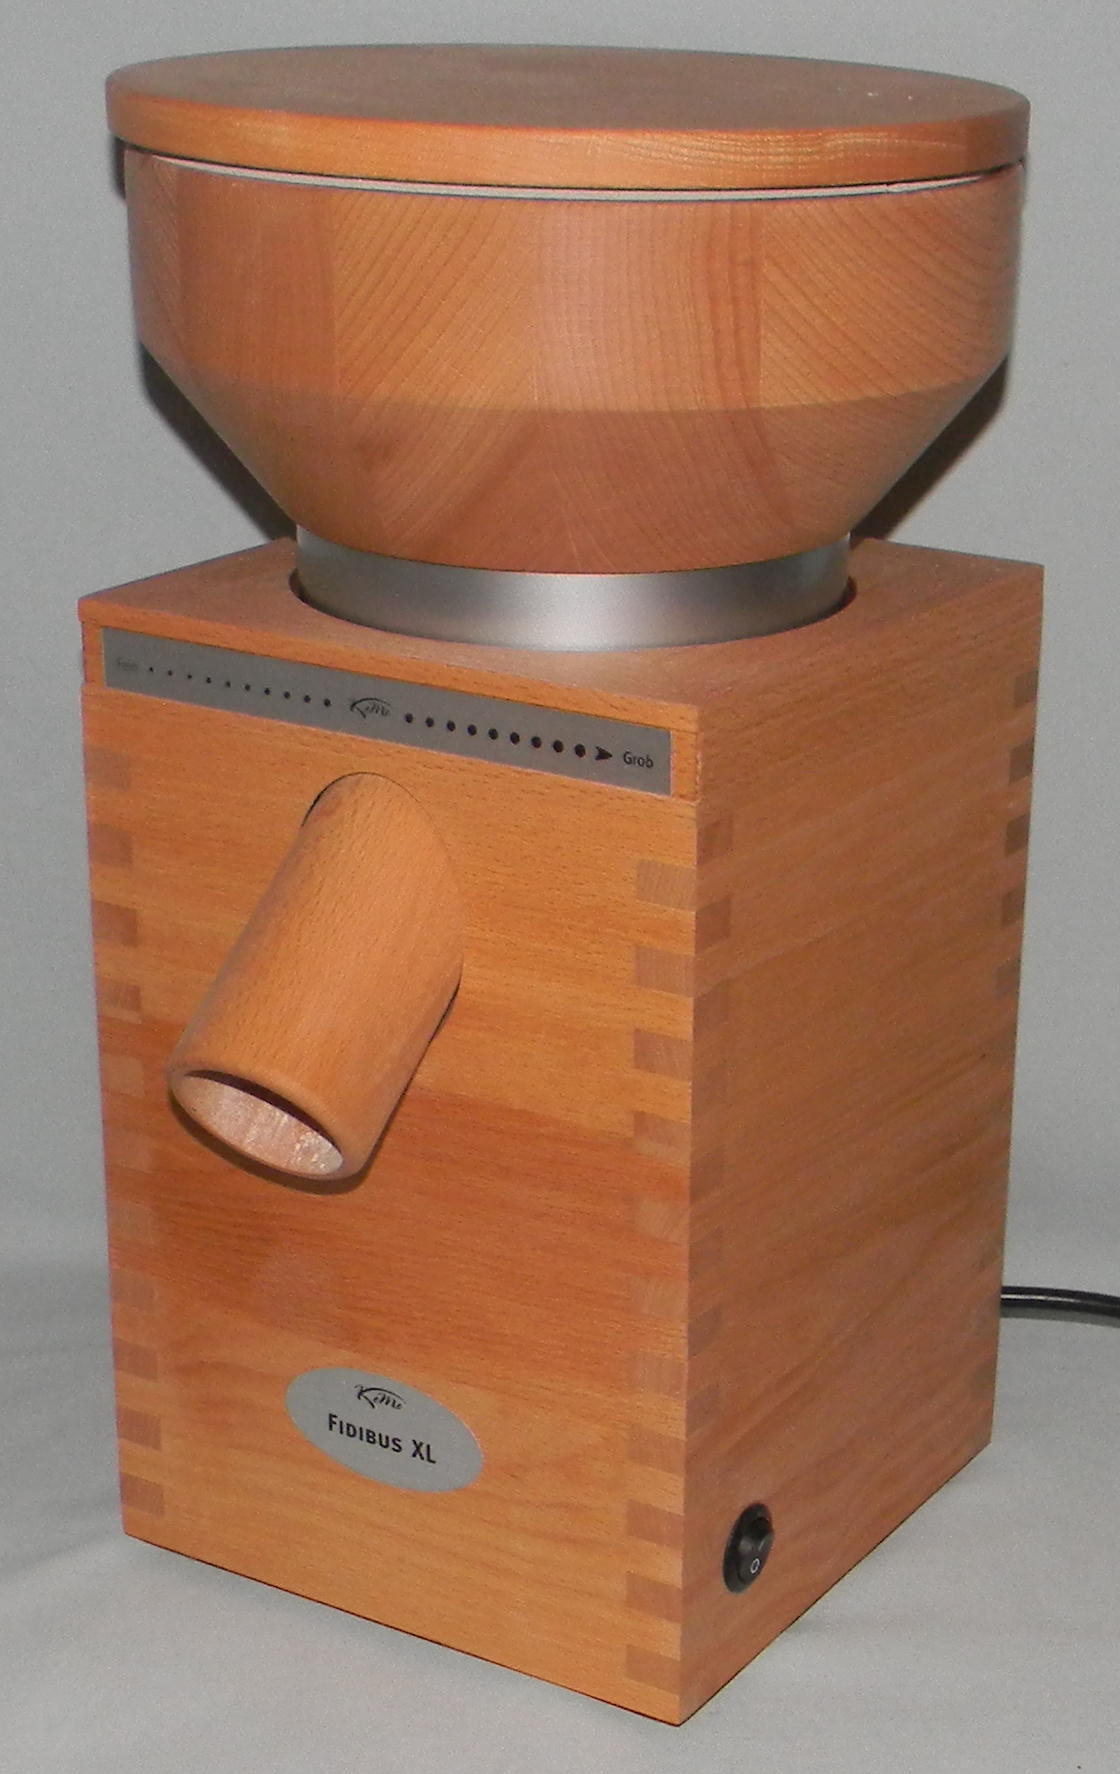
The grain mill I purchased was the KoMo 600 watt Fidibus XL and it is shown in the above picture on the right. Grain is poured into the top of the machine and then the lid is put back in place. Put a very large bowl under the discharge chute on the front of the machine. Turn the machine on using the simple on/off button on the bottom right of the machine. The texture of the ground flour is adjustable by rotating the top of the machine. Rotating clockwise will produce a finer flour. Rotating counter-clockwise will produce a coarser flour. The adjustment can be made when the machine is off or while the machine is running and grinding grain. After you achieve the flour texture you desire then you can stop making adjustments and the machine will continue to produce flour of that texture until you decide to change the adjustment at some time in the future. The grinding stones do not need to be cleaned between uses. However, if you decide to store the machine for an extended period of time then you can follow the simple instructions that come with the machine and clean it for long-term storage.
Since I have approximately 45 years of experience grinding grain on an occasional basis, I realized that the KoMo machines were perfect for grinding grain because the two most important issues about grinding grain into flour are:
- Stone ground flour is preferred to flour ground by metal wheels.
- A fine flour texture produces a tastier loaf of bread that is more easily digested. The electric KoMo machines can produce a very nice fine flour. This yields a loaf of bread with a texture that is similar to what most people have been eating their entire lives, and most people enjoy the taste of the bread, and most people can digest the bread because of its fine texture.
If you are interested in making the healthiest possible bread for your family then you should only grind the amount of grain that you will need for the specific recipe that you intend to bake that day.
The KoMo Fidibus Xl produces approximately twice as much fine flour as grain. Therefore if you need two cups of wheat flour, then put one cup of wheat grain into the top hopper. If you need one-half cup of cornmeal then put one-quarter cup of dent corn into the top hopper. If you need one-quarter cup of oat flour, then put one-eighth cup of oat groats, or "Quaker Steel Cut Oats," into the top hopper.
Automatic Bread Maker
 Before the invention of Bread Makers, fresh bread was baked at home in the oven. Many cooks still use the oven to bake bread. However, preparing the dough, waiting for the dough to rise, kneading the dough, waiting for the dough to rise a second time, and then baking the bread can take several hours of a person's time. If you have this much time then there is nothing wrong with the traditional method of baking bread in an oven.
However, if you do not have very much time, and you would like to have fresh baked bread when you wake up in the morning, or if you desire fresh baked bread for supper when you get home from work, then a bread maker will do all the work for you. All you will need to do is follow the instructions on your bread maker and add the ingredients into the bread pan in the correct order, put the bread pan into the bread maker, set the controls for the type of bread, indicate how long you want the machine to wait before it starts making the bread, and then press the start button.
The bread maker that I currently recommend is the KBS Bread Maker Model MBF-010 and it is shown in the picture on the right. The long white streak down the middle of the machine is the reflection of my camera flash.
The machine is an average price machine and it has a stainless steel exterior. All the controls are on the top of the machine as shown in the picture. Inside the machine is a ceramic bread pan which is very important to me. I did not want a machine with an aluminum bread pan. The only minor issue that I have is that the instruction manual was written by someone who learned English as a second language. Sometimes you have to read a sentence twice to figure out what the sentence means. And the instruction manual only mentions one time on one page that the "Stop/Start/Pause" button does not always work with one touch. To turn the machine off and finish a baking cycle, and reset all the other buttons, you must hold the button down for at least three seconds. Unplugging the machine does not reset the machine. The "Start/Stop/Pause" button must be held down for at least three seconds to reset the machine so the other buttons will work. Then you can either bake another loaf of bread, or set the machine aside until you need it again. After you have started a loaf of bread cooking you can see the countdown timer that shows how long before the bread will be ready by pressing the “Menu” button once and the countdown timer will briefly display the remaining time. The machine has a buzzer to notify you the bread is done. But the buzzer automatically turns itself off and if you are not in hearing distance of the buzzer when it goes off then you have to press the "Menu" button or the "Start/Stop/Pause/" button to see if the bread is done.
Respectfully,
Grandpappy
Grandpappy's e-mail address is: RobertWayneAtkins@hotmail.com