Home Page Hard Times Survival Hard Times Recipes Gourmet Recipes Gardening Tips Firearm Facts Economy Book Reviews
Wilderness Survival Christian Poems Bible & Prophecy Bible Truths Other Information Children Stories Product Links Search Website My Books

How to Hit the Target Bull's-Eye

Copyright © February 2, 2009 by Robert Wayne Atkins, P.E.
All rights reserved and all rights protected under international copyright law.

The information, illustrations, and pictures in this document may not be reproduced or
transmitted in any form without the prior written permission of the author.
If you wish to reference the information in this document then please do so with an "internet link."

Always follow the firearm laws and the hunting laws in your area.


The following article is included in my book: Grandpappy's Survival Manual for Hard Times, Third Edition.


Introduction

This article discusses the following topics in the following sequence on this page.
If you wish you may click on any underlined topic below to jump directly to that topic.
To return to the following list of topics, simply click the [BACK] button at the top of your Internet browser window.
Or you may read this entire article from beginning to end by simply scrolling down this page.
  1. What is a Bull's-Eye ?
  2. Individual Abilities
  3. Hours of Target Practice and the Learning Curve
  4. The Four Standard Shooting Positions
  5. Dry Fire Practice
  6. Breathing and Squeezing the Trigger
  7. Target Practice, Hunting, and Self-Defense
  8. Single-Shot or Semi-Automatic Firearms
  9. Handguns
  10. Rifles
  11. Shotguns
  12. Barrel Length
  13. Bullet Caliber (or Bullet Size)
  14. Distance to the Target
  15. How to Select the Optimum Distance for Your riflescope "Zero" Setting
  16. Riflescopes: The Top and Side Adjustment Controls
  17. How to Properly Center the Cross Hairs Inside Your riflescope
  18. Impact of a Cross Wind
  19. Shooting Up or Down a Hill
  20. Gun Cleaning Kit and Gun Tool Kit
  21. "Lemons" and "Cherries"
  22. Summary and Conclusions

What is a Bull's-Eye ?

Target Bull's-Eye The word "bull's-eye" refers to the small black or red circle in the exact center of a target.

It is possible that this term originated because the size of the flat center target circle was the same average size as the round eye of a bull. However, a real bull's eye is not flat.

On the other hand, according to the "Encyclopedia of Word and Phrase Origins" by Robert Hendrickson (New York, 1997), a more likely origin for the word "bull's-eye" is based on the time and place that modern firearm targets were first introduced into competitive shooting matches. This occurred in England in the early 1800s. At that time in England people frequently placed "bets" on these events, similar to the way people bet on horse races today. The common wager at that time was a flat one crown British coin worth five shillings. This one crown coin was called a bull's-eye. Therefore, it is more likely that the word "bull's-eye," when used in reference to a target's center, originated from the name of the British coin that was in common circulation at that time in world history when rifle targets were first used in competitive shooting matches. If the shooter hit the "bull's-eye" of the target then all the people who bet on that shooter won their bets and they received a coin called a bull's-eye.


Individual Abilities

Hunter Each one of us has unique talents in a variety of different areas. For example, some of us may be excellent golfers, or excellent musicians, or excellent cooks, or excellent mechanics, or excellent jugglers, or excellent managers. But no one is gifted in every possible skill area.

Please keep this in mind if you discover you are an average shooter, or a little below average, or a little above average. Only 2 or 3 people out of one-hundred will be truly excellent shooters. And only two or three people out of one-hundred will be very poor shooters. If you discover you are one of the excellent shooters then don't brag about it. If you discover you are one of the poor shooters then don't become upset about it.

However, the vast majority of us will be average shooters, or perhaps a little above or a little below average. We will be able to frequently hit the target bull's-eye but not with every single shot. Some of our shots will be a short distance away from the center of the target but those shots will still be close enough to the bull's-eye for most practical hunting scenarios.


Hours of Target Practice and the Learning Curve

Golfer Almost everyone could benefit from training in any area in which they are not already familiar. For example, if you have never played golf then a few hours of basic golf lessons could help you to significantly improve your average score on the golf course. However, once you reach your natural "performance plateau" then additional golf lessons will only result in relatively insignificant improvements in your golfing abilities.
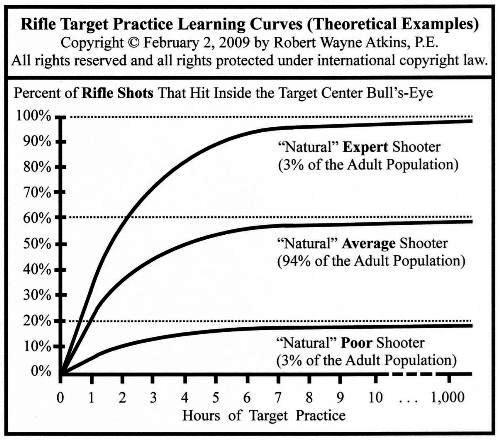
On the other hand, if you really enjoy golf then there is nothing wrong with visiting the golf course every Saturday and spending some time hitting several baskets of golf balls down the driving range. But if you believe that hitting more baskets of golf balls will somehow transform you into a "professional golfer" then you need to seriously reevaluate your mental image of yourself.

This same basic concept applies to firearms training. At some time during his or her life, everyone should enroll in a basic firearms training course and learn the proper safe way to handle firearms and the preferred method of shooting at targets. This basic training will significantly improve your "before" and "after" target scores when shooting at paper targets.

But at some point you will reach a level of diminishing marginal returns. The money you invest in more practice ammunition will have very, very little impact on your average shooting performance. When you reach that point you will need to carefully evaluate your priorities. If you can afford more target practice and you really enjoy shooting at targets, then you should do so, just like a person who enjoys hitting a basket full of golf balls down the driving range. But do not deceive yourself into believing that the additional money you invest in ammunition and training will somehow make a significant difference in your "natural" peak marksmanship ability.

This is illustrated graphical in the three learning curves below.
1. The top curve is for a "natural born expert shooter."
2. The middle curve is for a "natural born average shooter."
3. The bottom curve is for a "natural born poor shooter."

Leaning Curve

When you are evaluating your shooting performance you should compare your current performance to your previous performance and not to someone else's scores. Each of us has our own natural learning curve and as long as we are making noticeable progress along our own learning curve then additional practice is very beneficial. However, everyone eventually reaches his or her own natural learning curve peak (or plateau) and any additional minor improvements will only be achieved after a significant amount of practice. And is most cases that tiny extra performance improvement is not worth the time and money you invest in achieving those marginally better results.

Now let's interpret the "learning curve graph" for each of the three hypothetical shooters:
  1. Expert: If you are a "natural expert shooter" then a few hours of practice may result in your placing 80% to 90% of your shots inside the bull's-eye. And when you miss your bullets will probably be within one-half inch around the outside of the bull's-eye. If you continue to practice you could gradually approach 100% shooting accuracy. The question you would have to ask would be as follows: "Is it worth your time and effort to move those very few misses the short one-half inch required to get them all inside the bull's-eye? Or is the one-half inch already close enough for all your shooting purposes?"
  2. Average: If you are a "natural average shooter" then a few hours of practice could result in your hitting inside the bull's-eye about 50% to 55% of the time. And when you miss your bullets will probably all be grouped somewhere within about two inches around the outside of the bull's-eye. If you continue training for a very long time you might improve your performance by a few percent but you will probably never be able to put more than a maximum of 60% of your shots inside the bull's-eye.
  3. Poor: If you are a "natural poor shooter" then a few hours of practice may improve your shooting performance so you can hit inside the bull's-eye about 10% to 15% of the time. And when you miss your bullets will probably be somewhere within ten or fifteen inches of the bull's-eye. Even if you invest a tremendous amount of money and time in more practice your future peak performance will probably never be higher than 20% of your shots inside the bull's-eye.
Please keep the above in mind if you are told that "practice makes perfect." This is usually the advice of an "expert." The expert remembers how his or her original performance improved with practice and then assumes that all you need to do is practice more so you can achieve the same results. This is an invalid assumption.

However, practice can help you reach your personal "peak" potential. But unless you are a natural born marksman then additional practice will not transform you into an "expert marksman sharpshooter who never misses."

(Note: The above learning curves were not derived from any law enforcement or military data. The above learning curves are based on my own personal observations of watching a variety of different people learn how to shoot over the past 45 years - beginning at Scout Camp in the summers as a teenager. The above learning curves also closely correspond to my own shooting performance because I am only an "average shooter." The peak of each of the above learning curves could easily be increased by moving the target closer to the shooter, or the peak could easily be decreased by moving the target further away from the shooter.)


The Four Standard Shooting Positions

When hunting with a rifle there are four standard positions from which you can shoot your rifle. The following descriptions are for a right handed shooter who pulls the trigger with his or her right forefinger.

In each of the following positions you should begin by turning your body so you are facing somewhere between 30 to 45 degrees to the right of the target. You should then turn your head so you are looking straight at the target.

Support the front of your rifle with your left hand, hold the grip of your rifle stock with your right hand but keep your forefinger off the trigger, and securely plant the butt of your rifle against your right shoulder.

  1. Standing: Place your feet directly below your shoulders with your left foot pointed at the target. You will need to support your hunting rifle using the strength in your arms.
  2. Kneeling: Kneel on your right knee with your lower right leg under you against the ground. Sit gently on your right foot. Bend your left knee at an angle in front of you towards the target and place your left foot flat on the ground and pointed at the target. Support your rifle with your left elbow on your left knee. Your right elbow will have no support.
  3. Sitting: Sit on your rear end with your knees bent in front of you. Support your rifle with your left elbow on your left knee. Depending on the terrain and the elevation to your target you may also be able to put your right elbow on your right knee. Depending on the terrain you may cross your feet in front of you, or you may place your feet flat on the ground depending on which position feels most comfortable to you. Sitting on an average size rock (about 8 inches round) is usually more comfortable than sitting on the ground and it elevates your shooting height the same distance as the height of the rock.
  4. Prone (Lying Down): Lie on the ground on your stomach with the centerline of your body at a 30 to 45 degree angle to the target. Support your rifle with your elbows which should be firmly planted on the ground in front of you.
Shooting Accuracy and
Difficultly Getting into the Shooting Position and
Approximate Height Visibility Over Objects Between You and the Target

PositionAccuracyEase to AssumeVisibility
ProneBestSlowest15 Inches
SittingGoodSlow30 Inches
KneelingOkayFast42 Inches
StandingWorstFastest64 Inches

If you can hold your rifle steady then your accuracy will improve.
  1. If your rifle has a sling then put your left forearm through the sling and wrap it one complete turn around your left forearm so you can use the tension of the sling on the front of the rifle to help hold the rifle steady with your forearm.
  2. It is easier to hold your rifle steady if you can support it with something, such as supporting your elbows on your knees or your elbows on the ground. In most cases the ground is more stable than your knees so the prone position yields the best shot placement accuracy. Sitting allows you to use both knees for support so it is the second best position. Kneeling only uses one knee for support so it is the third best. Standing provides no rifle support so it is the least preferred in terms of accuracy of shot placement.
  3. To improve your shooting results while standing try to find some type of temporary stationary support for your rifle or for your elbows, such as a really huge rock or the side of a tree trunk.
  4. A rifle support tripod or a bipod is also nice but if you have the time to set one of these items up then you could just as easily have assumed a sitting or kneeling firing position, or found a nearby tree to help steady your rifle while aiming at the target.

Dry Fire Practice

The term "dry fire" means that you pull the trigger without any ammunition inside the firearm.

Do not dry fire any type of rimfire rifle or handgun. Rimfire means the gun powder inside the cartridge is ignited by striking the outside rim of the case. The 22 caliber bullet is a rimfire bullet. This includes the 22 short (22S), 22 long (22L), 22 long rifle (22LR), and 22 Winchester Magnum Rimfire (22 WMR).

Do not dry fire any really old or antique firearm. Some of the older weapons have firing mechanisms that could be damaged if you dry fire them. Therefore, the best strategy is to never dry fire a really old firearm.

It is okay to dry fire modern centerfire rifles and handguns. Centerfire means the gun powder inside the cartridge is ignited by striking the primer in the bottom center of the case.

The Army Marksmanship Training Unit begins with three weeks of dry firing before they issue any ammunition.

Dry firing has all the following advantages:
  1. It does not cost anything. It requires no investment in ammunition or "target practice range" fees.
  2. It can be done indoors or outdoors. You do not need to be at a safe "target practice range" to dry fire your weapon.
  3. It eliminates a lot of psychological stress because you know the weapon is empty and that you are just practicing.
  4. It allows you to get to know the feel of the trigger so you can safely practice "squeezing" the trigger in the proper manner.
  5. It allows you to practice keeping the scope cross hairs (or iron sights) on the target as you squeeze the trigger.
  6. It allows you to more rapidly learn proper shooting habits so your initial real target range results using live ammunition will be much better.
After you are really comfortable with your weapon and the way it feels when you "dry fire" it, then you can go to the Shooting Range and practice with live ammunition. However, by that time you should have mastered the basic firearm shooting procedures so the only new variables you will need to master will be the feel and sound of your rifle as it releases its bullet towards the target, and how to gradually improve your accuracy as you fire your weapon at targets placed at different distances.


Breathing and Squeezing the Trigger

The average individual can significantly improve his or her shooting performance by properly mastering the following two variables:
  1. Breathing (Elevation Error): If you breathe while you are shooting then you will be increasing and decreasing the elevation at which your bullets hit the target.
  2. Trigger Pull (Windage Error): If you pull (jerk) the trigger instead of squeezing it then you will pull the firearm to the right (if you are right handed) and your bullets will hit the right side of the target area.
Breathing Through Your Mouth Breathing: As you breathe your lungs and your chest area expands and contracts. If you have your rifle butt against your shoulder then your normal breathing will cause the front muzzle of your rifle to rise and fall. In other words, you will not be able to keep your scope cross hairs properly centered on the target bull's-eye.

There are three schools of thought on the proper time at which to stop breathing and hold your breath while you squeeze the trigger:
1. Take a breath and then hold it with your lungs full of air.
2. Take a breath and release half of it and then hold the rest of it inside your lungs.
3. Take a breath and release all of it and then hold your breath.

If you think about your normal breathing cycle then you will realize that you breathe in, and then you almost immediately breathe out to relax the pressure inside your lungs and expel carbon dioxide. Then your lungs pause for just a moment and then you repeat your normal breathing cycle. You do this 24-hours a day without even thinking about it.

If you practice the first technique above then you will be interrupting your normal breathing cycle and you will feel uncomfortable and you will want to expel the carbon dioxide trapped inside your lungs.

If you practice the second technique above then you will also be interrupting your normal breathing cycle and this forces you to think about the air still trapped inside your lungs when you should be thinking about your target.

If you practice the third technique above then your body will have completed its normal breathing cycle and it will be at the natural short break that it always takes before it begins another cycle. This is the best time to temporarily interrupt your normal breathing cycle because your body will remain calmer longer as you squeeze the trigger.

Therefore, of the above three breathing techniques, the third one is best for maximizing your shooting performance. Take a normal breath, let it all out, and then hold your breath for the three, four, or five seconds required to squeeze the trigger of your rifle. This will help to minimize the elevation error in your shooting performance.

Trigger Pull: Instead of pulling or jerking the trigger quickly, it is better to firmly squeeze the trigger in a slow continuous smooth motion. This will minimize the windage error in your shooting performance.

Some modern firearms have a single-stage trigger pull and some have a two-stage trigger pull.

  1. Single-Stage Trigger Pull: The resistance is uniform over the entire distance required to complete the trigger pull. On some firearms this distance is relatively short but on other firearms it is much longer.
  2. Two-Stage Trigger Pull: The first stage is relatively longer in length and it overcomes less resistance. The second stage is relatively shorter in length and it overcomes more resistance. If you will practice dry firing your weapon you will gradually be able to detect the end of stage one and the beginning of stage two. This will psychologically prepare you for the moment when your weapon fires.
Do not worry about holding your breath while you first learn the feel of your weapon's trigger pull. If you will practice dry firing your weapon you will gradually learn the total distance the trigger needs to be pulled before the firing pin is activated. You should continue to practice dry firing your weapon until you can successfully squeeze the trigger and dry fire your weapon in three or four seconds or less.

Then you should practice dry firing your weapon while holding your scope cross hairs (or iron sights) steady on a target, and holding your breath, and completing the trigger sequence in three or four seconds or less.

If more that four or five seconds pass and you have not completed your trigger pull and you begin to feel uncomfortable holding your breath then you should stop and relax the pressure on your trigger finger and stop the firing sequence. Do not take your sights off the target. Wait a few seconds, take a few normal breaths, relax, and then begin the trigger pull sequence again. If you have done a sufficient amount of dry fire practice then this should only happen to you on rare occasions at the target practice range.

In summary, the following steps will help you maximize your shooting performance:
  1. Wear hearing and eye protection whenever you are shooting a firearm.
  2. Aim the rifle at the target. Acquire the bull's-eye. Relax but do not allow your weapon to drift too far from the bull's-eye.
  3. Take three normal slow breaths.
  4. At the end of the third breath, after you have expelled the air in your lungs, begin to hold your breath and once again quickly center the scope cross hairs on the target bull's-eye.
  5. Slowly but firmly squeeze the trigger with the tip of your finger in a smooth continuous motion. Do not move the rest of your body.
  6. The bullet explosion should come as a "surprise" even though you were expecting it.
If possible, limit your target practice using live ammunition to one-hour or less per day. This will help to minimize shooting fatigue.

If possible, skip at least one-day between practice sessions. This will give you time to properly reflect on and think about your most recent range results. Simple minor things that you could do that may improve your performance will occur to you during this interval between range visits. This will help you maximize your progress along your own natural learning curve.


Target Practice, Hunting, and Self-Defense

The above target practice strategy is very effective for improving your accuracy when shooting at paper targets.

Being able to accurately shoot at paper targets will also improve your shooting results in other situations.

If you are hunting from a "stationary hunting blind" then the above procedure would allow you to properly and accurately place your shot in the animal's kill zone so you could bring some meat home for the family to eat. However, if you are walking and looking for wild game animals then it is possible that you will see the animal at approximately the same time it sees you. In that situation you will need to be able to quickly acquire your target and fire a round at the animal's kill zone before it disappears out of range of your hunting rifle.

The above target shooting instructions are not appropriate for a combat or self-defense scenario when the enemy is shooting back at you. You will need to consult a military or law enforcement training manual to learn the proper way to protect yourself and return fire when engaging a hostile enemy force. However, even in this situation you would still need a riflescope that has been properly centered so you could hit the enemy soldier in his "kill zone."


Single-Shot or Semi-Automatic Firearms

AR-15 Semi-Automatic Rifle Semi-Automatic Pistol

Rifles: Bolt Action, Lever Action, or Semi-Automatic - The difference in accuracy between bolt action, lever action, and semi-automatic rifles is very small. Therefore I would always select a semi-automatic rifle so I could quickly fire a follow-up shot if the current situation required it. The time required to cycle another cartridge into the rifle chamber using either a bolt-action or a lever-action rifle will allow whatever wild game animal you are hunting enough time to completely disappear: (1) into the woods, or (2) over the horizon, or (3) out-of-range of your rifle.

Handguns: Revolver or Semi-Automatic Pistol - For this same reason I would also prefer a semi-automatic pistol instead of a revolver.

Self-Defense: In a self-defense survival situation you will not have the calm rational emotional composure that you now have as you read this paragraph. If you are being shot at and your life is in danger then you really need a weapon that automatically loads another cartridge into the firing chamber so you can continue to shoot back at your adversary until your weapon is empty. You will not be happy with the slow response time of a bolt-action rifle or a lever-action rifle or a revolver in a self-defense situation when your life, or the lives of your family, depends on your ability to neutralize the attacking party. If you have extra magazines then you could also quickly reload a semi-automatic weapon.

Safety: Do not insert a cartridge into the firing chamber of your rifle or handgun until you are actually ready to fire your weapon. In other words, do not store or carry your firearm with a live round in the firing position in front of the firing pin. I know that many firearms are advertised as 7+1, or 11+1, or 15+1, and that the "plus one" means one round in the firing position. But this is a very hazardous way to store or carry your firearm. Everyone who has accidentally shot either themselves or someone else will testify that this is a stupid habit to get into. None of these individuals ever believed that they would make the mistake of accidentally discharging their firearm. Every single one of them honestly and truthfully believed they were going to be extra careful and therefore they would not have an accident. This type of thinking is similar to running with a sharp knife in your hand and somehow believing that you will never, ever stumble or fall and accidentally injure yourself with that knife. Almost everyone can see the stupidity of running with a sharp knife in your hands and a smart person will simply not do it. Therefore, do not load a live round into the firing position inside your weapon until you are actually ready to use your firearm at the target practice range, or you actually need your weapon for emergency self-defense in a life-threatening situation.


Handguns

Pistol and Holster 
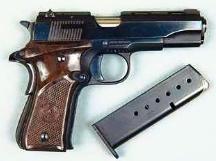
A handgun is only accurate at a very short distance, usually within 25 feet or less to your target (or much closer if you are shooting a relatively large caliber such as the 44 Magnum). If you are an average shooter and you are shooting a handgun in a caliber that you can control then you should be able to hit somewhere on the paper target with most of your shots if you are within twenty-feet of the target. However, do not expect to see a lot of bull's-eyes. Any shots inside the bull's-eye are probably due to random chance, unless you are shooting a very low caliber bullet with negligible recoil.

The primary purpose of a handgun is for personal self-defense at close ranges. Handguns are not designed for normal hunting or combat situations.

Handgun Hunting: On the other hand, if you are simply squirrel hunting, then a 22LR handgun will do the job if you can get close enough to the squirrels to accurately shoot them in the head. My personal experience is that I can usually walk to within pistol distance of squirrels that are on the ground when I am walking in the woods.

Muzzle Blast 
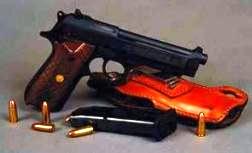
Handgun Laser: It is okay to put a laser under the barrel of a handgun to help you more quickly and accurately aim your handgun at the target. Some individuals recommend against the installation of a laser on a self-defense handgun because it may reveal your location to armed robbers who are invading your home in the middle of the night. However, if you will think about this for a moment, the first time you fire your handgun at night the muzzle blast will instantly show everyone exactly where you are. If you are using your handgun for emergency self-defense in a highly stressful life-threatening situation when criminals are shooting at you, then my opinion is that it would be advantageous to have a laser to quickly assist you in realigning your handgun on the "kill zone" of each attacker so you could end the conflict as quickly as possible with your being the only surviving participant. A laser would allow you to hold your handgun slightly to one side as you fire it. This means you would not need to keep your handgun directly in front of you so you could "aim" down the barrel of your handgun at your assailants. If your attackers were firing at the muzzle blast from your handgun then it is possible that their bullets will miss you out to the side that you are holding your handgun. However, this is just my opinion and you may follow whatever advice you choose. If you install a laser under the barrel of your handgun then you will need to follow the instructions that come with that laser and adjust it so that it points to the approximate location your handgun bullets hit when you fire your handgun at a target. It would probably also be a good idea to practice shooting your handgun while holding it in one hand out to one side of your body so you can develop some skill in this type of shooting using your handgun and your laser to place your bullets in the "kill zone" of the paper target.

Handgun Self-Defense: If the primary purpose of your handgun will be for emergency self-defense, then after you have your handgun sighted on the target you should practice firing "two" rapid shots at the target in the same way that law enforcement officers train. This is referred to as a "double tap." Unfortunately some target practice ranges will not let you rapid fire any type of firearm. The following two web sites have additional information on this defensive shooting technique:
http://en.wikipedia.org/wiki/Double_tap
http://en.wikipedia.org/wiki/Combat_pistol_shooting

Handgun Scope: Do not install a scope on the top of your handgun even if your handgun came with special scope mounts, such as some 44 Magnum revolvers. A handgun does not have the accuracy repeatability of a rifle.


Rifles

A rifle is accurate based on the normal range of the caliber of ammunition that it shoots. The closer you are to the target the easier it is to group your shots very close to the bull's-eye. As you move further away from your target you will notice more variability in where your shots hit the target in relationship to the center of the target.

Do not try to replicate your accuracy with a rifle when you are using your handgun. If you are aware of this from the beginning then you will be less likely to become emotionally upset when you compare the holes in your handgun targets to your rifle targets.


Shotguns

I am not going to discuss shotguns in this short article because:
  1. This article is about hitting the bull's-eye and this is relatively easy to do with a shotgun at its normal effective range.
  2. I believe the average person would be better off with a rifle and a handgun instead of a shotgun.
A shotgun does have valid useful applications in a variety of situations.

However, a rifle is more versatile in a wider variety of situations.

If I could only carry one firearm then that firearm would be a rifle. If I could carry two firearms then I would carry a rifle and a handgun.


Barrel Length

A longer barrel will generally provide better accuracy at greater distances than a shorter barrel. If you are purchasing firearms then this may be an important consideration depending on the options actually available in the type of weapon you desire.

If you live and hunt in an area with relatively flat land where the visibility is easily one-mile in almost every direction then a longer barrel is an absolute necessity.

However, if you will be hunting inside a heavily wooded area most of the time, then a longer barrel will make it more difficult to maneuver your rifle into a firing position when you are surrounded by trees, limbs, bushes, or other shrubbery. In that situation a shorter barrel that has the necessary accuracy at your maximum shooting distance would be preferred.


Bullet Caliber (or Bullet Size)

Two Bullets Firearm caliber is an important consideration. You will need a bullet that is big enough to terminate whatever type of wild game you may be hunting. But a really big caliber is not appropriate for smaller game animals, such as raccoons and opossums. The amount of information currently available on each of the different calibers is truly overwhelming.

Therefore instead of discussing the advantages and disadvantages of every possible caliber, please allow me to simply recommend that you avoid any "special" caliber that can only be fired in a limited number of weapons, and which may not be available at many locations that sell common caliber ammunition.

Instead, if it is possible, you should consider a rifle or handgun in one of the following "common" calibers:
Common Rifle Calibers: 22LR, 223 (5.56x45), 30-30, 7.62x39, 308 (7.62x51), 30-06.
Common Handgun Calibers: 22LR, 38, 357 Magnum, 9mm, 40 S&W, 45 ACP, 44 Magnum.

If you are going to use a semi-automatic firearm then you need to select a caliber that can be fired in a semi-automatic firearm. Some calibers are very common calibers but there are no semi-automatic weapons that fire them.

The rifle caliber should be big enough to be effective against the largest wild game animal in your geographical area. Your local gun shop or gunsmith will be able to assist you in this decision.

If you are in the market for a new rifle then you should make the caliber and rifle decision simultaneously. The rifle should be capable of semi-automatic fire and it should fire a caliber that is lethal against the largest wild game animals in your geographical area.

Recommended Rifle Caliber: If I could only carry one rifle, and if I intended to use that rifle for hunting and self-defense, then I would carry an original design AK-47 that shoots the 7.62x39 ammunition. That caliber is adequate for the largest wild game animal where I live and it is lethal for self-defense purposes at the range at which I can accurately shoot the rifle. However, if I lived in an area with larger wild game animals, or if I lived in an area where the visibility was normally one-half mile or more in almost every direction, then I would definitely upgrade to a 308 (7.62x51) semi-automatic rifle. However, the reason I personally prefer the smaller AK-47 is because:
  1. it is lethal at the average maximum visibility distance in my geographical area, and
  2. the AK-47 rifle is more affordable, and
  3. the AK-47 weighs less and it is less fatiguing to carry on your back, and
  4. 7.62x39 ammunition is a lot cheaper than 308 (7.62x51) ammunition, and
  5. the total weight of fully loaded 7.62x39 magazines is a lot less, and
  6. 7.62x39 ammunition is not regulated in the same manner as 308 ammunition (no 308 steel-core armor-piercing bullets for civilians).
Recommended Handgun Caliber: My first choice of a handgun would be a 40 S&W semi-automatic pistol. Most adults can comfortably grasp this weapon and shoot it accurately because it has an average recoil. It also has a law-enforcement history of being an effective single-shot man stopper.

If my hand were larger and if I could comfortably grip and control the recoil of a larger caliber handgun then I would select the 45 ACP semi-automatic pistol. The reason this would not be my first choice is because I may have a spouse, or teenage or older children, who may not be able to shoot this weapon effectively. If I were incapacitated and someone else in my family had to take my place and defend the family with my handgun then it would be sad if that handgun fired a bullet that person could not shoot accurately.


Distance to the Target

Hunter 
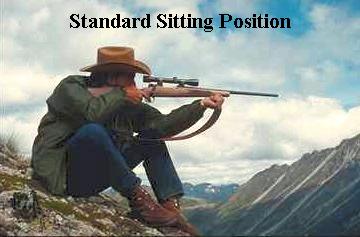
All firearms have a maximum possible distance if the bullet is fired at an angle up into the air and it covers an arched trajectory until it eventually falls to the ground. This distance is an interesting statistic but it is of little practical value because the bullet has lost almost all of its power and energy when it finally makes contact with the ground.

All firearms also have a maximum accurate distance at which they can be consistently relied upon to accurately hit a target. This distance will vary depending on the length of the barrel and the type of ammunition used. When the bullet arrives at the target it will punch a pretty hole in a paper target. However, it should be noted that punching a hole in the center of a piece of paper is not as difficult as penetrating the hide of a wild game animal.

All firearms also have a maximum lethal distance. This is the distance at which the bullet will still have enough remaining lethal force to penetrate and terminate the intended target, such as a deer. This is the distance you need to know for whatever firearms you may possess. This topic will be discussed in more detail later in this article.

Finally, the maximum lethal distance may be reduced depending on the terrain in which you intend to use your firearm. If you are a competition shooter and all your shooting will be at prescribed distances over clear terrain then this will not be an issue. But if you are a hunter then you will need to consider how far a bullet will normally travel before it makes contact with the deer, or a tree trunk, or a limb, or a bush, or anything else that may be between you and your target, such as the deer. In most heavily wooded areas 75 to 100 yards is a normal maximum shooting distance when the leaves are on the trees. However, during the autumn and winter months it is not uncommon for this distance to increase by an additional 25 to 50 yards when all the trees loose their leaves and the visibility significantly improves.

After selecting the appropriate distance for your particular application, then that is the maximum distance at which you should shoot your rifle when hunting wild game animals.


How to Select the Optimum Distance for Your Riflescope "Zero" Setting

Deer There are four factors that will help you determine the best distance to "zero" or set your riflescope cross hairs:
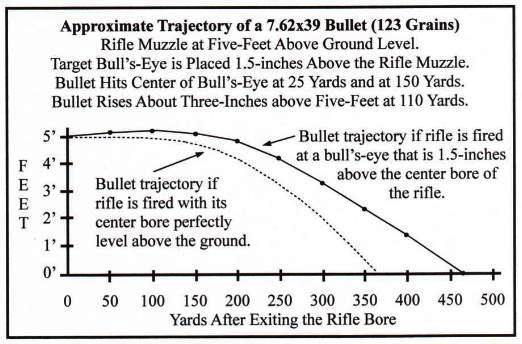
  1. The average line-of-sight visibility distance in the area you will normally be hunting.
  2. The maximum lethal distance of the ammunition you will be using.
  3. The normal trajectory of the ammunition you will be using.
  4. The average accuracy of your hunting rifle.
Visibility: You need to determine the average visible distance over which you will be shooting your rifle.

If you will be shooting across a watermelon field and the visibility is one-half mile in every direction then you can set your scope for the maximum lethal distance of the ammunition you will be using.

On the other hand, if you normally hunt inside a heavily wooded area then it would be very unusual to have a clear shot at a target that is more than 100 yards away. According to the available statistics provided by deer hunters each hunting season, in heavily wooded areas the vast majority of all deer are shot at distances of 100 yards or less.

Lethal Distance: A bullet begins to lose its power (or energy) the instant it emerges from the end of the rifle barrel. The bullet continues to loose energy the further it travels until it eventually hits the ground and comes to a complete stop. When the bullet stops it has lost all of its power or energy. However, long before it comes to a complete stop the bullet will have lost so much of its energy that it will no longer be lethal. In other words, it will no longer have the ability to penetrate an object such as the hide of an animal. The bullet may still have enough energy to sting or bruise the hide of the animal but if it can't penetrate the animal's hide and then continue to penetrate deep enough to kill the animal, then for all practical purposes the bullet has become ineffective even though it may still be in high-speed motion.

To effectively kill a deer, or any other average size game animal, a bullet should have at least 800 foot pounds (ft. lbs.) of remaining kinetic energy when it makes contact with the deer. A 7.62x39 bullet has an average muzzle exit energy of about 1,500 foot pounds and it has about 875 foot pounds of remaining energy at 200 yards, and about 800 foot pounds of energy at 240 yards. Therefore a 7.62x39 bullet would still be considered "lethal" at a distance of approximately 240 yards.

For a quick comparison a 223 (NATO 5.56x45) bullet has a muzzle energy of about 1,200 foot pounds. At 100 yards the 223 still has about 930 foot pounds of remaining energy, and at 150 yards it has about 800 foot pounds of remaining energy. Therefore if you limited your deer hunting with the 223 to 150 yards or less you would still have a lethal hunting rifle.

The 308 (NATO 7.62x51) has a muzzle energy of about 2,500 foot pounds, and at 300 yards it still has about 1,400 foot pounds, and at 600 yards it has about 800 foot pounds of remaining energy. Therefore a 308 has a lethal range of about 600 yards. However most of us are average marksmen and we have trouble hitting anywhere inside a 12-inch diameter circle at 300 yards. Therefore most of us would have to limit our hunting shots to a distance that is considerably less than the maximum lethal range of the 308.

(Note 1 - Minimum Energy: Some references quote 900 foot pounds as the minimum required kinetic energy. Other references quote 1,000 foot pounds. In each case the answer is correct for the type of hunting bullet being recommended. A round nose bullet, or a flat nose bullet, or a wider bullet will require more energy to penetrate an object to the same depth when compared to a pointed bullet. A pointed bullet, or a thinner bullet, will require less energy to penetrate to the same depth. Therefore, there is no single correct answer in this debate since the answer is a function of the design of the bullet. A pointed bullet, such as a 223 or a 7.62x39, only requires about 800 foot pounds for it to be lethal against medium size game animals such as a deer. This entire minimum energy debate also assumes that you hit the deer in its "kill zone.")

(Note 2 - Maximum Energy: Rarely will the topic of too much energy be discussed. However, to be successful a hunting bullet needs to penetrate the hide of the animal and expand inside the animal. It should do as much damage as possible inside the animal or while passing completely through the animal. If the bullet hits the animal's heart then the animal is dead. Period. End of discussion. But an animal's heart is not a big target. And if the bullet just misses the heart then it will destroy lung tissue. The more lung tissue destroyed the quicker the animal will die. But if the bullet still has a tremendous amount of remaining kinetic energy when it makes contact with the animal then it will quickly pass straight through the animal without expanding and exit the opposite side of the animal. If this happens then very little internal damage will be done and the animal can easily escape and you will never find it. The animal will probably die a slow death but there is also a small chance that it may gradually heal and survive. Too much energy is the one disadvantage of the 308 and the 30-06 when hunting medium size game animals at distances of 200 yards or less. For example, the 308 has about 2,100 foot-pounds at 100 yards and about 1,700 foot-pounds at 200 yards. With this much power the pointed bullet could quickly pass completely through a deer, or smaller animal, without stopping and without expanding. Therefore, when you select your rifle caliber you should seriously consider both its maximum and minimum energy at the distances over which you will be hunting. This is one of the reasons the round nose 30-30 is a great deer cartridge for distances of 100 yards or less which is the typical hunting distance in heavily wooded areas.)

You will need to consult a rifle ballistics table to determine the energy of your hunting ammunition at different distances. If you are using an internet search engine then you could type in your bullet caliber and the word ballistics to see a list of the web sites that may have the information you desire.

One web site that has good set of energy ballistics tables for a variety of different calibers and different loads is at the following link:
http://ballistics.ntinnovations.com/OpenLoad.aspx
At the above web site select a caliber listed in the table and then click the word Open on the same line on the left side of the table.

Another web site that has energy ballistics data is at the following link:
http://www.rifleshootermag.com/ballistics/
At the above web site select the caliber from the pull-down menu and then click the gold arrow to the right of the caliber menu.

When you consult a ballistics table make sure you look for the "energy" data in foot-pounds (ft.lbs.) and not the column that has "velocity" data in feet-per-second (fps). Those columns are sometimes side-by-side in the table.

As you consult the different ballistics tables you will notice that they do not all agree because of differences in the bullet weights, the initial powder charge, the type of powder, the rifle barrel length, and a variety of other factors. If you are certain that you will always be using the same exact hunting bullet all the time, then you could simply look that bullet up in one of the tables. However, if there is a chance that you may use different bullets of the same caliber then it would probably be a good idea to copy the ballistic data from several different tables and then use the table that has the lowest numbers to give yourself a margin of safety when hunting. If you are hunting for meat then it doesn't do anyone any good unless you can find the deer after you shoot it so you can bring it home to the food freezer.

After you have determined the distance that your rifle caliber bullet still has at least 800 foot-pounds of remaining energy (for a pointed bullet), then that will be the maximum distance at which you should shoot at wild game animals.

Trajectory: Immediately after the bullet leaves the front muzzle of your rifle the bullet will gradually slow down and begin to make its way towards the ground due to wind resistance and gravity.

If your rifle is perfectly level to the ground then the bullet will travel in a straight line for a short distance and then it will gradually begin its decline towards the ground. This is illustrated in the dotted line trajectory in the illustration below. Since the center line of the rifle bore is perfectly level with the ground, the bullet will not travel above the center line of the rifle after it leaves the rifle barrel.

Bullet Trajectory

If you have your rifle pointed at a very slight angle up into the air then the bullet will travel up into the air for a short distance before it begins to descend towards the ground. In this case the bullet will also not travel above the center line of the bore of your rifle. But if you have your rifle pointed at a slight upward angle then the bullet will travel slightly upwards but not above the center line of your rifle bore. (Remember that you have the center line of your rifle bore pointed slightly upwards into the air.) You could observe this event if you could watch the bullet's trajectory from the side. This would be possible if someone else fired your rifle using "tracer ammunition" and you were standing a safe distance away at a 90-degree angle far off to one side. This is illustrated as the solid line trajectory in the illustration.

Or you could place a series of targets (or large flip chart pages) at 25 yard intervals in a straight line along the bullet's estimated future path and you could then document the trajectory path of your bullet as it passed through each of these thin paper targets on its way to the earth.

Since the bullet is initially traveling upwards for a short distance before it begins its normal descent to the earth, the bullet will in fact pass through the bull's-eye of two targets. It will pass through one bull's-eye while the bullet is rising and it will pass through another target bull's-eye while the bullet is falling. In the illustration for 7.62x39 ammunition this would occur at 25 yards and 150 yards respectively. The bullet would reach a maximum height of about three inches above the rifle barrel at its highest point along its trajectory. But if your targets are placed 1.5 inches above the front muzzle of the rifle then the bullet will only be about 1.5 inches above the target bull's-eye at its maximum trajectory. For a 7.62x39 bullet the maximum bullet trajectory height will occur at a distance of approximately 110 yards from the rifle muzzle. At 175 yards the bullet would be about 1.5 inches below the bull's-eye. By the time the 7.62x39 bullet has reached a distance of 200 yards the bullet will pass through the target at a distance of about 4 inches below the target bull's-eye.

If you had your riflescope set to the above parameters and you were shooting 7.62x39 ammunition, then you could accurately shoot and kill a deer at any distance out to a maximum of 175 yards away without having to worry about estimating the distance to your target or making any elevation corrections on your scope. You could simply line up the scope cross hairs on the center of the proper heart/lung circle of the deer and slowly squeeze the trigger. Regardless of how far away the deer may be your bullet would never travel more than 1.5 inches above or below the cross hairs of your riflescope. For deer hunting this would be an almost certain kill if you used the proper ammunition that was still lethal at 175 yards and there were no other factors, such as a significant cross wind and whether you are shooting up or down a hill at the deer (these topics will be discussed later).

Hunting Rifle Accuracy: Shoot three (or four) shots at a variety of targets placed at 25 yard or 50 yard intervals. In other words, shoot at targets at the following distances: 25 yards, 50 yards, 75 yards, 100 yards, 125 yards, 150 yards, 175 yards, and 200 yards. As you move further away from your target the average circle that you draw around your three or four shot groups on each individual target will gradually increase due to a number of different factors. When the circle reaches a maximum diameter of about four-inches then you should consider that distance to be the normal reliable accuracy of your hunting rifle. In the future you should confine your hunting shots to this distance (or less) whenever possible. You should also record the distance information and the date on each of these practice targets and save them for future reference purposes.

In summary, to determine your maximum effective hunting distance you should use the minimum of the following distances:
  1. The maximum average visibility in your normal hunting area.
  2. The lethal range of your ammunition at which it still has at least 800 foot pounds of remaining kinetic energy (for pointed bullets).
  3. The trajectory of your bullet so that it does not rise or fall more than two-inches during its flight path until it hits your target.
  4. The distance at which your hunting rifle can still group at least three shots into a four-inch diameter circle.
- - - - - - -

Example One: As an example, assume you are hunting deer using 7.62x39 ammunition in a forest area and you have determined the following values:

1. Maximum visibility is 110 yards in the forest.
2. The lethal range of 7.62x39 ammunition is 240 yards.
3. Your rifle has a plus or minus two-inch trajectory out to 175 yards.
4. You can accurately group three shots within a four-inch circle at a maximum distance of 150 yards.

Based on the above numbers you should limit your shots to 150 yards or less over open terrain, or out to the maximum visible distance in the forest which will probably be 110 yards or less. You would leave your scope exactly the way you now have it set up even though you probably will not be using it out to its maximum trajectory range of 175 yards.

- - - - - - -

Example Two: As a second example, assume you are hunting deer using 7.62x39 ammunition in a very lightly populated rural farming area:

1. Maximum visibility is 800 yards in most areas.
2. The lethal range of 7.62x39 ammunition is 240 yards.
3. Your rifle has a plus or minus two-inch trajectory out to 175 yards.
4. You can accurately group three shots within a four-inch circle at a maximum distance of 225 yards.

Based on the above numbers you should limit your shots to 175 yards or less. However, if you memorize the amount of your bullet's drop for distances out past 175 yards then you could shoot out to 225 yards but you would need to aim a little higher for any shots out past 175 yards based on the estimated trajectory for your bullet at that distance.

- - - - - - -

Summary of "Average" Ballistics Data for Three Common Rifle Calibers
When the Rifle Bullet Passes Through the Target Bull's-Eye at a Distance of 25 Yards and
the Target Bull's-eye is 0.5 inches Above the Rifle Muzzle at 25 Yards for the 223 (5.56x45) and
the Target Bull's-eye is 1.5 inches Above the Rifle Muzzle at 25 Yards for the 7.62x39 and 308 (7.62x51).


Rifle CaliberFirst Bull's-eyeSecond Bull's-EyeMaximum TrajectoryMinimum Trajectory800 Foot-Pounds
223 or NATO 5.56x4525 Yards175 Yards+ 1.0 inch at 95 Yards- 1.0 inch at 200 Yards150 Yards
7.62x3925 Yards150 Yards+ 1.5 inches at 110 Yards- 1.5 inches at 175 Yards240 Yards
308 or NATO 7.62x51 25 Yards220 Yards+ 3.0 inches at 125 Yards- 3.0 inches at 260 Yards600 Yards

(Note 1: Depending on which references you consult you will see that the effective "kill zone" on a deer is an imaginary circle that may vary from 8-inches to 12-inches in diameter around the heart/lung area of the deer. Therefore, using this data your bullet could rise and fall a maximum of between four to six inches from center and it would still hit inside the lethal kill zone of a deer. However, smaller game animals, such as a beaver, do not have a "kill zone" this big. Therefore I personally prefer to use the smaller rise and fall of plus and minus two-inches for the trajectory of my hunting bullets. However the ammunition that you use in your hunting rifle may have more ballistic variability than plus and minus two-inches and that may dictate a different logical decision for your particular hunting rifle. This is a personal judgment decision and you may follow whatever advice you prefer.)

(Note 2: You should also consult any good hunting book that shows the cross-section of the insides of a variety of different game animals so you can determine the correct point at which to aim for a quick kill of each animal. This is called shot placement. Shot placement, or hitting the animal in its kill zone, is just as important as selecting a large enough bullet for that particular animal, and hitting the animal with that bullet while the bullet still has enough remaining lethal force to quickly and humanely kill the animal.)


Riflescopes: The Top and Side Adjustment Controls

Human Eye Safety Precaution: Larger caliber rifles generally have more recoil than smaller caliber rifles. If you place your eye too close to the scope then when the rifle fires it will recoil backwards and the scope will move backwards with the rifle and you will get a serious "black eye" or something worse. Therefore always:
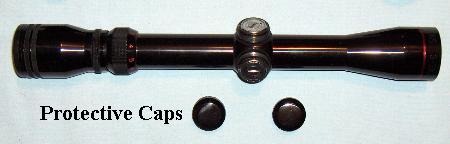
  1. make sure that the butt of your rifle is firmly seated against your shoulder, and
  2. make sure your eye is a "safe" distance away from the scope.
If your rifle is not firmly seated against your shoulder, and if you don't hold that shoulder steady, then your shoulder will travel backwards with your rifle recoil while your eye stays in the same approximate location and you will get hit in the eye with your riflescope. Most of us have to get one serious "black eye" before we appreciate the wisdom of this advice. Perhaps you can be one of those rare individuals who does not have to repeat this particular mistake yourself.

There are two adjustment controls on a riflescope as follows:
riflescope
  1. The Top Adjustment Control Dial (Elevation): Moves the horizontal cross hair that extends from the left to the right side inside your scope. To move the point of bullet impact "Up" rotate the dial counter-clockwise. To move the point of bullet impact "Down" rotate the dial clockwise.
  2. The Side Adjustment Control Dial (Windage): Moves the vertical cross hair that extends from the top to the bottom inside your scope. To move the point of bullet impact "Right" turn the dial counter-clockwise. To move the point of bullet impact "Left" turn the dial clockwise.
Depending on the type of scope, you may first have to remove a cap that covers and protects each of the adjustment dials. If the protective cap is screw mounted then you can remove it by turning it in a counter-clockwise direction. If you rotate the protective cap and nothing happens then the protective cap is simply pressure mounted and it will snap on and off the control dial. Some scopes do not have any protective cap and you can adjust the dial control by simply rotating the control dial immediately without having to first remove any type of protective cap.

Some of the control dials are designed to be moved with your fingers. Other control dials must be moved with some type of tool, or with a coin from your pocket, such as a dime.

Read the instructions that came with your scope to learn the proper way to care for your scope and the proper way to adjust your particular scope. Most centerfire riflescopes are set so that each click on the adjustment dial will move the point of bullet impact 1/4 inch at 100 yards (Type C Scope), or 1/2 inch at 100 yards (Type D Scope). If you are initially adjusting your scope at the recommended range of 25 yards then you will need to keep that in mind. And if you are trying to adjust the point of impact at any distance other than 100 yards then the one-click ratio will not be correct. The following table may help you to better estimate the number of clicks required to move the point of bullet impact on the target.

Bullet Impact Adjustment Per One Click on the Dial
Distance to Target =25 Yards50 Yards100 Yards200 Yards
Type C Scope =1/16 Inch1/8 Inch1/4 Inch1/2 Inch
Type D Scope =1/8 Inch1/4 Inch1/2 Inch1 Inch

If you are closer to the target you will need more clicks to move the point of impact one-inch on the target. But if you are further away from your target you will need fewer clicks to move the point of impact one-inch on the target.

Based on my personal experience I have discovered that it is usually easier to get the point of impact correct in one direction at a time. In other words, I will first get the horizontal point of impact correct so the bullets hit at the correct center height on the target halfway between the top and the bottom of the target. Then I will adjust the left or right vertical point of impact so the bullets hit in the center of the target halfway between the two sides of the paper. However some people prefer to do both adjustments at the same time. Therefore you may follow whichever method you prefer.

(Safety Note: Remember the first and second firearm safety rules which are: (1) Always treat every firearm as if it were loaded and ready to fire, and (2) Never point a firearm at anyone or anything you do not intend to kill or destroy. Therefore never use your riflescope instead of binoculars to look at other hunters. If your rifle were to accidentally discharge then you would be guilty of murder. Even though you might claim that your firearm went off accidentally, you could not claim that you were only "accidentally" looking at the other hunter through your riflescope. You need to remember that what you see through your riflescope is exactly what your rifle is pointed at. Would you want other hunters pointing their rifles and their riflescopes at you? I think not. Therefore don't do it to other hunters.)


How to Properly Center the Cross Hairs Inside Your riflescope

Use proper safety precautions and make sure that your bullets have a proper range backstop and that your bullets will not exit the "shooting range" and injure someone or damage any type of property.

Wear hearing and eye protection whenever you are shooting a firearm.

Zeroing a riflescope is best done on a very calm day when there is no noticeable wind. If your scope is properly centered for "no wind" conditions then you can later adjust your point of aim for different wind conditions as appropriate. "Wind drift" will be discussed later in this article.

Allow the barrel of your rifle to cool down between shots so that you will not be introducing another variable into the sight adjustment process. In other words, wait at least one-minute before you fire another shot through your rifle barrel.

Adjustments to your riflescope should be based on the average of three shots. Fire three bullets at the target and then draw a circle that surrounds all three of the holes in your target. Compute the distance from the center of the circle you just drew to the center of the target bull's-eye in order to determine the average correction necessary to center your shots on the bull's-eye. Do not measure the straight line distance from your circle to the center of the target bull's-eye. Instead you will need to measure two distances. You will need to measure the distance from the center of your circle to the center of the page (from left to right) on a horizontal straight line for your windage adjustment. You will also need to measure the distance from the center of your circle to the center of the page (from top to bottom) on a vertical straight line for your elevation adjustment.

Generally it is much easier to initially center your riflescope at a target that is only 25-yards away. After you can successfully hit the bull's-eye on a target that is 25 yards away then you can gradually move the target out to any distance you prefer and you will only need to make minor adjustments to the cross hairs inside your scope. However, if you start at 100-yards then your original shots may not even be on the paper target and therefore you will have no idea how to make the correct adjustments to your scope cross hairs.

As already discussed above, you should place your paper target so its bull's-eye is approximately one or two inches above the front muzzle of your rifle. For a 223 the bull's-eye should be about 1/2 inch above the rifle muzzle. For a 7.62x39 and a 308 the bull's-eye should be about 1.5 inches above the rifle muzzle. This will allow you to impart a slight upward trajectory to your bullet before it begins its downward descent and it will help you to increase the effective distance at which your rifle will be "accurate." Depending on your "shooting range" this may require you to shoot your rifle from a sitting or prone (lying down) position. If you shoot at a target bull's-eye that is exactly level with the center bore of your rifle (or a little lower) then you will not achieve the optimal zero settings for your riflescope, and you will be disappointed with your future shooting results when hunting any wild game animal that is not at the same exact distance from your scope as your original paper target.

If you are at a "professional target range" and your targets must be attached to a pulley wire to move them out into the firing range, and the bull's-eye of the target will always be approximately level with the center bore of your rifle, then aim for a spot about one or two-inches above the original target's bull's-eye to set your riflescope. You can create a new higher bull's-eye on your target using a black felt tip marking pen. Just draw a new bull's-eye the same diameter as the one on your target but about one or two-inches above the original bull's-eye.

If you are not at a "professional target range" then you can establish a level target range for shooting by stretching a piece of string tightly between two sticks or poles driven into the ground (or between two trees) and then verifying the level of the string using a carpenter's level. This will not yield "surveyor accuracy" but it will be adequate for your simple shooting tests. Place the center of the bull's-eye of each target level with the string and then make sure the front muzzle of your rifle is about one or two inches below the string, or below the target bull's-eye.

After properly securing your riflescope to your rifle there are three methods of centering the cross hairs inside your riflescope:
  1. Trial and error.
  2. Bore sighting.
  3. Using your rifle iron sights (if you have see-through scope mounts).
Trial and error: Simply shoot your rifle three times at the bull's-eye on a really big target that is about 25 yards away. Based on the average position of those three shots on the target you can then adjust the cross hairs inside your scope accordingly. This method is relatively simple and easy to do if you have a really big sheet of paper or a really big cardboard box. However, this method normally does require a slightly higher investment in ammunition because your first few shots may be a really long distance away from the target bull's-eye.

Bore sighting: If your rifle bolt is removable then remove the bolt from your rifle. Properly secure your rifle to some type of bench rest or between two sand bags so your rifle will not move. Then look through the inside rifle bore and mentally remember exactly where on the target the bore is pointed. Then look through your scope and adjust the cross hairs to that approximate position on the target. Then look through the rifle bore and verify that your rifle has not shifted position. If it has, then note the new position that it is pointing to on the target and adjust the scope cross hairs to match. Continue this procedure until the image you see when looking through the inside bore of your rifle is in the center of the cross hairs of your scope. If your rifle does not have a removable bolt then you could invest in a special "bore sighting tool" (collimator) that is placed inside the front muzzle of the rifle and then you adjust the scope cross hairs to match the center of the optical target that extends above the tool in front of your scope. This will put you somewhere on the paper target when you first shoot the rifle. However, in my opinion the first method above is just as good and therefore I suggest that you not invest in a special "bore sighting tool" unless you intend to zero new riflescopes to earn a living.

Rifle Iron Sights and Scope 
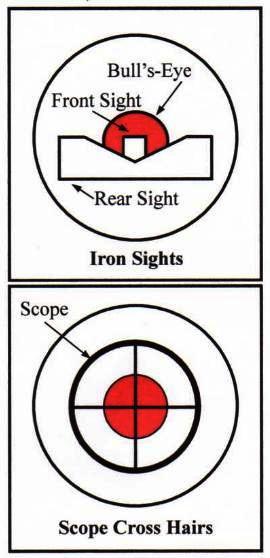
Iron Sights: Most rifles have iron sights permanently attached to the top of the rifle. The design of those iron sights vary somewhat but the most common design is shown in the illustration on the right. Point the rifle at the target and align the top of the front sight so that it is level with the right and left tops of the rear sight as shown in the illustration. Depending on the size of the target bull's-eye and your distance from the target, it may be necessary to align the very bottom of the target bull's-eye with the straight line formed by your front and rear sights. This is necessary because the bull's-eye may appear so small at 100 yards that it is difficult to see and it may be completely covered by your front and rear sights if you try to center those sights on the center of the bull's-eye.

Shoot your rifle three times at a target using your iron sights to determine where the bullet actually makes contact with the target (on the average). If your rifle has adjustable iron sights (either front, or rear, or both) then make the appropriate adjustments following the instructions that came with your rifle until your shots hit the approximate center of the bull's-eye. Make sure your iron sights are properly tightened to your rifle before you continue. Record the date, the yardage, and the words "iron sights" on your paper target along with the make of rifle and the type of ammunition you are using. Save this target for future reference purposes.

If you have "see-through" scope mounts then you can use either your iron sights or your scope depending on the current hunting situation. For example, sometimes there is a light fog early in the morning and some scopes will not provide as good a sight picture as your iron sights.

If you will be purchasing new scope mounts then I personally suggest that you invest in good quality see-through scope mounts. See-through scope mounts will elevate your riflescope approximately one-inch higher than regular scope mounts and therefore you will need to raise your head and your eye about one-inch higher than normal. Individuals who are accustomed to the lower mounts find this uncomfortable and therefore they will try to discourage you from using these types of mounts. You will need to make your own decision about the type of scope mounts that you prefer.

However, almost everyone agrees that higher quality scope mounts are preferred to the cheaper mounts. Price is not the only issue. Look at the number of screw holes in the top surface of one of the scope mounts. If each side of the scope mount has two screw holes then you will have two screws on each side of each mount locking your scope to your scope mount. However, if each side of the scope mount only has a single screw hole then you will only have one screw on each side of each mount locking your scope to your scope mount. If possible, always buy scope mounts with two screw holes on each side of each scope mount. In other words, you would have a total of eight screws locking your scope to your scope mounts instead of four.

See-Through Scope Mounts: Look down your iron sights at the bull's-eye of a target that is 25 yards away and without moving your rifle immediately look through your scope to see where the scope cross hairs are centered. Make a mental note of the image you see. Repeat this process three times (look down your iron sights and then through your scope). Then adjust your scope control knobs the appropriate number of "clicks" to put the scope cross hairs on the center of the target. After you have your scope cross hairs adjusted to match the original sight picture that you see through your iron sights, you will then stop using your iron sights and you will only use your scope. Test fire three shots using your scope. Look at the target and draw a circle around the three holes in the target. Compute the horizontal distance and the vertical distance from the center of the circle you just drew to the center of the target bull's-eye. Adjust your scope cross hairs accordingly.

Fire three more shots and verify the results. Repeat this process until your three shots are reasonably well centered around the bull's-eye using your scope. Then place a new target at 50 yards and fire three shots. Do not worry about the point of impact above the bull's-eye. Only adjust the windage left/right dial to better align the bullet in the center of the target halfway between the left and right edges of the target. Then place a new target at 75 yards and repeat. Record the data for the three shots and only adjust the left/right cross hairs as necessary. Repeat at 100 yards, 125 yards, and 150 yards (if possible). If feasible and possible on your "shooting range" then repeat at 175 yards, 200 yards, 225 yards, and 250 yards. (Note: For most of us distances beyond 100 yards may not be possible on our "shooting range.") Record all the data. Make sure you write the date, the yardage, the make of rifle and scope, and the type of ammunition on each paper target and keep those targets for future reference.

You will probably discover that your bullets hit all the targets at each of the different distances at approximately the same right/left center of the target (assuming a calm day and no noticeable wind). Depending on the ammunition, you may also notice that the bullets were less than three or four inches above the bull's-eye when the targets were closer and less than three or four inches below the bull's-eye when the targets were further out. At some distance the bullets may have dropped 4-inches below the bull's-eye. This is the maximum range for your rifle with the scope originally centered at 25 yards. It will also now be centered at some other distance further out. And you can now successfully hunt medium size wild game animals without having to estimate the exact distance to the target, as long as the animal is anywhere within the lethal accurate range of your rifle. Your shots will hit the animal in its kill zone which is usually an eight-inch circle on medium size game animals, such as deer.

As an example, your hunting rifle may be bull's-eye centered at 25 yards and at 125 yards. It may rise four-inches above the bull's-eye at 85 yards. And it may drop four inches below the bull's-eye at 150 yards. Therefore your effective eight-inch kill zone would be anywhere out to a maximum distance of 150 yards.

A high-power hunting rifle will not work on really small game animals such as rabbits or squirrels. If you are going to hunt rabbits or squirrels with a rifle then I suggest that you use 22LR ammunition and that you get within 25 yards of the animal and shoot it in its head (if your 22LR rifle is that accurate at 25 yards). If you are using a 22LR pistol then you should probably get within 25 feet of the squirrel.


Impact of a Cross Wind

Smoke in the Wind Depending on the direction from which the wind is blowing the wind will have the following impact:
  1. Front or Head Wind: A wind blowing directly into your face will decrease the normal trajectory range of your rifle. Generally, it will not blow your bullet off course by a significant amount.
  2. Rear or Tail Wind: A wind blowing directly from your rear will increase the normal trajectory range of your rifle. Generally, it will not blow your bullet off course by a significant amount.
  3. Side or Cross Wind: A wind blowing from your side will blow your bullet off course. It may also have a minor impact on the trajectory of your bullet. Therefore you will need to understand the impact of a cross wind on your bullet.
Cross Wind: When you are hunting and your shooting distance will be at 100 yards or less, then a 10 mile-per-hour cross wind will drive your bullet off its straight line flight path by one-inch or less. Even if you are shooting at a small game animal with a four-inch kill zone, this amount of drift should not result in your missing the "kill zone" on your target.

If your shot will be more than 100 yards, then you may need to estimate the current wind speed and the wind direction and determine the wind's probable impact on your hunting bullet. The wind will not only blow your bullet sideways but it may also change your bullet's normal trajectory by lifting the bullet up or pushing the bullet down a little bit. As an example, at 200 yards the wind could push your bullet three-inches (or more) off its original center line to the target. This might cause you to miss your target's kill zone and the animal may then escape and die by itself in some lonely place.

Approximate Impact of a 10 mile per hour 90-degree Cross Wind
Bullet Caliber100 Yards200 Yards300 Yards
223 (5.56x45)0.9 Inch3.6 Inches8.5 Inches
7.62x390.8 Inch3.4 Inches8.0 Inches
308 (7.62x51)0.7 Inch3.2 Inches7.5 Inches
30-060.7 Inch3.0 Inches7.0 Inches
---------------------------------------
Average "Rounded"1.0 Inch3.0 Inches8.0 Inches

Note 1: The wind drift data values for each caliber in the above table are the average wind drift numbers from several different ballistic tables from several different sources. There is a lot of variability in wind drift data depending on which ballistics table you consult. For the same caliber these wind drift differences are caused by differences in bullet weight (grains), bullet composition, and bullet shape. However, at 100 yards these differences have a minor impact on wind drift, usually plus or minus 0.2 inches or less for different weight bullets of the same caliber. But at 300 yards the difference can be plus or minus two or three inches for the same caliber. If you will always be shooting the same exact bullet, with the same number of grains, of the same shape, from the same manufacturer, then you should use the wind drift numbers for your bullet instead of the above average table values.

Note 2: If your rifle caliber is not in the above table then consult any good wind ballistics table to determine the wind drift for your bullet based on a ten-mile per hour cross wind blowing at a 90-degree angle to your shot. One web site that has good set of wind drift tables for a variety of different calibers and different loads is at the following link: http://ballistics.ntinnovations.com/OpenLoad.aspx

Note 3: I realize there are slight ballistic differences between a 223 and a NATO 5.56x45 bullet, and also between a 308 and a NATO 7.62x51 bullet. However, for most hunters those differences are not significant. However, if you wish you may consult a ballistics table that has your exact caliber listed and use that data instead of the "average" approximations that are listed above.

The above table contains very little data because most of us can't remember all the necessary statistics required to compensate for shot accuracy under normal hunting conditions when we frequently only have a few seconds to align our rifle on the target and slowly squeeze the trigger. However, most of us can remember two or three numbers and then make adjustments to those numbers as the situation requires. If your hunting rifle has a lethal "kill zone" trajectory of 200 yards or less then you would only need to memorize the 100-yard and 200-yard numbers in the above table for the caliber of bullet you shoot in your hunting rifle.

On the other hand, if you wish to exactly determine the impact of the wind on your bullet then the first thing you would need to know would be an accurate determination of the true wind speed at the exact time you intend to fire your rifle. The second issue would be an accurate measure of the exact angle from which the wind is blowing. The third factor would be that the wind normally does not blow at a constant steady speed but it slows down and speeds up over a very short period of time. The fourth factor would be that trees or other objects on the wind side of the bullet's flight path will change the wind turbulence as the bullet passes those points. These four factors are very difficult to simultaneously correlate accurately when you only have a few seconds in which to make your shot and your adrenalin level is also quite high.

Therefore, if the above factors could be simplified into an easy method for quickly "estimating" the impact of the current wind conditions then you could make a quick decision about your point of aim on the animal's "kill zone circle."

Simple Wind Drift Mathematics:

If the wind is blowing from a 45-degree angle instead of a 90-degree angle then it will result in 75% of the above wind drift values and not 50% even though a 45-degree angle is one-half a 90-degree angle. Therefore, for "practical rough estimates" we can ignore the exact angle at which the wind is blowing and simply use the original 90-degree wind data.

Therefore, memorize the 10 mile per hour wind drift numbers for your rifle at 100 yards, 200 yards, and maybe also at 300 yards. If you believe the wind is about 10 miles per hour then use the table values for your caliber of ammunition exactly the way you have the numbers memorized. But if you believe the wind speed is only about 5 miles per hour then divide those values in half. If you believe the wind speed is 20 miles per hour then multiply those values by two. If you believe the wind speed is 30 miles per hour then multiply those values by three.

After you quickly do the appropriate mental multiplication, then you should align your scope cross hairs that distance away from the center of the animal's "kill zone" into the direction that the wind is blowing from and slowly squeeze the trigger. In other words, if the wind is blowing from your right then aim that distance to the right of the animal's kill zone. If the wind is blowing from your left then aim that distance to the left of the animal's kill zone.

If you will use this simple technique then you can leave your scope "windage" adjustment dial alone and not move it to compensate for a cross wind. It is really nice to be able to always know exactly where your bullet will hit at different distances under no wind conditions. But if you are constantly changing your scope windage and elevation settings then after a short period of time you will have to stop and reset your riflescope back to its original zero. But if you follow the above suggestions then there will be no need to adjust your windage or elevation scope controls and your scope will remain centered the way you originally aligned it.

Grandpappy's Average Wind Drift Values

In the real world there are several problems when you try to be extremely precise with wind drift data:
  1. The wind does not always blow at exactly 90-degrees to your line of fire. A 45-degree cross wind results in a 75% wind drift effect.
  2. It is extremely difficult to accurately estimate fractions of an inch at 100 yards, or 200 yards, or 300 yards.
  3. It is extremely difficult to accurately estimate the exact distance to the target when the target is a wild game animal (because all deer are not the same exact size).
Therefore it would be useful if we could make the intellectual transition from a perfectly controlled wind drift experiment to a practical real world hunting situation. In other words, instead of trying to be precise to within 1/10 of an inch, let's be satisfied if we can get our shot to within approximately one-inch of where it needs to be.

The above wind drift table begins with one of the smallest hunting calibers (.223 caliber) and it continues up to one of the larger calibers (30-06 caliber). From the smallest to the largest caliber the average wind drift distance at 300 yards varies by only 1.5 inches. If you compute the approximate average of the above table values and then round that average to the nearest whole number, then you could easily compute a single wind drift number for each distance and use it for all calibers. Those are the average rounded values on the bottom line of the above table.

Therefore, when I am hunting and there is a 10 mph cross wind, and the target is at 100 yards then I use one-inch, at 200 yards I use three-inches, and at 300-yards I use eight-inches, regardless of the caliber of firearm that I might be using at the time. I then try to roughly guess the wind speed and the distance to the target. Then I quickly adjust my wind drift numbers accordingly. Then I adjust my point of aim to match my quick calculations. This simple quick easy estimate usually works for me. It might also work for you depending on your firearm, the caliber of bullet you hunt with, your ability to estimate distances, and your ability to guess approximate wind speeds.

You should also remember that if you exceed the normal trajectory range of your hunting rifle then you will also need to compensate for the additional trajectory drop of your hunting bullet. When you only have a few seconds to make a decision about your point of aim, this can easily cause you to completely miss the target, or to simple wound the animal and it will die later in a remote lonely area. Therefore, even though there is a lot of literature dedicated to "long range" hunting, my advice is that you should seriously consider limiting your hunting shots to the normal lethal trajectory range of your hunting rifle.

I realize the above "wind drift" simplification is inadequate for anyone who wishes "perfect" shot placement. But most of us only want to be able to reliably hit the game animal in its "kill zone" so we can bring some fresh meat home to the family to enjoy for supper.


Shooting Up or Down a Hill

Deer on Hill 
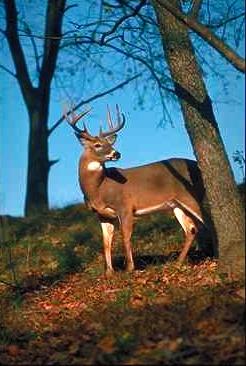
Only a few of your hunting shots will be on perfectly level ground. Most of your shots will be fired at a game animal that is a little above or a little below the center bore of your rifle. If the animal is only five or ten feet above or below you, then you can safely ignore the difference in elevation and simply align your scope cross hairs in the center of the animal's "kill zone" the same as if you were shooting over level ground.

If you are shooting inside the normal trajectory range of your rifle, you can also ignore the difference in elevation. In other words, for a 7.62x39 bullet that is fired at a game animal that is a maximum of 175 yards away, then you can ignore any difference in elevation and align your scope cross hairs as if the animal were on perfectly level ground.

However, if the game animal is more than 10 feet above or below you, and your shot will be further away than the normal plus or minus two-inch (or three-inch) trajectory of your hunting rifle, then aim a little "lower" than normal.

In other words, to compensate for shooting at extended distances either up or down a hill, aim a little "lower" than normal.

To determine approximately how much lower you will need to remember the trajectory data for your rifle cartridge at approximately three-fourths of the visual distance to the animal. This will be a simple quick approximation but you will probably not have the time to do research on the data or consult any type of ballistics chart.

Simple Elevation Mathematics: If you are shooting inside the normal trajectory range of your rifle, then you can ignore any difference in elevation and align your scope cross hairs as if the animal were on perfectly level ground. However, to compensate for shooting at extended distances either up or down a hill outside the normal trajectory range of your rifle, aim a little "lower" than normal.

Finally, if the animal is beyond the lethal kill zone of your hunting rifle, you would need to ask yourself why you are attempting this shot? If the reason is because the animal is not a "meat" animal but it is a "pest" animal that is killing your livestock or eating your crops, then take the shot and hope for the best. Even if you don't get a quick kill, if you can mortally wound the animal then it will probably eventually die due to the loss of blood or other reasons.


Gun Cleaning Kit and Gun Tool Kit

Gun Cleaning Kit 
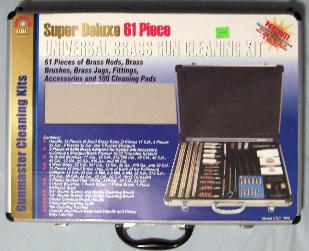
If you can afford it then you should consider investing in a Multiple Purpose Gun Cleaning Kit that could be used to clean almost any type of handgun, rifle, or shotgun, including the smallest BB or pellet rifle up to the 50 caliber BMG (Browning Machine Gun). Although you may not currently have an application for all the gun cleaning accessories in this kit you may discover that you will eventually need many of them if you continue to acquire more firearms during your lifetime. The Universal 61-Piece Gun Cleaning Kit in the picture on the right is available at some WalMarts in their Sporting Goods section for approximately $40.

In addition to a gun cleaning kit you will also need additional gun cleaning patches, gun cleaning solvent, and gun cleaning oil. If you wish you may purchase specially formulated gun cleaning chemicals. However, if you are interested in some alternative gun cleaning solvents and oils then please click on the following link:
Alternative Gun Cleaning Solvent and Gun Cleaning Oil.

You should keep all the special hex wrenches and other firearm adjustment tools that you gradually acquire in a special portable Gun Tool Kit reserved just for your firearms. This gun tool kit could be a cloth bag or a plastic box or a small metal tool box. You can add to this tool kit yourself as you gradually acquire more tools, such as the tools that come with any scope mounts, scopes, or lasers that you mount on your firearms. If you will keep all your special firearm tools together then they will be easy to locate at some future date when you again need them to make an adjustment to your firearm or one of its accessories.

Gunsmith Screwdriver Set Gunsmith Screwdriver Kit 
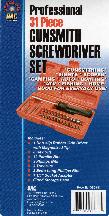
The one additional tool kit that you should seriously consider buying is a special Gunsmith Screwdriver Set that contains all the special screwdrivers, hex wrenches, and other special tools that you will normally need to properly disassemble and reassemble your firearms without damaging them.

The kit illustrated in the first picture on the right (blue storage case) is an old kit and it is no longer available for sale. However, the following two links are to similar Gunsmith Screwdriver Sets that are currently available for sale on the internet:

Pachmayr 30-Piece Professional Gunsmith Screwdriver Set, Price = $26.99 plus shipping
http://www.midwayusa.com/eproductpage.exe/showproduct?saleitemid=776936

B-Square 31-Piece Professional Gunsmith Screwdriver Set, Price = $22.49 plus shipping
http://www.midwayusa.com/eproductpage.exe/showproduct?saleitemid=429783

Please note that if you click on one of the above links I do not earn a commission of any kind. The above links are provided for your convenience only.

Gunsmith Screwdriver Set Added April 7, 2009: The Gunsmith Screwdriver Kit shown in the second picture above right (reddish brown storage case) is now available in the Hunting and Sporting Goods section of some WalMart Stores for approximately $9.97 plus tax. The kit is made in China but it is distributed by DAC in the United States.


"Lemons" and "Cherries"

Lemons Cherries

Your average shooting performance will be directly related to the average accuracy of the firearm you are using.

Several years ago I had the following two rifles and they were both chambered for 22LR ammunition:
  1. A Marlin Model 39AS Lever Action 22LR. It would consistently group three-shots into a five-inch circle at 50 yards.
  2. A Ruger Model 10/22 Semi-Automatic 22LR. It would consistently group three-shots into a one-inch circle at 50 yards.
In both of the above shooting tests I was the only shooter (please remember I am only an "average shooter"). In both cases I was in a standard sitting position without any type of bench rest. The ammunition was exactly the same. The distance and other conditions were also the same because the targets were in the same exact location. I paused, relaxed, and intentionally took my time to aim carefully before firing each shot. The only significant variable was that I was using two different firearms.

I also tried a different brand of 22LR ammunition. The above results did not change.

I do not mean to imply by this that all Ruger Model 10/22 rifles are more accurate than all Marlin Model 39AS rifles. That simply is not true.

What I do mean to imply is that some Ruger Model 10/22 rifles shoot significantly better (or worse) than other Ruger Model 10/22 rifles. And some Marlin Model 39AS rifles shoot significantly better (or worse) than other Marlin Model 39AS rifles. If you find a rifle that has remarkable accuracy then I suggest you never sell it.

The above concept is important because you may be evaluating your average shooting performance based on the results of one rifle. If you have an "average accuracy" rifle then your results will be directly related to your true average shooting ability. But if you have a "poor accuracy" rifle then your poor performance may be due to your rifle and not to your natural born ability as a marksman. The only way you can test this theory is to shoot the same type of ammunition at the same distance in a similar rifle to see if your average accuracy remains approximately the same.

The above concept also applies to other things such as trucks. Occasionally someone will buy a brand new truck and it will be a "lemon" and it will break down during the first 1,000 miles of driving. And someone else will buy the same exact model of truck and it will be a "cherry" and it will last 500,000 miles. Most people understand this concept when it comes to vehicles. But this same exact concept also applies to firearms and to almost every other item that you might purchase, such as DVD players and washing machines. Most of these units will be normal average quality items but a very small number of them will be either lemons or cherries.

In my opinion my particular Marlin was a "lemon" and my particular Ruger was a "cherry."

In most cases when a person discovers that he has a firearm that is not reliable or that it has some other type of problem then he becomes very anxious to sell it or trade it. You should keep this in mind if you see an unbelievable bargain on a firearm. There may be something seriously wrong with that weapon. Before you make a decision to purchase that firearm I strongly suggest that you have it examined by a professional gunsmith, and that you then test fire it to determine its potential accuracy.

In my opinion you should purchase "new" firearms whenever possible. "Used" firearms do have certain advantages but they also have the potential to be very inaccurate or they may need a major repair that is not obvious until after you have fired a few shots through the firearm. However, one important exception would be antique firearms that you purchase for their rarity or investment value or because they are "pre-1899" federal regulation exempt firearms.


Summary and Conclusions

Firearm Safety Rules:

  1. Always treat every firearm as if it were loaded and ready to fire.
  2. Never point a firearm at anyone (including yourself) or anything you do not intend to kill or destroy.
  3. Always point a firearm in a safe direction, such as the ground but not at your foot, when you are moving the firearm from one location to another location.
  4. Never put the open end of the barrel on the ground or in water because if anything gets inside the barrel then the gun may explode when the trigger is pulled.
  5. Never put your finger on the trigger until the sights are aligned on the target.
  6. Never, never pull the trigger unless the firearm is pointed in a safe direction or at your target, including when the firearm is not loaded. Thousands of firearm injuries and accidental deaths could have been avoided if this rule had been followed.
  7. Positively identify your target (no guessing) and everything behind your target the bullet might hit.
  8. Always wear safety glasses when shooting any type of firearm.
  9. Do not put your eye too close to a riflescope or you will receive a black eye, or a more serious injury to your eye.
  10. Always wear some type of hearing protection when shooting any type of firearm.
  11. Do not put your hand, fingers, or face on or against the moving parts of the firearm when pulling the trigger or you will get injured.
  12. If using two hands to hold a semi-automatic pistol then do not put your other hand directly behind the moving slide on top of the pistol because it will seriously injure your other hand. Instead grasp the wrist of the hand that is holding the handgun.
  13. Do not store or carry your firearm with a live round in the firing position in front of the firing pin. Wait until you are actually ready to use your weapon before you insert a live round into the firing chamber. Thousands of firearm injuries and accidental deaths could have been avoided if this rule had been followed.
  14. If your firearm has a safety then the safety should be ON until you are ready to actually pull the trigger.
  15. Do not use your riflescope to look at other hunters. Use binoculars instead.
To improve your accuracy when shooting at paper targets:
  1. Dry fire your weapon without any ammunition in it until you are comfortable with your breathing cycle and your trigger pull.
  2. Wear hearing and eye protection whenever you shoot a firearm.
  3. Aim the rifle at the target. Acquire the bull's-eye. Relax but do not allow your weapon to drift too far from the bull's-eye.
  4. Take three normal slow breaths.
  5. At the end of the third breath, after you have expelled the air in your lungs, begin to hold your breath and once again quickly center the scope cross hairs on the target bull's-eye.
  6. Slowly but firmly squeeze the trigger with the tip of your finger in a smooth continuous motion. Do not move the rest of your body.
  7. The bullet explosion should come as a "surprise" even though you were expecting it.
  8. If possible, limit your target practice using live ammunition to one-hour or less per day to minimize shooting fatigue.
  9. If possible, skip at least one-day between practice sessions to maximize your progress along your own natural learning curve.
To determine the maximum effective hunting distance for your rifle you should use the minimum of the following distances:
  1. The maximum average visibility in your normal hunting area.
  2. The lethal range of your ammunition at which it still has at least 800 foot pounds of remaining kinetic energy (for a pointed bullet).
  3. The trajectory of your bullet so that it does not rise or fall more than two-inches (7.62x39) during its flight path until it hits your target. If you have a rifle caliber other than 7.62x39 then you may use plus or minus four-inches if necessary.
  4. The distance at which your hunting rifle can still group at least three shots into a four-inch diameter circle.
To center the cross hairs on your riflescope:
  1. Place the bull's-eye of all your targets approximately 1.5 inches above the front muzzle of your rifle (use 1/2 inch for a 223).
  2. Wait at least one-minute between shots to allow your rifle barrel time to cool off.
  3. Adjust the cross hairs inside your riflescope so your rifle is zeroed on the bull's-eye at 25 yards.
  4. Only adjust your scope windage dial to center your shots between the left and right edges of the target at 50, 75, and 100 yards.
  5. Continue to move the targets out 25 yards at a time until your shots fall four-inches below the bull's-eye. This is the maximum accurate range of your rifle.
  6. Look at your collection of targets and determine which target, in addition to the one at 25 yards, has your shots grouped equally around the center bull's-eye of your target. Your rifle will also be zeroed at this yardage in addition to 25 yards.
  7. Verify that the maximum trajectory of your bullets did not exceed four inches above or below the bull's-eye over the entire lethal trajectory range of your rifle. (Note: I use plus or minus two-inches for a 7.62x39 bullet but your rifle caliber may require plus or minus four inches.)
Simple wind drift mathematics:

  1. Front or Head Wind: A wind blowing directly into your face will decrease the normal trajectory range of your rifle. Generally, it will not blow your bullet off course by a significant amount.
  2. Rear or Tail Wind: A wind blowing directly from your rear will increase the normal trajectory range of your rifle. Generally, it will not blow your bullet off course by a significant amount.
  3. Side or Cross Wind: Memorize the 10 mile per hour wind drift numbers for your rifle caliber at 100 yards, 200 yards, and maybe also at 300 yards. Or you could use Grandpappy's Universal Average Wind Drift Values as follows:
Grandpappy's Universal Average Wind Drift Values
for a 10 mile per hour 90-degree Cross Wind

Distance =100 Yards200 Yards300 Yards
Wind Drift =1 Inch3 Inches8 Inches

Multiplication Factors for Different Wind Speeds
(mph = Miles Per Hour)

Wind Speed =5 mph10 mph15 mph20 mph25 mph30 mph
Multiply By =0.51.01.52.02.53.0

If you believe the wind is about 10 miles per hour then use the appropriate table values exactly the way you have the numbers memorized. But if you believe the wind speed is only about 5 miles per hour then divide those values in half (or multiply by 0.5). If you believe the wind speed is 20 miles per hour then multiply those values by two. If you believe the wind speed is 30 miles per hour then multiply those values by three. After you quickly do the appropriate mental multiplication, then align your scope cross hairs that distance away from the center of the animal's "kill zone" into the direction that the wind is blowing from and slowly squeeze the trigger. In other words, if the wind is blowing from your right then aim that distance to the right of the animal's kill zone. If the wind is blowing from your left then aim that distance to the left of the animal's kill zone.

Simple elevation mathematics:

If you are shooting inside the normal trajectory range of your rifle, then you can ignore any difference in elevation and align your scope cross hairs as if the animal were on perfectly level ground. However, to compensate for shooting at extended distances either up or down a hill outside the normal trajectory range of your rifle, aim a little "lower" than normal based on the trajectory data for your hunting bullet.

Distance, Trajectory, and Lethal Energy:

Summary of "Average" Ballistics Data for Three Common Rifle Calibers
When the Rifle Bullet Passes Through the Target Bull's-Eye at a Distance of 25 Yards and
the Target Bull's-eye is 0.5 inches Above the Rifle Muzzle at 25 Yards for the 223 (5.56x45) and
the Target Bull's-eye is 1.5 inches Above the Rifle Muzzle at 25 Yards for the 7.62x39 and 308 (7.62x51).


Rifle CaliberFirst Bull's-eyeSecond Bull's-EyeMaximum TrajectoryMinimum Trajectory800 Foot-Pounds
223 or NATO 5.56x4525 Yards175 Yards+ 1.0 inch at 95 Yards- 1.0 inch at 200 Yards150 Yards
7.62x3925 Yards150 Yards+ 1.5 inches at 110 Yards- 1.5 inches at 175 Yards240 Yards
308 or NATO 7.62x51 25 Yards220 Yards+ 3.0 inches at 125 Yards- 3.0 inches at 260 Yards600 Yards

As the distance increases, the number of variables also increases and the chance of your hitting the animal in its kill zone significantly decreases. Therefore, please limit your shots to the maximum accuracy range of your hunting rifle to avoid simply wounding an animal. A wounded animal will almost always escape to its den or bedding area and there it will die a slow and unpleasant death. This is not a quick humane kill and it benefits no one (unless the animal is a "pest" and it needs to be dispatched to protect your livestock or your crops).

Therefore, regardless of your centerfire rifle caliber, if you are shooting at a distance of 150 yards or less then you can probably ignore the trajectory of your bullet, and the differences in elevation to your target, and only make minor adjustments to your point of aim if a cross wind is blowing. Some of the larger centerfire rifle calibers can extend this distance out to approximately 250 yards, more or less. However, unless you are a truly skilled marksman who has a significant amount of practice shooting under a wide variety of elevation and wind conditions at extended ranges beyond 250 yards, then you should probably not attempt shots past 250 yards with your hunting rifle. There are too many variables to compensate for and the probability of your hitting the target in its kill zone at that extended distance is relatively small.

Lemons and Cherries:

Your average shooting performance will be directly related to the average accuracy of the firearm you are using.

Respectfully,
Grandpappy.


Grandpappy's e-mail address is: RobertWayneAtkins@hotmail.com

Home Page Firearm Topics