


How to Build a Safe Temporary Shelter
Copyright © January 3, 2011 by Robert Wayne Atkins, P.E.
Introduction
The design of a "temporary shelter" will vary based on the primary reason you are building the shelter.
- A shelter from the rain or snow: If you are hiking and you are a long ways from your normal shelter and you get caught in a sudden severe rain storm or snow storm, then you may be forced to quickly construct some type of temporary shelter to protect yourself from the elements. In most cases you will have to use whatever you can find at hand in the immediate vicinity and fashion it into some type of shelter that will keep the rain, wind, or snow off you until the bad weather has passed and you can travel again.
- A shelter for one night: If you are on a one night camping expedition then a quickly made primitive shelter may be okay. Or if you are on a long hike towards a distant location and it will take several days to complete your journey, then you will probably build a quick lean-to type shelter at the end of each day to protect your sleeping area from becoming wet with the night dew. Most wilderness survival manuals discuss a wide variety of different shelter options that can be constructed for this purpose.
- A shelter you will live in for several weeks: This type of shelter will need to be rain proof, wind proof, and provide safety from wild animals. This is the type of shelter that will be discussed in this article. It will probably take an adult male between two to three days to build this type of shelter but when you are finished you will have a safe dry place to sleep at night and you will not have to worry about being killed by wild animals while you are asleep. The type of shelter I recommend will also allow you to stand up so it will be an acceptable place to spend rainy days.
Permanent Shelter versus Temporary Shelter
A cabin cave would be a permanent shelter. Complete instructions for building a cabin cave are on my web site. However, since it will take between six to twelve weeks for an adult male to construct a cabin cave, you may need a place to live during its construction.
If you have a mini-van or a regular size van then you could sleep in the rear of the van at night. But if you don't have a van then you will need a "temporary shelter" to help you survive the wilderness environment until your cabin cave is complete.
The reason I cannot recommend a tent as a temporary shelter is because it offers no protection from wild animals. A bear could easily collapse a tent on top of you and then kill you while you are trapped inside the canvas. A pack of wolves could easily and quickly tear a tent to pieces and you would become their next meal. Therefore I suggest that you do not depend on a tent for protection from wild animals.
Area Selection
Your temporary shelter should be on higher ground than the surrounding area. This will help to prevent flooding problems inside your shelter during a period of heavy rains.
Your temporary shelter should be in a heavily wooded area with relatively dense bushes close to the ground so the bushes can hide your shelter naturally. People normally will not enter thick underbrush because it is too difficult to walk through.
Your temporary shelter should also be relatively close to the site where you will build your cabin cave (six to twelve weeks of work). Since you will be living in this temporary shelter for several weeks it should be strong enough so you feel safe from wild animals when you are inside it.
Shelter Size
You should be able to stand upright inside your shelter with your back straight. If you are forced to bend over the entire time you are inside your shelter you will be miserable. Therefore the lowest point on the inside roof of your shelter should be at least six-feet above the ground.
Your temporary shelter needs to be large enough so you can comfortably lie down on your mattress, cot, or sleeping bag. Your bedding should not touch the walls of your shelter to avoid moisture or condensation problems.
The number of people who will be living in your temporary shelter will be a major factor. Each person will need enough space to lie down at night in order to sleep. During the day their cots or mattresses can be stacked to create walking space inside the shelter but the shelter will need to be big enough for each person to stretch out comfortably at night.
The size of your biggest tarp will determine the maximum possible outside rectangular dimensions of your shelter. A clear plastic tarp is ideal for this purpose because it will let light into your shelter. Clear plastic tarps are usually sold in the paint department of stores. A clear plastic tarp that is 4 Mil thick and 10 feet by 25 feet would be ideal as a roof tarp. This tarp could be folded in half so the outside dimensions would then be 10 feet by 12.5 feet and the thickness would then be 8 Mil. However, if you don't have a clear tarp then a regular tarp will do fine.
This big tarp will form the roof of your shelter and it should be in one piece to avoid water leakage problems. The roof tarp should overlap each of the four walls by at least six-inches to help keep the inside of the shelter dry. Therefore, measure your biggest tarp and deduct at least one foot from each direction to determine the maximum outside rectangular dimensions of your shelter. You do not have to build a temporary shelter this big. You can build a smaller shelter if you wish. However, you should not build a temporary shelter bigger than your biggest tarp unless you have a very good reason.
(Note: Tarps are frequently sold based on the cut size of the tarp material before a seam is sewn along all four edges of the tarp. Therefore the finished tarp size may be several inches shorter than the size reported on the tarp label. This is why I recommend that you actually measure the tarp before you begin construction on your shelter.)
It is possible to use two overlapping tarps to cover the roof of your shelter. But if the wind is blowing in the direction towards the seam between the two tarps then the wind will blow rain water under the seam and into your shelter. If you duck tape the two tarps together the entire length of this seam then you can minimize this problem. However, you should be prepared for the duck tape to gradually become loose and for the rain to eventually find its way into your shelter. Therefore, I recommend one big tarp for your roof instead of two smaller tarps.
A Quick Shelter versus a Better Shelter
For safety and basic survival reasons it would be smart to build a temporary shelter as quickly as possible the first day you are in the wilderness in order to provide a relatively safe dry place to sleep the first night. A quick temporary shelter is something an adult male could construct in one working day. It should provide a safe place of refuge from wild animals and from the elements, such as the wind and the rain.
While you are living inside your quick temporary shelter you could begin construction on a better temporary shelter that would take an adult male two or three days to complete. However, while you were working on this improved shelter you could still sleep safely each night inside your quickly made shelter. And all the building materials you used on your quickly made shelter could be used on your better shelter after you have the four corner posts securely buried in the ground. Therefore none of your efforts would have been wasted because you would be able to use all the sticks and tarps from your quick shelter to complete the construction of your better shelter.
On the other hand, if you are completely satisfied with your quick temporary shelter then you would not need to build a better temporary shelter. Instead you could begin work immediately on your cabin cave.
A Quick Temporary Shelter
A quick temporary shelter could be 70% to 90% completed in one day and therefore it would provide a relatively safe dry place to sleep your first night in the wilderness. The next day you could add some more sticks to the walls and to the roof of the shelter to make it safer and more secure.
There are two minor shortcomings of a quick temporary shelter as follows:
- A very small amount of water may leak into the shelter at each of the four corners of the shelter during a rain storm. This leakage can be almost completely eliminated by duck taping the tarps together where the tarp corners overlap on the roof.
- A very small amount of wind may enter the shelter from the corner in which the wind is blowing because it will enter between the two tarps at the overlapping stick area.
The wind and rain problems could be eliminated by hanging tarps on the inside of the shelter under the roof and around all four inside walls. This would be in addition to the tarps on the outside roof of the shelter and the four outside walls. An outside tarp can be draped over the roof and down the outside of one wall. If the tarp is long enough it may cover two opposite walls.
Sketch of a Quick Temporary Shelter
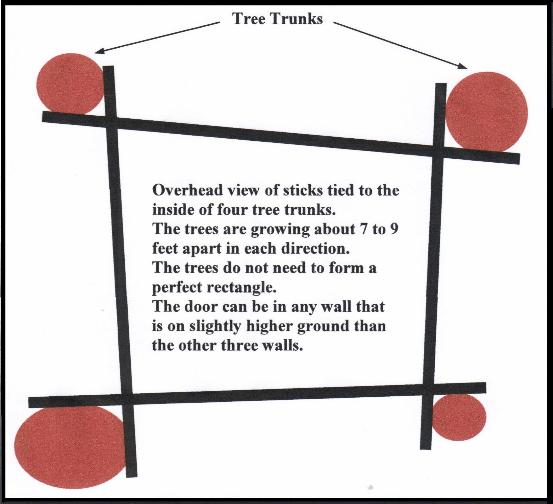
An Overhead View Looking Down on Top of the Shelter
Instructions for Building a Quick Temporary Shelter
Step One: Find a relatively flat area where there are four trees that are growing between seven to nine feet apart with each tree being in the approximate corner of a rectangle. The trees do not need to form a perfect rectangle.
Now follow the instructions for building a "better temporary shelter" which appear below but skip steps two and three in those instructions. Start with step four and continue to follow those instructions all the way through step twenty.
The major differences between a quick shelter and a better shelter are as follows:
- The sticks should be wire tied to the inside surface of the four tree trucks for a quick shelter. However, for the better shelter (discussed below) the sticks should be wire tied to the outside surface of the four corner posts.
- The tarps for a quick shelter will need to start on the roof and then extend all the way down one of the side walls to the ground. If the tarp is long enough it may extend down two opposite side walls of the quick shelter. In other words, all the tarps for a quick shelter will begin on the roof and then drape over and completely cover either one or two of the side walls. The final tarp for a quick shelter will cover the entire roof from the front door wall to the rear wall where rain water will flow off. However, for the better shelter the tarps should be wrapped around the outside of the four walls beginning on the left side of the door. You will use several tarps to wrap the four walls and the last tarp should overlap the first tarp by approximately one-foot (beyond the door opening) for rain and wind protection. The better shelter will then be completed by putting a tarp over the roof of the shelter with all four edges of that tarp hanging a short distance down each of the four walls to prevent rain from entering the shelter.
Sketch of a Better Temporary Shelter
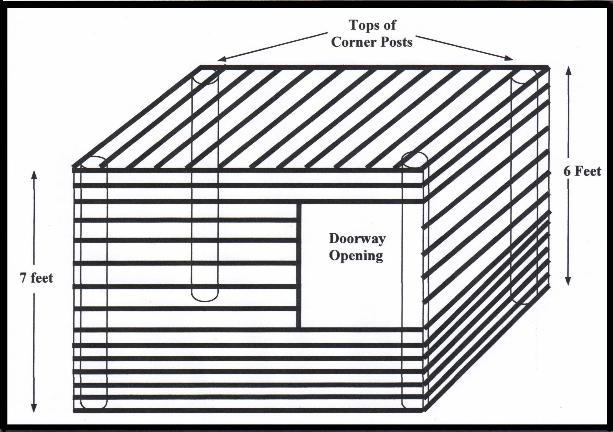
The following sketch shows the four corner posts and a few of the wall and roof sticks
before the shelter is covered with heavy-duty tarps.
If possible build the shelter directly behind a wide evergreen bush or tree.
Instructions for Building a Better Temporary Shelter
- Find a relatively flat area that forms a ground rectangle with sides of approximately 7.5 or 8 or 8.5 feet to provide a reasonable size temporary shelter that you can stand in, sleep in, and relax in on rainy days. Clear the ground of all vegetation and rocks. Level the ground the best you can but leave a very gentle rear slope. In other words, the front wall of your shelter (with the door) should be on ground that is just a little higher than the rear wall of your shelter to help rain water flow away from the rear of the shelter.
- Find four thin pine trees that are relatively straight and approximately four or five inches in diameter. Saw these trees down at ground level and cover the stumps with dirt. Saw off any side branches. Saw two of these trees to a length of 9 feet long and saw two of the trees to a length of 8 feet long. These four trees will be the corner posts for your future shelter. If the pine tree was originally 16 or more feet tall then you may be able to saw two corner posts from one pine tree if the top of the pine tree was at least 4 inches in diameter at your final saw cut. You may leave the bark on these pine trees.
- Dig holes two feet deep in each of the four corner locations of your future shelter and insert one corner post into each of these four holes. The thick end of the post should go into the ground. The two 9 feet tall posts will support the front wall of your shelter and the two 8 feet tall posts will support the rear wall of your shelter. The two front posts will be 7 feet above ground and the two rear posts will be 6 feet above ground. Securely pack the dirt around the bottom of each corner post.
- Use thin wire to tie long straight thick sticks horizontally to the corner posts with the sticks level with the ground. Thin wire is better than twine because wild animals cannot chew through wire. The sticks should be round and relatively smooth with nothing that could tear a hole in your tarps. The sticks should be between 2 to 3 inches in diameter. Do not cut all the sticks from one area. Gather your sticks from a reasonable distance away from your shelter and from several different areas and then carry them to your shelter site. Cut the sticks off at the ground and then cover the stump with dirt and leaves. It would be best if you sawed the sticks off at the ground. Be sure to bury the sawdust. (It is okay to leave the bark on these sticks.)
- You will need about 20 good sticks to begin the construction of the walls and the roof. Use 12 sticks to form the top, middle, and bottom framework of your shelter, or three sticks on each of the four sides equally spaced from the top to the bottom of the shelter. The bottom stick on each wall should make firm contact with the ground to make it more difficult for a wild animal to get into your shelter by crawling under the bottom stick. Use 8 sticks on the roof of your shelter to provide minimal support for your tarps so you can have a place to sleep out of the wind and rain the first night. Continue to add more sticks to the framework until you are satisfied with the safety of your temporary shelter.
- The top front stick should be about 7 feet off the ground at the front entrance to your shelter and level with the tops of the two front corner support posts. The front entrance should be on slightly higher ground than the rear of the shelter for rain water drainage.
- The top rear stick should be about 6 feet off the ground at the rear of the shelter and level with the tops of the two rear corner support posts. You may sleep near the rear wall of the shelter. Or you may sleep in the center of the shelter and move your sleeping cot out of the way during the day.
- The top side sticks on the left and right should slope from the front to the rear at the top of the shelter.
- Starting at the ground level secure more sticks to the support posts with a 2 inch space between the sticks until you reach a height of about 4 feet. Then tie the sticks with about 4 inch spaces between them until your reach the top stick. These sticks will form the inside walls of your shelter and they will help to keep the tarps from blowing into your living area. (Note: If you wish to build a stronger shelter then do not leave any space or gap between the sticks. Each stick should touch the stick below it. This will more than double the amount of work and time required to build your temporary shelter but it will result in a stronger shelter.)
- The reason the sticks should be closer together near the ground is to help protect you from any wild animals that might try to enter your shelter. The sticks should be strong enough to give you plenty of time to grab your gun and shoot the wild animal through the tarp. A tarp with a hole in it is better than a person with teeth bites or claw marks that are bleeding profusely. You can easily patch the tarp hole with some duck tape on both sides of the hole.
- The front side of the shelter should have sticks from the ground up to a height of about 28 inches and then stop. Start again at the top of the front side of the shelter and tie sticks from the top down to about 72 inches off the ground. Tie a strong straight stick vertically up and down at approximately 3 feet from one of the corners to the top and bottom sticks on the front wall. This will form the doorway opening. Now continue tying shorter sticks to the wall side of the doorway from 28" up to the 72" to finish building the front wall.
- Tie some roof support sticks from the front wall to the rear wall at six inch intervals across the top of the shelter to make a roof that will support the roof tarp so it does not sag down when it rains. The sticks need to slope in the direction that the rain will run off the tarp to prevent rain puddles on the roof tarp. In other words, do not tie the sticks across the roof from the left to the right wall. Instead tie the sticks from the front to the rear wall.
- Arrange and secure the wall tarps so you can enter through the front doorway. The wall tarps should be wrapped around the outside of the four walls in a clockwise direction with the first tarp beginning flush with the left side of the door. The wall tarps should extend about one-inch below the lower side of each wall onto the ground and the opposite side of the wall tarp should be draped over the roof of the shelter. You will need several tarps to complete the rectangle around the outside of the four walls. As you work your way around the walls you should overlap the beginning of each new tarp approximately one-foot across the end of the previous tarp for rain and wind protection. The final wall tarp should overlap the very first tarp by approximately one-foot past the door opening for rain and wind protection. Depending on the size of your last wall tarp it may therefore overlap the previous wall tarp by more than one-foot. When you enter and exit the shelter you will need to be able to temporarily move the wall tarp in front of the door out of your way and then secure it back into position.
- If you have a clear transparent tarp then hang it over the top roof support sticks to form a shed type roof from front to rear with a one-foot slope to direct rain water off the rear 6 foot tall end of the shelter. The clear tarp will let a lot of light into your shelter even on a rainy day. If you don't have a clear tarp then a regular tarp will be fine. The top roof tarp should be in one piece and it should hang down over the outside of all the wall tarps to keep rain water out of your shelter. Therefore the size of your biggest tarp will determine the size of your shelter. Sprinkle a few leaves and brown pine needles and tiny twigs on top of this tarp to help it blend in with the surrounding environment.
- Secure the metal grommets on the outside edges of your wall tarps and your roof tarp to the bottom sticks or to stakes driven deep into the ground. The tarps should be snug against the support sticks to prevent a lot of movement during windy weather. Movement will gradually wear holes in your tarps.
- Also secure the metal grommets to the top sticks and the side supports whenever there is a grommet at that particular location. Use all your grommets to better secure your tarps to your shelter.
- You should be able to step over the front doorway sticks to enter and exit your shelter after moving the loose doorway tarp out of your way. Tie the doorway tarp to the sticks when you are inside the shelter and when you are away from the shelter.
- If you wish you can build a small door for your shelter by tying some sticks together and then tying your small door to the top stick on the inside of the shelter. Swing the door up and hold it there to enter and exit. You can tie the door to the bottom of the doorway opening when you are inside the shelter or when you are away from the shelter. Or, if you prefer, you may secure the door to the side of your shelter and then swing the door into the shelter to enter and exit the shelter, similar to a regular door. You should tie the door to the opposite side of the door opening when you are inside your shelter or when you leave your shelter.
- If you wish you can spread a tarp inside the shelter on the ground to make a floor for your shelter. You can tie the grommets on the outside edges of this tarp to a wall stick a short distance up each wall to make the shelter floor relatively waterproof. However, for this to be effective the floor tarp needs to be at least six-inches longer than the inside floor of your shelter in every direction so you will have at least six-inches to tie to each wall.
- Optional: Transplant several thick evergreen bushes about 7 feet tall close to the outside walls of your shelter to help hide your shelter. Randomly space the bushes to create a natural appearance.
Concluding Comments
A temporary shelter will not be acceptable during the cold winter months because you would freeze to death. But during the other months it will provide some safety and a place to sleep at night and a place to rest on rainy days while you are building your cabin cave.
You could put one or more big water buckets or plastic tote containers (black or brown or dark green so it can't easily be seen) at the rear of your shelter to catch rain water when it runs off your shelter roof. However, you must filter the water through a good water filter before drinking it, or cooking with it, or using it to brush your teeth, or washing your dishes. But you can use rain water without filtering to wash your hands, your body, and your clothes. But you should not ingest rain water you collect off your roof tarp until after you have filtered it because your roof tarp will gradually collect a few "bird droppings." If you don't have a good water filter then you will need to boil your water to make it safe to drink.
You could store some of your equipment and supplies inside your temporary shelter to keep them safe and dry. Do not store open food containers in your shelter and do not cook inside your shelter or near your shelter. The smell will attract wild animals and insects.
You could put camo netting on the roof and sides of the shelter to help disguise its appearance. If you don't have camo netting then smear the outside of the tarp walls with dirt to help the walls blend in with nature.
If you use a clear roof tarp then remember to be careful with the use of light inside your shelter after sunset to avoid attracting attention to your shelter. If for some reason you are not exhausted at the end of the work day and you want to stay up after dark, then you could place a regular tarp or some thick blankets across the underside of your roof inside your shelter to block any light from revealing the position of your shelter. You can support this tarp or blankets by weaving the tarp or blankets up over every third roof support stick and then under two roof support sticks until you reach the wall. Then walk outside briefly after dark to verify that you can't see any light from the inside of your shelter.
Please do not sleep on the ground unless you have to. Some better options would be as follows:
- Heavy-Duty Foam Sleeping Pad: These pads are sold in the camping section of many stores. They are about 3/4-inch thick and they roll out on the ground and then you put a sleeping bag on top of it.
- High-Quality Air Mattress: These air mattresses can be purchased in twin, full, and queen sizes. This means you could use your current fitted sheet sets and your current pillow and your blanket.
- Folding Cot: These cots may have a canvas pad to sleep on, or they may have springs and a thin mattress. Normally they are used with a sleeping bag.
- Your Current Mattress: In my opinion this is the best option. Remove the top mattress from your bed and take it with you into the wilderness. You won't need the bottom foundation piece of your mattress set unless you just want to take it with you. Another option would be to buy a 4-foot by 8-foot sheet of plywood and place the plywood on top of your ground tarp inside your temporary shelter. Then put your mattress on top of the piece of plywood. Now you can use your current fitted bed sheets, and pillow, and blankets and you will be able to get some excellent sleep every night. (Note: The piece of plywood will be too long and you will need to saw a short piece off one end of the plywood so the plywood is about four inches longer than your mattress. This will allow two inches of plywood to extend beyond each end of your mattress. The plywood may also be about one-foot narrower than the width of your mattress. You can use the piece you cut off one end of the plywood below the side of your mattress.)
When your cabin cave is almost done you can remove the tarps from your temporary shelter and use them to make your cabin cave watertight. Then you should take down your temporary shelter and leave no trace it was there. You can live inside your cabin cave as you complete the work on it, such as shoveling the dirt against the tarp side walls and the cabin cave roof.
Respectfully,
Grandpappy.
Grandpappy's e-mail address is: RobertWayneAtkins@hotmail.com