


Gill Nets:
The Easy, Efficient Way to Catch Fish for the Frying Pan
(Check Your State and Local Laws for any Restrictions on the Use of Gill Nets.)
Copyright © 2007, 2009 by Robert Wayne Atkins, P.E.
All Rights Reserved.
For Fair Use and Educational Purposes Only.
Introduction
 Generally any type of fish net is an offense to the average recreational sport fisherman. For these individuals fishing is only a hobby or a sport and his fishing success or failure each day does not impact the future survival of his family.
On the other hand, if his family's survival depended not only on his ability to catch fish but also on his ability to do a wide variety of other chores every day, then the average sport fisherman would probably change his opinion about fish nets.
In defense of fish nets it should be noted that:
- At least eight of Jesus' disciples used nets to catch fish: Simon Peter and his brother Andrew, James and John the sons of Zebedee, Thomas (called Didymus), Nathanael from Cana in Galilee, and two other disciples not specifically named (Matthew 4:15-22 and John 21:1-3).
- Jesus approved of the use of fish nets (John 21:8-13, Matthew 15:35-39, and John 6:10-13).
- Jesus gave His disciples specific instructions on how to use fish nets to catch the maximum number of fish (Luke 5:4-7 and John 21:4-6).
Therefore, if Jesus approved of the use of fish nets, then perhaps we should not be too quick to criticize them.
Gill Net Basics
There are a lot of different types and designs of fish nets. This article will only discuss one type of fish net that is called a "Gill Net."
Gill Nets have been the subject of several different research studies in a variety of states including Florida, Georgia, Kentucky, Louisiana, Michigan, Mississippi, Oklahoma, Texas, Virginia, Washington, and Canada. These studies date back to the 1970s. These studies include tests using both monofilament nets and nylon nets, in a variety of different mesh sizes, in side-by-side comparisons that were conducted during all twelve months of the year. The average results from these different studies have been consolidated and included in the test result summaries that appear below.
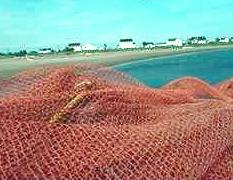
Applications: Gill nets may be used in either fresh water or salt water.
Mesh Size: Nets are classified based on the size of the mesh. The mesh opening is formed into a square and the length of any one side of the square is referred to as the size of the mesh.
The size of the mesh will determine the size of the fish caught in the net. For example, an average size mesh will allow smaller fish to swim through the net. Larger fish will not be able to enter the mesh. A fish of the proper average size will be able to push its head through the net but it fins will prevent it from swimming through the net. When it tries to back out of the net the fish will get caught by its gills and the fish will be trapped.
Tests conducted on different mesh sizes yielded the following results:
- Mesh sizes of 1 inch or less capture too many small fish that are not big enough to eat. This is wasteful because these small fish will not have the opportunity to grow into a size that would provide a "good meal."
- Mesh sizes of 2 inches or more allow too many average size good quality edible fish to escape. However, if you are only interested in the larger, longer, heavier fish then this larger mesh size is more effective for capturing these bigger fish.
- For the average fish, the most efficient mesh size is between 1 1/2 inches to 1 5/8 inches (3.8 cm to 4.1 cm). This size mesh will catch the maximum number of fish of average edible size, plus a reasonable number of larger fish. It will also catch more total pounds of edible fish each day.
Gill Net Dimensions: The length and width of your Gill Net should be based on where you intend to use your net. If you will be using your net in a gentle flowing river or stream, and the stream is only 15 feet across and only three feet deep, then a 12-foot by 4-foot Gill Net would work well. But if you are using your net in a huge lake (or other body of water) that is 15 or more feet deep, then a 50-foot by 10-foot Gill Net would be a better choice.
Harvesting: Several fish can be caught during one day with a Gill Net. Therefore, you should check your Gill Net at least once per day and remove the fish and then reset the net. If you catch more fish than your family can eat in one day, then you should not reset your net until your family has consumed all the fish you have already caught. However, if you have the means to preserve your catch of fresh fish for future consumption, then you may reset your net immediately.
Cleaning: Nets cleaned of debris once each day are twice as efficient as nets that are only cleaned once every two days.
Location: Fish are somewhat territorial. Therefore when your daily catch starts to decline then it is time to move your net to a new location.
Storage: When you are not using your Gill Net you should store it inside a plastic bucket, or a plastic container, or a Ziplock Freezer bag. Punch several small holes in the storage device so moisture can gradually drain out and evaporate, and the net can gradually dry out.
Gill Net Material
Gill Nets may be made from two basic types of fishing line: monofilament or nylon.
Some commercial fishermen will only use nets made from one or the other of these materials. Their choice is based on their past experience in their specific fishing region and the type of fish in that region. If you know any of these experienced commercial fishermen then you should ask them for their advice on this topic. Most of these fishermen will probably be happy to share their knowledge with you. However, I suggest that you speak to at least two or three different fishermen to get a better idea of what works best for the average fishermen in your area.
If you do not know any commercial fishermen then the following advantages and disadvantages of the different types of fishing nets may help you to make the best choice for your particular future application:
Monofilament nets have the following advantages:
- They can be set and retrieved faster.
- They experience fewer tangle problems.
- On the average, they incur less damage than a nylon net.
- They do not adhere to twigs, sticks, or weeds and therefore these items may be more easily removed from the net.
- A monofilament net is much easier to clean than a nylon net.
- Fish may be removed faster and easier from a monofilament net.
- They are clear and they can't be seen by the fish. Therefore they catch more fish during the day and at twilight.
- They catch more different types of fish.
- They catch more total fish of the same type.
- On the average, a monofilament net will catch twice as many pounds of fish as a nylon net.
Monofilament nets have the following disadvantages:
- They are more expensive than nylon nets.
- They are not as flexible as nylon nets.
- The mesh does not stick to the fish as easily as nylon nets. Therefore it is possible for a fish to more easily escape from the net if it is not entangled in some other way in the net.
- In the dark of night a monofilament net has the same efficiency as a nylon net.
Nylon nets have the following advantages:
- They are usually less expensive than monofilament nets.
- They are more flexible and therefore they more easily cling to the fish.
- They will gradually become stained the same color as the water in which they are set. This will gradually make them more difficult to see. Therefore, do not try to wash the water stains off a nylon net.
Nylon nets have the following disadvantages:
- In addition to fish, nylon nets also more easily cling to everything else, including all types of sticks, twigs, and weeds. Therefore, nylon nets are very difficult to clean.
- It is more difficult to remove fish from a nylon net.
- Nylon nets tangle up more easily and they are more difficult to untangle.
The State of Louisiana conducted a two-year test on Gill Nets that ended in 1981. They tested both monofilament nets and nylon nets in a variety of different mesh sizes. The different nets were sewn together side-by-side and they were used in the same waters at exactly the same time. Most species of fish could be caught by either net. However, thirteen different species of fish could only be caught in the monofilament webbing. And four species of fish could only be caught in the nylon webbing. Overall the most efficient mesh size for both monofilament nets and nylon nets was 1 5/8 inch (approximately 4 cm).
Therefore, unless I had a very good reason to use a nylon net, then I would personally prefer to have a Gill Net made from monofilament line instead of nylon line. The reason is because monofilament line is more versatile, and it will capture more different types of fish, and it will capture more total pounds of fish each day.
Gill Net Construction
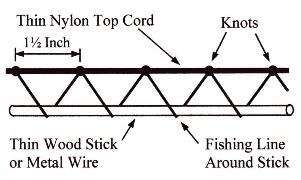
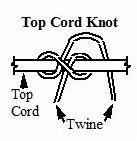
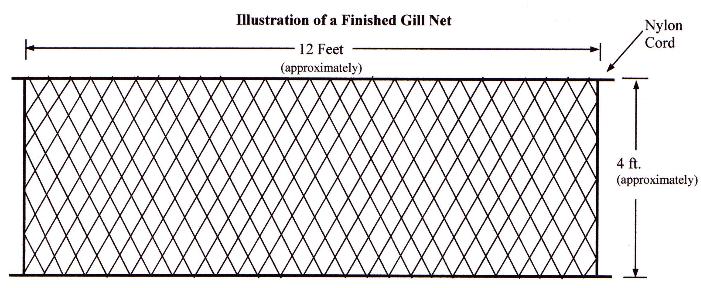
- Use braided nylon cord or braided polypropylene cord or parachute cord for the top support line of the Gill Net. This "Top Cord" should be between 1/8-inch to 3/16-inch in diameter. The length will depend on how big a Gill Net you wish to construct. The Gill Net in the illustration below has a 13-foot long "Top Cord."
- Use medium or heavy weight fishing line for the mesh. The weight of the fishing line should be based on:
- The maximum size fish normally caught in your area (the weight of one fish).
- The size or total square footage of your Gill Net (the total number of fish that will be captured each day).
10-pound to 15-pound fishing line is adequate for smaller nets (12-feet by 4-feet) and average size fish (one or two-pound fish).
20-pound to 30-pound fishing line will be needed for larger nets (25 feet by 8-feet) and larger size fish (three pound or larger fish).
If you will be using your Gill Net in a variety of different areas to catch a variety of different types of fish then a 25-pound line is a good choice.
- For a 12-foot long net, cut a 26-foot long piece of fishing line. This will be used to tie your top row of Gill Net diagonals.
- Tie the fishing line into a mesh pattern going from left-to-right to the thin nylon top cord at 1.5-inch intervals (4 cm) with a 60-degree angle going down to a temporary support stick and a 60-degree angle going back up to the thin nylon top cord with an up and down length of approximately 1.5-inch in each direction. (Note: Some sources recommend tying the line from right-to-left instead of left-to-right. Depending on whether you are right-handed or left-handed, you may do it the way that is most comfortable for you.) The long wood stick or piece of wire will keep the fishing line from becoming tangled. Tie the fishing line to the thin nylon top cord. Continue looping the fishing line around the wood stick and tying the fishing line to the thin nylon top cord until you reach the right end of your Gill Net. Then tie the fishing line to a straight piece of nylon cord that will run from the top to the bottom of the Gill Net (see the illustration of a finished Gill Net in the middle of the page below).
Note: Instead of two thin wood sticks you could use two plastic water pipes. The Top Cord should be lying flat against the pipe. The equation for the circumference of a circle is C = (3.1416) X (diameter). A one-inch outside diameter pipe will have a circumference of approximately 3.14-inches which will yield a finished square mesh size of approximately 1.57 inches or a little less than 1 5/8 inches. A 1.25-inch outside diameter pipe will yield a square mesh of approximately 2-inches. A 1.5-inch outside diameter pipe will yield a square mesh of approximately 2 3/8 inches. One side of the square mesh will be approximately equal to one-half the circumference around the outside of the pipe.
- Cut another 26-foot long piece of fishing line. This will form your second row of Gill Net diagonals. You will need a second wood stick or piece of wire to hold the bottom of this piece of fishing line stable just like you did on the top row of fishing line diagonals. Tie the fishing line to the bottom of each loop of the top fishing line with a knot, then loop around the bottom stick, and repeat until you reach the end of your Gill Net. At this time you can remove the upper stick and use it for your next row of diagonals.
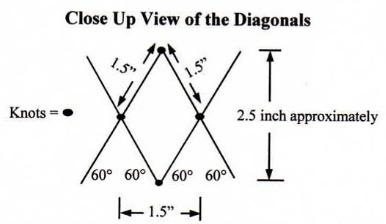

- The interior mesh diagonals will be two sizes. The shorter diagonal (side to side) will be approximately 1.5-inches (4 cm) wide, and the longer diagonal (top to bottom) will be approximately 2.5-inches (6.3 cm) long. However, this net would be called a 1.5-inch mesh (4 cm) because the mesh could be stretched into a 1.5-inch square. To create this finished pattern, tie a knot every 1.5-inches. The size of the opening should be based on the average size of the head of the fish in your area. The head of the fish should be able to enter the net up to a point past its gills. However, the body of the fish should not be able to pass completely through the opening in the net. If the fish in your area are larger than normal, then you should increase the size of the diagonals by tying the individual knots further apart than 1.5-inches, such as 1.75-inches, or 2-inches, or 2.25 inches, or 2.5-inches (4.4 cm to 6.3 cm).
- Cut a second long piece of thin nylon cord about 13-foot long and tie it to bottom of the mesh diagonals so it can be used to anchor the Gill Net to the bottom of the river after it is placed in the water. Remove and discard the two wood sticks that were used to keep the fishing line from becoming tangled during construction. Your finished Gill Net should look something like the illustration below. (Note: The length and width are approximate sizes and your net may be bigger or a little smaller than the illustration.)
How to Use a Gill Net
Gill Nets are generally not used like a conventional fish net. A conventional fish net is cast into the water in the hope that it will fall over the fish and capture the fish inside the net. A Gill Net is typically not used this way. A Gill Net also does not use any fish hooks.
The correct way to use a Gill Net is to tie a long rope to each of the top corners of the Gill Net. Later you will use these ropes to pull the net of fish from the water.
There are two basic types of Gill Nets:
- Tie-Down (TD) Nets: Used in flowing water (rivers and streams). A Tie-Down Net has a bottom line and weights are attached to the bottom line to hold the net in position in the moving water.
- Flag Nets: Used in still waters (ponds and lakes). A Flag Net has a top line but it usually does not have a bottom line. It is supported by the top line in a manner similar to a cloth flag that is hung on a flag pole by one side of the cloth flag. However, a flag net is hung straight down into the water and not out to the side like a cloth flag blowing in the wind.
Floats may or may not be attached along the top line of either a Tie-Down Net or a Flag Net depending on your specific application.
There are a variety of different ways to use the above two different types of Gill Nets:
- Moving Water Tie-Down Net (Gentle Stream or Gentle River): Secure the end of each rope to a tree or other stationary object near the water so the net can be stretched straight across the water. Tie several weights (rocks) to the bottom of the Gill Net. Drop the weighted bottom of the net into a stream or river. If possible, the entire net should be under water. The fish will not see the thin mesh of the net and the fish will swim into it. Small fish will swim through. But the head of a larger fish will enter the net but its body will not pass through the net. The front gills of the fish will become caught in the net as it tries to free itself. (Note: Do not attempt to use a Gill Net in a fast moving stream because any large foreign objects floating down the stream will rip the Gill Net to pieces.)
- Still Water Flag Net (Lake or Pond): Secure the end of each rope to a tree branch near the water so the net can be stretched straight across the curved bank of a lake. The tree branch should have some flexibility in it so the Gill Net can move one or two-feet with the swimming action of a fish. Do not attach any weights to the lower edge of the Gill Net. Lower the net into the lake or pond.
- Side, Middle, and Top Net Catch: The fish will swim into the net and the net will move forward with the fish for a short distance. When the net begins to slow the fish down and the fish feels the net against its body, the fish will try to turn and get out of the net. But the sides of the net will cling to the fish and the fish will get tangled up inside the net.
- Bottom Net Catch: Lower the net until about six to twelve-inches of the net is lying on the bottom of the pond. If a fish swims towards the lower part of the net and turns away from the net, the turning action of the fish will cause the bottom of the net to rise up and surround the fish. As the fish tries to escape it will become entangled in the bottom of the net.
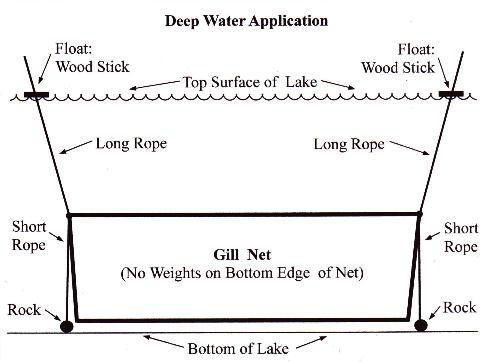
- Deep Water Flag Net (See illustration below): Determine the depth of the water by tying a heavy rock to a long nylon rope and then lower the rope until the rock touches the bottom of the lake. When your raise the rope you can determine how deep the water is at that location. Tie a nylon rope that is one-foot wider than the net to each of the top two corners of the net. For example, if you have a 12-foot long by 4-foot wide net, then tie a 5-foot rope to each top end of the 12-foot long net. Tie a weight to the bottom end of each of these 5-foot short ropes. Then tie two more long ropes to the top edge of the 12-foot long net. These two long ropes will need to be long enough so they can be tied to two trees on the bank of the lake. Tie some type of float (piece of wood) to these ropes at the exact depth that you want the net to be under water. Lower the net down into the water and then secure the ends of the long ropes to some trees on the bank of the lake.
(Rope Note: Instead of cutting your nylon rope to the desired lengths it is better to simply tie one really long rope to the top edge of the Gill Net so that approximately 5-feet of the rope extends down the side of the net. Tie a rock to this short end of the rope. Then tie the long end of the rope to a tree on the bank of the lake. Any rope that is left over can be coiled around the tree trunk or it can be coiled onto the ground beside the tree. This will allow you to keep your ropes at their maximum length for use in a variety of different deep water applications.)
In deep waters you should experiment and determine if the Gill Net is more effective in one of the following two situations:
- When its lower edge is about one-foot above the bottom of the lake (see illustration below), or
- When it has one-foot of its lower edge lying on the bottom of the lake (tie rocks higher on the short ropes).
- Shallow Water Flag Net: In shallow water the Gill Net may be used like a conventional fish net. If you have a partner then your partner should hold one side of the net and you should hold the other side. If you don't have a partner then you could hold one side of the net in each hand, or you could secure one side of the net to a tree that is growing close to the water. Lower the bottom of the Gill Net down into the water so that the bottom of the net touches the bottom of the stream bed. Pull the net through the water and towards the bank of the stream. Remove any fish that are caught inside the net. This technique is extremely effective when you can actually see the fish swimming in the shallow waters of the stream.
- Emergency Survival Tie-Down Net: In a true survival situation a Gill Net may also be used as a Weighted Net to capture birds or small animals. Tie several small rocks to various locations around the outside edge of your net and then toss the weighted net so that it falls over the bird or the animal on the ground, or over the small bush in which the bird has nested. Please consult any good wilderness survival manual to learn more about how to use a Weighted Net in this manner.
Online Sources for Gill Nets
Gill Nets may be purchased on ebay, or Amazon, or at the following internet store:
https://www.texastastes.com/gill-nets.htm
Note: I do not earn any type of commission if you purchase from the above internet store. The above link is being provided simply for your convenience.
Respectfully,
Grandpappy.
Grandpappy's e-mail address is: RobertWayneAtkins@hotmail.com