


 A good compass has been a valuable asset to explorers, travelers, and hunters for many centuries. However, as technology advances the traditional compass is gradually being replaced by GPS units (Global Positioning System). The purpose of this narrative is to discuss some of the alternatives to a compass other than the GPS.
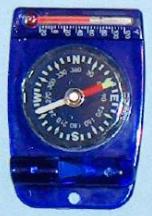
Let's begin be examining the primary function of a compass. The magnetic needle of a compass points to magnetic north. Magnetic north and true north may be slightly different depending on your exact location, but they are usually close enough for normal decision making purposes. Looking at the picture of the blue compass on the right, North is on top of the compass, East is on the right, South is on the bottom, and West is on the left. The needle in the center of the compass rotates on a pivot and points to magnetic north (the red side of the needle). If you wish, you can rotate the entire compass in your hand until the "N" on the display lines up at the red end of the needle in the center of the compass. The letters N, E, S, and W on the compass are printed on the fixed display, but the needle rotates freely above the display in a protected glass area. To function properly, the compass must be held level in a horizontal position.
On some compasses the letters are on a dial on the outside border of the compass. The dial can be moved by hand so you can manually rotate the outside dial until the letter "N" lines up with the magnetic needle inside the compass.
In the picture of the black compass below, the N, E, S, and W are printed on a floating dial inside the compass. As the dial rotates to magnetic north, the letters automatically line up correctly.
Regardless of which type of compass you have, the relative position of N, E, S, and W in relation to one another is always the same. Therefore, if you can correctly determine any one major compass direction (north, east, south, or west) then you automatically know all four compass directions.
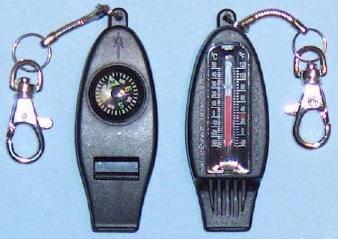
Many camping supply stores, including WalMart, sometimes carry a small compass that is part of a multi-function unit that usually includes a miniature thermometer and a whistle (and sometimes a folding magnifying glass). The design of these units vary from one store to the next. In the picture of the blue compass at the top right, the thermometer is on top, the compass is in the center, and the whistle is on the bottom of the unit. In the picture of the black compass on the right (front and back), the compass is on the front side, the whistle is on the bottom, and the thermometer is on the back side of the unit. A small magnifying glass folds into the center of the unit out of the way until it is needed. The thermometer will help you determine the actual temperature (no more guessing). The whistle has a variety of uses, such as helping rescue teams determine your location in the event you get really lost.
If you plan on exploring a new area, then it is usually a good idea to carry two (2) compasses with you. The reason is simple. Accidents happen. If your primary compass should become damaged in any way, then you would still have a back-up compass to guide you to your destination. A small spare compass is relatively light and you won't notice it unless you need it in an unexpected emergency. Then it could quickly become one of your most valuable assets.
If you should decide to carry two compasses, then may I suggest that they be made by different companies. If you should ever need your compass for survival then you can compare the readings on both compasses and if they agree then you can be reasonably comfortable basing your decision on that information. But if both compasses are made by the same company then you may start wondering if some type of manufacturing defect is causing the compasses to malfunction, particularly if your gut instincts tell you that North is in a different direction.
Regardless of how careful you are, there is still a possibility you might find yourself in a unexpected situation without a compass. If that happens, then it would be advantageous if you knew how to determine the basic compass directions without the aid of a traditional compass.
Let's look at the following six methods for determining basic compass directions:
1. the Sun,
2. the Moon,
3. the Stars,
4. a Straight Stick,
5. a Wrist Watch, and
6. a Simple Homemade Compass.

Although this is an obvious method for determining directions, it is included here for completeness.
The sun rises in the east and sets in the west. The best time to determine east (or west) is in the early morning and late evening when the sun is near the horizon. During the middle of the day it is more challenging to accurately determine east and west by simply looking at the sun.

Except for the few nights each month when the moon is full or almost full (or the dark new moon), the bright side of the moon always points in the direction of the sun. Between sunset and midnight it will point west towards the setting sun. After midnight it will point east towards the rising sun.
In the northern hemisphere, the stars appear to rotate around the North Star (or Polaris) as the Earth spins.
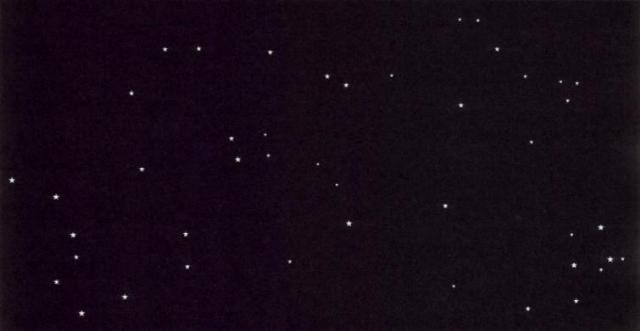
It is relatively easy to look at a star chart with all the stars and constellations neatly identified and think that finding the North Star is no big deal. However, it is an entirely different challenge to walk outside at night and find the North Star in the sky. For example, look at the illustration above. Only a VERY small portion of the sky is shown. In addition, only a few of the larger stars in that part of the sky are shown. Can you find the North Star just by looking at the above illustration?
Identification of the North Star is easier if you can first find the Big Dipper or Cassiopeia. The North Star is approximately half-way between the Big Dipper and Cassiopeia. The North Star is at the handle end of the Little Dipper.
The Big Dipper may be above, or below, or to the right, or to the left of the North Star. If it is below the North Star then it may be below the horizon and therefore not visible at the current time. The two stars at the cup end of the Big Dipper point towards the North Star. The distance between those two stars when multiplied by five is the approximate distance to the North Star.
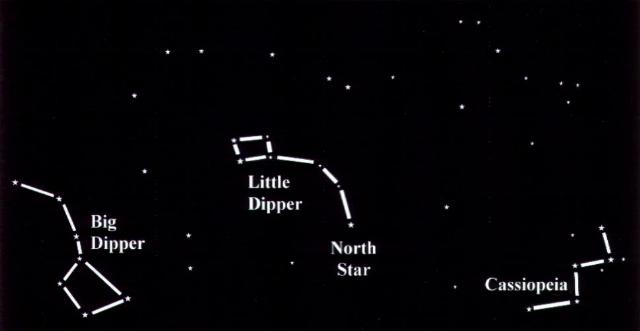
Cassiopeia, or the W, is on the opposite side of the North Star from the Big Dipper. In my opinion, it is much harder to identify by itself. Once again, the W may be above, or below, or to the right, or to the left of the North Star. If it is below the North Star then it may be below the horizon and therefore not visible at the current time. The center of the W is about the same distance from the North Star as the Big Dipper.
Although the Little Dipper contains the North Star as part of its constellation, the entire Little Dipper may NOT be visible. If it is below the North Star then a good part of the Little Dipper may be below the horizon.
The Earth is constantly rotating and the stars will appear to be rotating around the North Star with the passage of time. But it is not the stars that are moving, it is the Earth. For example, just after dusk the Big Dipper may be clearly visible. But as the Earth rotates, the Big Dipper could disappear below the horizon.
Academic knowledge, such as the above, is only of practical value when you become proficient in its application. When you can walk outside at night and look into the sky and easily find the North Star, then you will have mastered this concept.
While you are practicing, you can use the moon to orient yourself. Once you know which way is east and west, then you can determine which way is north. Then you can look in the northern part of the sky and continue your search for the North Star. (Why do you need the North Star if you have the moon? Because sometimes the moon is full, and sometimes there is no visible moon in the sky, and sometimes the moon is behind some heavy clouds but the stars in the northern sky may still be visible.)
In the southern hemisphere, the stars appear to rotate around the Southern Cross, which is relative easy to find by itself (compared to the North Star by itself). The longer bar of the Southern Cross points towards the south pole.
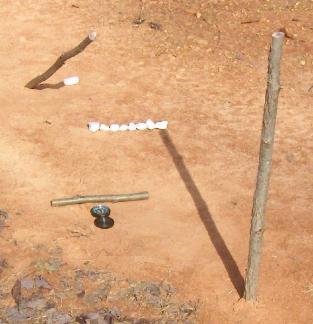
Method One: Find a relatively straight stick that is about two-feet long. Push one end of the stick far enough into the ground to hold it stationary. Point the opposite end of the stick directly at the sun so the stick does not cast any shadow. Wait 30-minutes for the sun to change its position in the sky. The stick will now be casting a very short shadow which will be pointing east.
Method Two: Find a relatively straight stick that is about two-feet long. Push one end of the stick far enough into the ground to hold it stationary. Point the opposite end of the stick straight up into the air so it does cast a shadow. Place a small rock at the tip of the stick's original shadow. Wait 30-minutes for the sun to change its position in the sky. Place a second small rock at the tip of the stick's new shadow. A straight line between these two rocks will be pointing from the west to the east, with the position of the first rock indicating west and the position of the last rock indicating east.
In the picture on the right, the short stick lying on the ground directly above the compass is aligned west to east with west being on the left side of the picture. The slanted stick in the ground at the top of the picture has a white rock placed at the east end of its shadow (after 30-minutes elapsed). The upright stick in the ground at the bottom of the picture has a white rock at the tip of its shadow (after 30-minutes elapsed). The white rock on the far left was the position of the upright stick's original shadow. The white rocks between the two end rocks were placed on the ground at the end of the 30-minutes so the direction west to east would be clearly visible in the picture.
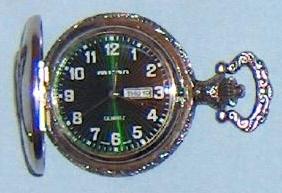
If you have an ordinary wrist watch (or pocket watch) with an hour-hand and a minute-hand (or any non-digital clock), then you can determine South by using the sun. This is especially useful during the middle part of the day. If the sun is visible then point the short hour-hand at the sun and south will be half-way between the short hour-hand and the number 12 on the watch. This works consistently on standard time. If you are on daylight saving time, then use the number 1 instead of the 12. You also need to be north of the equator.
If you are south of the equator, then point the number 12 at the sun and north will be half-way between the number 12 and the short hour-hand on the watch.
Magnets come in a variety of shapes, such as horseshoe and rectangular. All magnets have north and south poles. If you have a rectangular magnet, then tie a thin string or thread to the center of the magnet and tie the opposite end of the string to any stationary object (chair, tree limb, whatever). Adjust the string on the center of the magnet until it is evenly balanced and then wait for the magnet to stop moving. It will be aligned with the north and south poles of the earth. If you know which direction is north, then you can mark the ends of the magnet for future reference. However, remember that opposites attract. The south end of the magnet will be pointing to the north pole. The north end of the magnet will be pointing to the south pole.
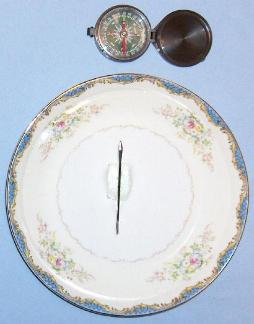
If you have a magnet and a sewing needle (any size needle or a small nail), then stroke the north end of the magnet along the surface of the sewing needle from its eye to its point. Remove the magnet from the point of the needle, lift it up, and put it on the eye of the needle again. Stroke the needle 30 times from its eye to its point, always in the same direction. Then put a small cork, or chip of wood, or piece of styrofoam in a bowl of still water. Put the needle on top of the cork, wood, or styrofoam. Wait until the needle stops moving and the head of the needle will be pointing north. (Make sure there are no large metal objects nearby or the needle will point to them instead.)
In today's modern world, knowing which direction is north is not necessary very often. If a person wants to go somewhere, then a good road map and the ability to decipher that map is usually adequate. However, if a person unexpectedly found himself or herself in a potentially hostile or dangerous environment, or in an unfamiliar environment, then the ability to positively identify compass directions could make the difference between that person's life or death.
Respectfully,