Home Page Hard Times Survival Hard Times Recipes Gourmet Recipes Gardening Tips Firearm Facts Economy Book Reviews
Wilderness Survival Christian Poems Bible & Prophecy Bible Truths Other Information Children Stories Product Links Search Website My Books

The Three Most Important
Wilderness Survival Items

Copyright © 2008 by Robert Wayne Atkins, P.E.
All Rights Reserved.


Wrecked Airplane If you were unexpectedly stranded in a wilderness environment then your chances of survival would be significantly enhanced if you had three common items in your possession. This assumes you are not stranded in a barren wasteland, or in a frozen snow covered wilderness, or in a hot barren desert. Each of these situations would require a unique set of additional items.
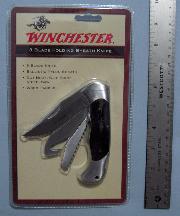
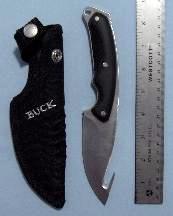
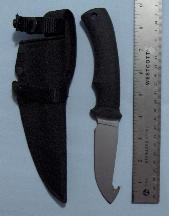
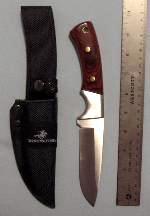
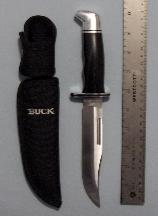
However, assuming you are simply in a dense forest, or in a jungle, or on a tropical island, then the following three items would significantly improve your chances of survival:
  1. a knife,
  2. a new butane lighter, and
  3. a compass.
The above three items are listed in the order of their importance to your survival. Let's examine each of the above three items one at a time.


A Knife

Other than the will to live, the most important survival necessity is a basic hunting knife. A knife cannot be made from scratch in the middle of the wilderness. And there is no backup primitive tool that can perform all the functions of a modern steel knife. Therefore everyone should have a knife in his or her "possibilities bag." If you have a good knife then your chances of survival skyrocket even if you only have a little survival knowledge. However, if you don't have a knife then your chances of survival are greatly reduced regardless of how much survival knowledge you may have.

A knife has a multitude of practical uses such as providing you with:
Moccasins
  1. Immediate protection and self-defense while you construct more suitable weapons.
  2. The ability to quickly sharpen a strong stick to make a spear for hunting and for protection.
  3. The ability to gradually and carefully build a handmade bow and arrows.
  4. The ability to cut vines and/or animal hides into thin strips to use as cord so you can make or build things.
  5. The ability to cut and build a variety of primitive traps and snares to capture wild game.
  6. The ability to properly skin an animal and slice the meat into thin strips to make jerky.
  7. The ability to properly scrap and prepare a deer skin so it can be tanned into a useful buckskin.
  8. The ability to convert a buckskin into a nice pair of moccasins.
Either a fixed blade hunting knife or a high quality folding knife will work exceptionally well. I prefer a fixed blade knife in a sheath. However, if space is limited then a good folding knife is an excellent second choice. Since a knife is an absolutely critical necessity in a wilderness survival situation, I personally recommend that you have two different brands and types of knives in your "possibilities bag" in the event you lose or damage your primary hunting knife.

Buck Knife Gerber Gut Hook Winchester Knife Folding 3 Blades
Buck Gut Hook ($42)Gerber Gut Hook ($45)Winchester Basic ($16)Winchester Folding ($16)

There are a number of companies that make good hunting knives, including Buck, Gerber, and Winchester. The knives in the above pictures are all good knives and they are affordable. I realize that some people believe that the quality of a knife is always proportional to the price you pay for the knife but that is only true in a general way. Some "affordable" knives are worthless and they do not have a sharp cutting edge and they will break or fall apart during heavy use. Some "expensive" knives are simply expensive and they are not significantly superior to a good quality affordable knife. The above knives are all "affordable" and they have a sharp cutting edge and they will not break during normal use in a wilderness environment as long as they are not misused.

The Buck Knife in the above left picture is a typical hunter's knife because of the shape of its blade and the fact that it has a "gut hook" that makes opening and skinning a dead animal relatively easy. The steel blade is in one piece and it extends all the way to the end of the handle which makes the knife very strong. The handle is riveted to the blade in three places. The knife has a composite handle that is easy to hold onto if it gets wet. The knife also has a "lanyard" hole at the handle end of the steel blade so you can tie the end of the knife to your belt, if you believe this would be appropriate. This knife is an excellent hunter's knife because of the short four-inch blade and the "gut hook." However it is not a good self-defense knife for these same two reasons.

The Gerber Knife in the above center-left picture is similar to the Buck Knife but it has a composite handle that completely surrounds the lower portion of the blade. This makes the knife very easy to control even if it gets wet while you are skinning an animal.

The Winchester Knife in the above center-right picture is a basic knife that is useful for a variety of tasks, including emergency self-defense. It has a solid steel blade that extends all the way to the far end of the handle, and it has a "lanyard" hole.

The Winchester Folding Knife in the above right picture has three blades - a standard knife blade, a gut hook, and a saw blade. Each blade locks into position when it is fully extended. This prevents the blade from accidentally closing onto your fingers while you are using the knife. To unlock the blade you must press the blade release lever at the handle end of the knife. This knife also comes with a belt sheath which is not visible in the above picture because it is behind the cardboard insert in the back of the plastic package.

There is a huge body of knowledge on knives and I do not intend to summarize all of that knowledge into this short article. However, I would like to make the following four comments:
  1. A fixed blade knife that has a steel blade that extends all the way to the far end of the handle is a very strong knife. Some knives have blades that only extend about half-way down inside the handle. This is a cheaper production technique and it results in a weaker knife.
  2. A "stainless steel blade" will never rust. A stainless steel blade is more difficult to sharpen but it will hold its edge longer than a non-stainless steel knife.
  3. A belt sheath designed specifically for the knife will allow you to conveniently carry the knife on your belt so it will always be within easy reach.
  4. To keep your knife sharp you will need an Arkansas Sharpening Stone or a Diamond Sharpening Stone or a "Pocket Pal Sharpening Tool." You will also need to learn the proper way to sharpen your knife.
As you gradually learn more about knives you will discover that different companies make specialty knives for every conceivable purpose. Because of the wide variety of applications it is very easy to become confused about the best knife choice for your particular situation. Therefore please allow me to make the following recommendations:
Buck Model 119
  1. Buy two knives.
  2. Buy a name brand fixed blade knife without a gut hook for maximum flexibility and for self-defense, such as the Winchester Basic for about $16 (pictured above), or the Buck Model 119 for approximately $39 (picture on right). The Buck Model 119 is 10.25 inches long from end to end with a 5.75 inch steel blade that is approximately one-inch wide. The Buck knife in the picture on the right is a new knife but I have personally had one of these knives since 1972. I used my Buck Model 119 extensively during my Maine adventure in 1975. My old Buck knife is still in excellent condition. The only noticeable thing that Buck has changed over the years is the sheath design.
  3. Also buy a name brand folding blade knife with a gut hook for skinning game, such as the Winchester Folding Knife pictured above. Your primary folding knife should have a maximum of no more than three or four blades.
  4. Do not buy a Swiss Army Knife. If you want a "tool knife" then I suggest you consider the "Leatherman Wave Multi-Tool" for about $70.


A New Butane Lighter

Fire is an absolute necessity for all the following reasons:
  1. Boiling water to make it safe to drink.
  2. Cooking fish, wild game, and wild plants to make them more palatable and digestible.
  3. Providing heat for comfort if the temperature drops below a reasonable level at night.
  4. Quickly lighting a brush fire that will create a lot of smoke to alert and guide rescue search parties, planes, helicopters, or boats to your exact location.
There are a variety of different ways to start a fire, including both modern and primitive methods. Modern methods include matches, butane lighters, magnesium fire starters, and a blast match.

There are also a wide variety of primitive fire starting methods. I suggest that you print a copy of all the different primitive fire starting methods that you find and keep them all together in a folder for future reference. One day that information may be useful to you. If you have absolutely nothing else to do you could follow those instructions and learn for yourself how truly challenging these primitive fire starting methods really are.

Each primitive fire starting method requires practice and a considerable amount of effort which can quickly exhaust you. Each primitive method is based on the application of either sparks or friction to elevate the temperature of extremely dry tinder material to the point where it will ignite.

The two times when you will desperately need a fire are during:
  1. rainy weather when the air is very damp and humid, and
  2. freezing weather when the combustible material is either frozen or very, very cold.
Under these types of adverse weather conditions all of the primitive fire starting methods are completely unreliable.

If the air is damp or humid then your sparks will encounter extra moisture in the air and they may not be hot enough to start a fire when they make contact with the tinder material, which is also surrounded by damp, humid air. If you are using friction then it will take a lot more friction to start a fire in a damp environment.

During freezing weather conditions the surrounding cold air quickly saps the heat out of your sparks, or from the friction you are trying to create to start a fire. It is extremely difficult during freezing weather to get a fire started using any primitive fire starting method. If you have some really good very dry tinder that you have warmed using your natural body heat then you will increase your chances of getting a fire started, but the odds will still be weighted heavily against you.

In addition, during rainy weather and freezing weather it is very easy to quickly become depressed, irritable, and fearful. Primitive fire starting methods are even more difficult to properly execute during these times of emotional stress.

Finally, during adverse weather conditions the sun will not be visible so any fire starting method based on focusing the sun's energy will simply not work.

You will not read about the above shortcomings in any survival manual that teaches and recommends primitive fire starting methods. But the above problems are real and therefore I cannot personally recommend any primitive technique as a primary method for starting a fire.

Besides, during a wilderness survival adventure or a "hard times event" you really don't need to be investing your time and energy in trying to start a fire. You will already have enough stress and pressure in your life from a multitude of other sources. You will also have far more important things you could be doing instead of trying to start a fire using a primitive method.

For all of the above reasons I prefer any modern fire starting method instead of any primitive method.

Butane Lighters Kiitchen Matches Blast Match Magnesium Unit
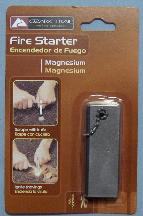
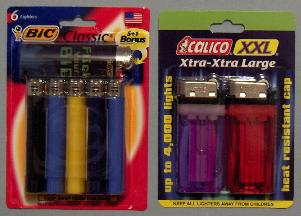
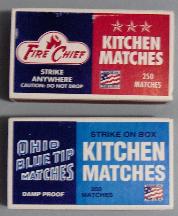
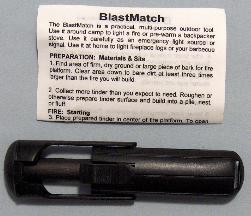
Butane Lighters (Standard & Hi-Capacity)Kitchen Matches ($1/Box)Blast Match ($15)Magnesium Unit ($7)

If I were limited to a single fire starting method then I would select a New Butane Lighter. New butane lighters can be purchased almost anywhere for one-dollar each or less. A new small butane lighter will light about 1,000 fires, or one fire a day for about three years. A new standard size butane lighter will light about 2,000 fires, or one fire a day for approximately 5.5 years. A new high-capacity butane lighter will light about 4,000 fires, or one fire per day for approximately 11 years.

Matches are also nice but each match is only good for one fire, unless you know how to carefully split the match to get two or more fires from a single match. Also if your matches accidentally get damp then they may or may not work after you dry them out. There are a variety of different types of matches including Strike Anywhere Kitchen Wooden Matches, Standard Kitchen Wooden Matches, and Paper Matches inside a match book (20 matches per book). If you do not have the strike anywhere matches then be sure to include the striking strip off the box in your "necessities bag" but wrap it separately inside something waterproof so it cannot accidentally come into contact with the match heads.

A Blast Match is a spark making tool but it requires some really good tinder, such as clothes dryer lint. Extremely dry decayed wood is also very good tinder. The tiny sparks the blast match creates will start any easily ignitable material burning. However, unless you have some really good tinder that is extremely flammable then the tiny sparks will go out before igniting the tinder. Therefore, I prefer a Magnesium Fire Starter instead of a blast match.

A Magnesium Fire Starter requires that you shave a little magnesium off the magnesium block and then strike the attached flint with the blunt edge of your knife to throw some sparks onto the very thin magnesium shavings. The shavings will quickly catch fire and burn extremely well. This is a very reliable way to start a fire and it should work well if both your matches and your butane lighters should fail for some unexpected reason. (Note 1: If all the available tinder is damp or frozen then you could place a few shavings off the magnesium block below some damp tinder, and then ignite the magnesium shavings with a match to get the tinder burning, and then you could gradually build a normal fire.) (Note 2: There is enough magnesium on the block to reliably start somewhere between 75 to 125 good fires. However, even after you have used all the magnesium, the spark making flint will still be intact and it can be used to start additional fires if you have some really good tinder material.)

In summary, I recommend that a person have two good butane lighters manufactured by two different companies, and some strike anywhere matches in a waterproof container, and a magnesium fire starter. These items are all very small and they do not weigh very much. But with this combination of items you could start a fire under almost any type of adverse weather condition.

The reason I recommend matches and a butane lighter is simple. During freezing weather the striking wheel on a butane lighter can freeze and render the lighter useless for starting a fire. In that situation the matches usually work just fine. However, during really damp humid weather it is possible that the matches may get a little damp and be difficult to strike. In that situation the butane lighter works just fine. If you have a different backup method for starting a fire then you will have a much better chance of starting a fire under a variety of adverse weather conditions.


A Compass

A compass is useful on overcast days, on rainy days, and at night. It will help to keep you from traveling in the wrong direction so you don't waste time and precious energy needlessly. Regardless of where you are, if you can travel consistently in one direction you should eventually reach a road that you can follow. However, without a compass the chances of your traveling in a straight line are greatly reduced.

Compass 
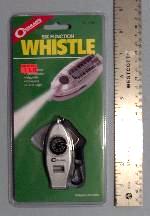
The "Coghlan's Six Function Whistle Compass" shown in the picture on the right can be purchased at some Army Navy Surplus Stores for approximately ten dollars. It contains all of the following items:
  1. Compass on front (see bottom of green package - direction finding).
  2. Thermometer on back (see top of green package - weather changes).
  3. Small Mirror in center (partially extending right side of compass - light signaling and face/eye inspection).
  4. Magnifying Glass in center (partially extending left side of compass).
  5. Whistle on bottom (noise signaling for help).
  6. LED Flashlight on top (see top of green package - emergency light).
A variety of other ways to determine direction in addition to a compass are discussed on the following web page here.


Conclusion

If you have the above three items and you know how to use them, then your chances of survival in the wilderness will be very good. However, if you need some additional practical guidance in the use of these items, then I recommend that you include the following small book ($8) in your "possibilities bag":

SAS Survival Guide by John "Lofty" Wiseman (ISBN 978-0060849825).

Respectfully,
Grandpappy.


Grandpappy's e-mail address is: RobertWayneAtkins@hotmail.com

Home Page Wilderness Survival